Adding and Connecting JIRA Instances
- Kevin Pham (Deactivated)
- Marc Ray (Deactivated)
Adding a New JIRA Instance
Editing an Existing JIRA Instance
Connecting a JIRA Instance to a Project
From Zephyr 6.2 and onwards, the Zephyr Connector is no longer required to be able to add and connect your JIRA instances.
The user credentials that are required when integrating your JIRA instance with Zephyr will need the following permission enabled in JIRA:
- Browse Project Permissions for All Projects
- Issue Permissions - Assignable User, Assign Issues, Close Issues, Delete Issues, Edit Issues, Link Issues, Move Issues, Set Issue Security, Transition Issues
- Comments Permissions
- Attachment Permissions
- Jira Web-hook Enabled
- Issues Related Events - Updated, Deleted
- Project Version Related Events - Released, Unreleased, Created, Moved, Updated, Deleted
- Project Related Events - Updated, Deleted
Zephyr Internal Defect Tracking System Zephyr provides support for 2 defect tracking/wiki/spaces/ZEE50/pages/77725932integrations as a defect tracking tool:
- Multi-Jira Instances
As an Administrator, under System Setup, you can select the Defect Tracking section to expand the window for adding a defect tracking system to Zephyr.
Pick carefully, as switching to another Defect Tracking System at a later stage is not recommended.
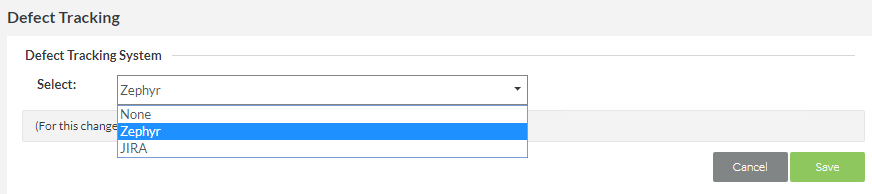
Zephyr provides managers/administrators with our own Defect Tracking module that allows users to file new defects, view existing ones, modify them and report on them without the use of JIRA. This interface remains the same for both options.
Zephyr provides managers/administrators to connect multiple JIRA instances to the system. Multi-JIRA Instances can be extremely useful when managers want to use a specific JIRA instance for a specific project but want to have multiple JIRA instances added to the system.
No Defect Tracking Integration
Picking the 'None' option will disable defect tracking and remove the Defect Tracking icons from the users.
Once a Defect Tracking System is selected the user should log out and log back into the system again for it to become effective.
Adding a New JIRA Instance
Prior to adding a new JIRA instance, the user must be within the administration section of Zephyr and be on the Defect Tracking page.
Before proceeding with adding and connect your Jira instance, ensure that you use the credentials of a Jira user that has the following permission in Jira listed above.

1. Click on "Insert Add icon" button at the top right of the interface to add a new JIRA instance to the table/system.
- A new row will appear in the JIRA instance table with field that can be edited.
2. Fill in all the mandatory fields for adding a JIRA instance.
- Name - A name used to define the instance of JIRA.
- JIRA URL - The URL of the JIRA instance that you are adding to Zephyr.
- Username - The username that is used to log into the JIRA instance for the JIRA URL.
- Password - The password that is used to log into the JIRA instance for the JIRA URL.
3. Click on the![]() button to finalize the fields for the JIRA instance.
button to finalize the fields for the JIRA instance.
Editing an Existing JIRA Instance
Prior to editing an existing JIRA instance, the user must be within the administration section of Zephyr and be on the Defect Tracking page.
Before proceeding with adding and connect your Jira instance, ensure that you use the credentials of a Jira user that has the following permission in Jira listed above.

3. Click on the![]() button to begin editing the selected JIRA instance.
button to begin editing the selected JIRA instance.
- Once clicked, the fields in table row with the JIRA instance selected becomes editable.
2. Add any edits or changes to the JIRA instance by simply changing the text within the fields.
3. Click on the![]() button to remove all edits/changes made to the JIRA instance and cancel editing.
button to remove all edits/changes made to the JIRA instance and cancel editing.
3. Click on the![]() button to finalize any additional edits/changes to the JIRA instance.
button to finalize any additional edits/changes to the JIRA instance.
Connecting a JIRA Instance to a Project
Prior to connecting a JIRA instance, there must be an existing JIRA instance added in the Defect Tracking page under the administration section.

1. Click on a project in the able to be able to configure and make edits to the project.
2. Scroll down and look for the "Connected JIRA" drop-down list.
- This drop-down list contains the entire list of JIRA instances that were added in the system from the Defect Tracking page.
3. Simply click on the drop-down list and select an existing JIRA instance that you want to connect to this specific project.
4. Scroll down and then click the "Save" button to finalize connecting a JIRA instance to a project.
Additional Note
You can have multiple JIRA instances saved in Zephyr but you can only have one JIRA instance connected to a project at a single time. Essentially, you have multiple JIRA instances and then you could choose which JIRA instance to use for whichever project you want to use it for. Once the JIRa instance is connected to the project, the project can then use that JIRA instance for performing other features in Zephyr related to Jira such as importing requirements, importing test cases, etc.
If you had an existing JIRA instance connected and switched to a different instance, any saved data or changes that were made to the previous (first) instance will lose progress. Be careful when switching a project's existing connected JIRA instance to a new one.