Test Cycles
The Test Planning tool can be found in the Lead's Desktop (and in the desktop of any other user whose role has access). Test Planning is used to plan execution schedules and make testcase execution assignments to testers. It allows for visually setting up a testing schedule, picking phases, and testcases that need to be executed and assigning them to testers. This must be set up before testers can start executing test cases in their Test Execution.
The concept is of high-level Test Cycles that have multiple Test Phases. These are either corresponding to the root-level nodes of the Test Repository tool or a set of individual tests picked in a free-form manner which in turn contain all the testcases that need to be executed and hence need to be assigned to testers.
This tool allows the Test Lead to:
- Set up various different execution cycles
- Use the structured set of testcases or pick individual tests in a free-form manner
- Assign testcases to testers (or Anyone) to execute
- Assign both manual and automation testcases
- Bulk assign testcases
- Modify a schedule as needed based on changes in the project/release
- Reassign or load balance unexecuted testcases to other testers
A calendar based on month and week views is shown and can be toggled between these two views. < and > buttons allow months and weeks on either side of the currently displayed view to be shown. Clicking on "today" brings the view back to the present time and selecting the calendar icon and picking a specific date brings the view to that appropriate day.
Add a New Cycle
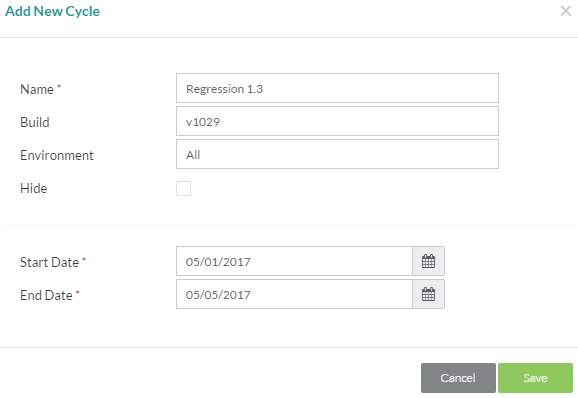
To create a cycle, click the + button. All of the fields except Build and Environment are mandatory.
1. Name - This is the name of the test cycle that will be displayed in the schedule
2. Build - This is an informational field for Testers to know which build/version/patch of the software they need to be testing
3. Environment - This is an informational field for Testers to know which environment they need to be running these tests in
4. Hide - Checking this box will hide this Cycle from the Test Planning (Testers) and Test Execution views
5. Start Date - The start date of this test execution cycle
6. End Date - The end date of this test execution cycle
Once the above information is entered and saved, the cycle shows up in the right pane of the tool. Note that the Start Date and End Date of the cycle has to be within the Start Date and End Date of that particular Release (see Release Setup).
Editing a Cycle
Test Cycle editing can be done in three ways; by selecting a test cycle contextual menu on the left and clicking on the Edit button, by selecting the cycle itself in the right pane, and by right clicking the cycle in the right pane. The Edit window allows all of the cycle data to be modified. This is very useful especially in situations where schedule slippages are occurring or dates have to be reset for other reasons. If the checkbox for Keep duration fixed is checked, then the entire cycle can be moved to start on a different date while keeping its duration fixed. If it is not checked, then both the Start Date and End Date can be modified.
Obviously, all phases in that cycle should be within its data range. If any of the phases' Start Date or End Date fall outside the range, they will be displayed in red and will need to be modified before the changes can be saved.
Clone a Cycle
By selecting a test execution cycle and clicking on the Clone button, the entire cycle is copied including all its Test Phases. You can now rename this copied cycle. By checking the Keep duration fixed box, the entire cycle is copied keeping the same duration as the original one but with the ability to change the Start Date. If the Keep duration fixed box is not checked, then both the Start Date and End Date can be adjusted. All phases in that cycle should be within its data range. If any of the phases' Start Date or End Date fall outside the range, they will be displayed in red and will need to be modified before the changes can be saved.
The Also copy testcase assignments over checkbox allows you to copy over all the tester assignments while resetting the execution status.
Delete a Cycle
By selecting a test execution cycle and clicking on the Delete button, the entire cycle is deleted after a confirmation, including its Test Phases, Assignments and gadgets. This operation cannot be undone.
Export a Cycle
On selecting a Cycle and clicking on the Export button, the entire Cycle can be exported via Custom Export Report Wizard. This includes details such as testcases, assignments, schedules and execution statuses.
Hide a Cycle
On selecting a Cycle and clicking on the Edit button, you see a checkbox to Hide this cycle. Clicking on it hides this cycle from the Test Execution tool. This is particular useful if there are a large number of cycles in a particular release and you want to tidy-up by hiding older ones.

