Testcase Execution Assignments (Free-Form)
Adding Next Level Folders
On selecting a free form Test Phase in a Test Cycle and clicking on the folder icon, additional next level folders or nodes can be created (or edited or deleted). Testcases can then be added to each level independently. Note that the tree structure being created here is not aligned or sync'ed with the tree structure created in your Test Repository.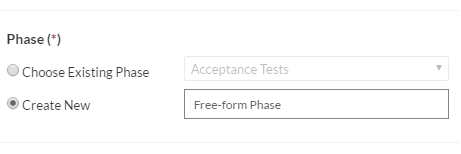
Adding Testcases
On selecting a free form Test Phase in a Test Cycle and clicking on the Add button allows the addition of testcases to this test phase (or a nested folder) via a number of different ways.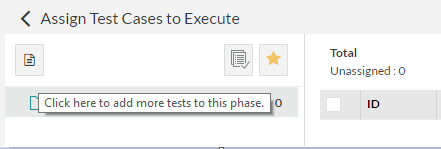
Testcases can be added in one of two ways:
- By Searching
- From Other Cycles
1. By Searching
Using either a Quick search or any of the standard Search options, testcases can be found and added to this test phase. Results are paginated so if more than one page of results are displayed and all of them need to be added to this test phase, then select the Save all testcases fetched by search option and click on Save. The entire hierarchy of tests can also be brought into this cycle.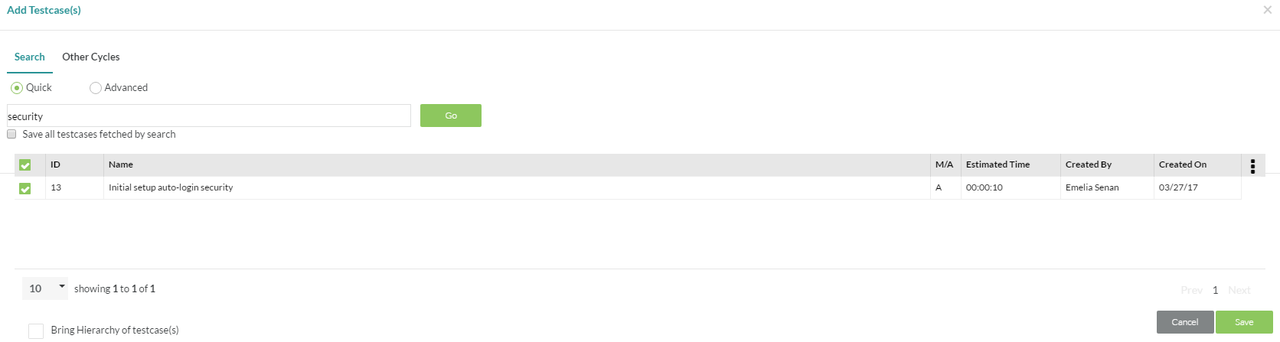
2. From Other Cycles
This option allows for finding testcases from previously created test cycles and phases (either Structured or Free Form) and then adding them to the current test phase, including their hierarchy. A further option allows the ability to filter those tests by their execution status and keep the original testcase execution assignments intact. For example, this option is very useful to rapidly create free form Regression test phases by adding failed testcases from previous cycles, while keep the original assignments intact.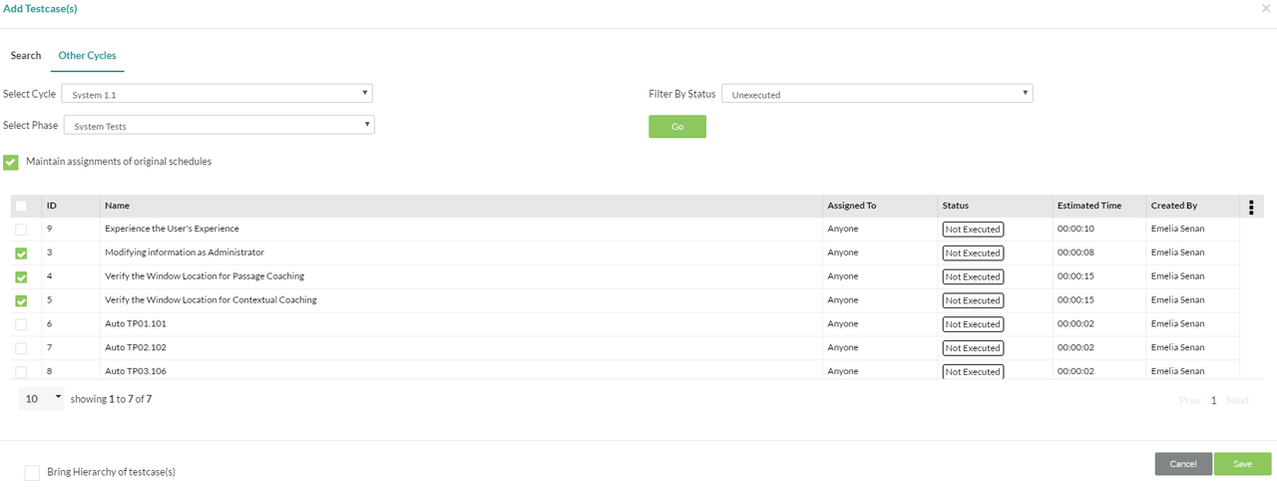
Assigning Testcases for Execution
On selecting a free-form Test Phase in a Test Cycle and clicking on the Assign button, the Assign Test Cases to Execute window displays testcase execution assignments. Once these assignments are done, the cycles show up in the Test Execution tool for Test Leads, Testers and any user with a Custom Role that has the Test Execution tool turned on.
Every single folder for that Test Phase is displayed including all the testcases in them. The overall number of testcases in the phase are shown in the top-level folder. These numbers are then broken down by folder for every sub-folder underneath. Also shown are the current assignments and the status of the execution of those testcases.
There are three buttons in the toolbar that (left to right), allow synchronization of test nodes and testcases, bulk flag and unflag testcases in a node, and bulk assign testcases. The far right side of the header also has buttons to flag/unflag individual testcases, delete single or multiple testcases in the selected node, and perform bulk selective assignments.
Different ways to assign
There are two ways in which testcase assignments can be done:
- Selective
- Multiple
- Bulk
1. Selective
Every individual testcase can be assigned on its own to a specific tester using the Assigned To drop-down in the grid on the right. This will give users access to only the executions they are assigned to.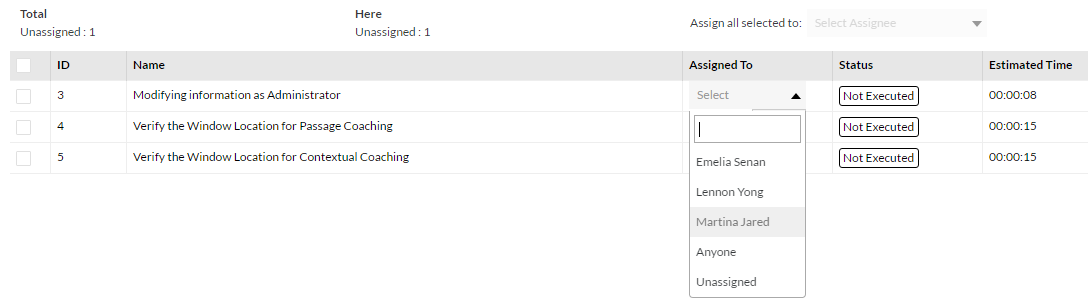
2. Mulitple
A select set (using the checkbox on the left) of testcases can be unassigned, assigned to an individual tester or Anyone using the Assign all selected to drop-down in the top right corner of the header. This will give users access to only the executions they are assigned to.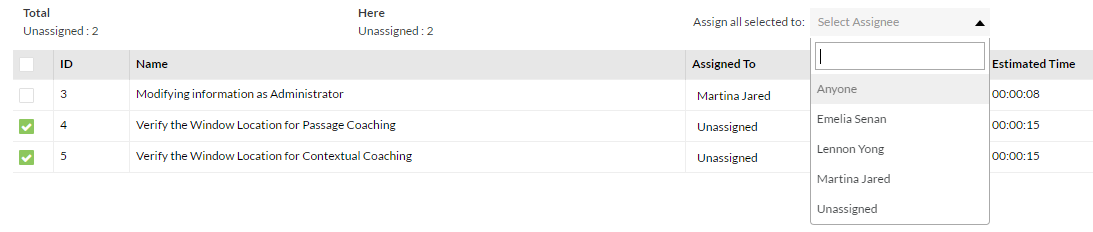
3. Bulk
This assignment method is a very powerful and speedy method to assign large groups of testcases to testers. On selecting a node and clicking on the Bulk Assignments button in the top-left, the window for bulk assignment is displayed. There are three main options for bulk assignment to choose from and each can be applied to the selected folder node or that folder and all sub-folder nodes below it. Neither will apply to higher-level nodes.
The first option, "Assign all 'Not Executed" testcases in selected folder to" will take every testcase that is not executed and assign them to the selected user, Anyone, or unassign them entirely.
The second option, "Assign all 'Unassigned' testcases in selected folder to" will take every testcase that is currently not assigned to a user and assign them all to the selected user or Anyone.
The final option, "Assign all assigned but 'Not Executed' testcases in selected folder" will take every testcase that is assigned to a selected user and reassign them to another user, Anyone, or unassign them entirely. Only unexecuted assignments will be included in this reassignment.
Flag/Unflag nodes and testcases
Testcases that have been added to this phase are highlighted with a yellow star that indicates that these are new or modified. This allows for easy identification of which nodes have new testcases added to them as well as actually identifying those testcases with a yellow star too. Once these testcases have been identified, it becomes easy to select them and perform an assignment as described above.
Selecting a node in the tree and clicking on the toggle button in the toolbar allows that flag to be reset (or set, on a subsequent click). Selecting a single testcase or multiple testcases in the grid on the right and clicking on the toggle button allows that flag to be reset (or set, on a subsequent click). Clicking on the star directly in the grid behaves the same way too.
Deleting Testcases
Testcases can be deleted from a Phase by either selecting an individual testcase, selected testcases, or an entire folder of tests by clicking on the Delete button.
Export
Clicking on the button with the right facing arrow in the toolbar brings up the Custom Export Report Wizard wizard that allows you to build and export a detailed custom report for test assignments.