SSL Setup in Zephyr
- Kevin Pham (Deactivated)
Analytics
Disclaimer
Please be aware that this material is provided for your information only and using it is done so at your own risk. Zephyr has taken care that all the information contained here is correct and complete, but it is impossible to ensure this is the case. The documentation represents two generic scenarios for implementing SSL, and doesn't take into consideration any unique characteristics of your own server and network setup. Decisions made by your company regarding the security of your data via an implementation of SSL should be based on the understanding that even a correct SSL deployment will inherit any limitations of the technology and that it cannot protect against unknowns such as general human error. Zephyr cannot be held liable for any downtime or security breaches that may result from the use this document.
The following is the procedure for the basic SSL setup process for Zephyr Enterprise. It is by no means a guide for SSL configuration regarding your HTTPS and SSL certificates.
As a reference, you can use SSL with Zephyr Enterprise but all SSL configuration assistance is outside the scope for the Zephyr support team.
About SSL, Deployment Options, and Prerequisites
Why should you run Zephyr over SSL or HTTPS?
When web applications are being accessed across the internet, there is always the possibility of usernames and passwords being intercepted by intermediaries between your computer and the ISP/company. It is often a good idea to enable access via HTTPS (HTTP over SSL) and make this a requirement for pages where passwords are sent. Note, however, that using HTTPS may result in slower performance.
This document includes example instruction sets for SSL configurations which can be used to secure Zephyr's traffic.
Deployment Options:
Zephyr's underlying application server platform is Apache Tomcat. Apache Tomcat options for SSL configuration: Java (JSSE) .This requires a set of keys and certificates. JSSE generally uses a JKS (Java) keystore.
Java (JSSE): A JKS certificate can be used to cover both traffic channels.
Deployment Prerequisites:
While using Java JSSE method, then all you need a JKS (Java keystore) certificate. Use your JAVA keytool to create a certificate and have it signed by a CA (certification authority), or create a self-signed certificate.
Getting Started
In order to make Zephyr's communication secure there are two locations to make changes inside the Zephyr installation directory. These locations define our HTTP communication, where changes can be made to switch to HTTPS . The changes are needed in the server.xml file and in the jdbc.properties file.
Making changes to the server.xml file in <Zephyr Root>/tomcat/conf
This is the main configuration file of Tomcat. You will be converting HTTP to HTTPS.
Using JSSE to change HTTP to HTTPS
Locate the following section:
<!--
<Connector port="8443" protocol="org.apache.coyote.http11.Http11NioProtocol"
maxThreads="150" SSLEnabled="true" scheme="https" secure="true"
clientAuth="false" sslProtocol="TLS" /> -->
Once you locate the section, uncomment it. Then add the appropriate information to keyAlias, keystoreFile and keystorePass.
The connector location will look like the following once the above lines are added and additional other highlighted changes are made:
<Connector port="8443" protocol="org.apache.coyote.http11.Http11NioProtocol" SSLEnabled="true"
acceptCount="100"
maxThreads="150" scheme="https" secure="true"
clientAuth="false" sslProtocol="TLS" keystoreFile="C:/Program Files/Zephyr/tomcat/conf/yzstore.jks" keystorePass="changeit" />
Making changes to the jdbc.properties file in <Zephyr_Root>/tomcat/webapps/flex/WEB-INF/classes
This is the Zephyr file responsible for defining all the communication channels used by Zephyr and its clients. You will be converting non-secure to secure. The jdbc.properties file can only work with Java JKS certificate format.
Locate the following section:
Needed by services-config.xml
secured=false
<!-- Provide correct keystore.file, keystore.password and keystore.alias if secured property is true-->
keystore.file=
keystore.password=
keystore.alias=
Make the following edits to it:
Needed by services-config.xml
secured=true
<!-- Provide correct keystore.file, keystore.password and keystore.alias if secured property is true-->
keystore.file=c:/progra~1/zephyr/tomcat/conf/yzstore.jks
keystore.password=changeit
keystore.alias=yz
Making changes to the web.xml file (Optional)
Limiting SSL Usage
Enabling SSL in Apache Tomcat's server.xml file causes all files to be run both as secure and insecure pages, which can cause unnecessary server load. You can choose which applications offer SSL connections on a per-application basis by adding the following <security-constraint> element to the application's WEB-INF/web.xml file.
Make changes to web.xml under:
<Zephyr Root>/tomcat/webapps/flex/WEB-INF/web.xml
Make changes to web.xml under:
<Zephyr Root>/tomcat/webapps/zephyr/WEB-INF/web.xml
<!-- Uncomment the following if jdbc.properties secured property is true--> <security-constraint>
<web-resource-collection>
<web-resource-name>Zephyr</web-resource-name>
<url-pattern>/*</url-pattern>
</web-resource-collection>
<user-data-constraint>
<transport-guarantee>CONFIDENTIAL</transport-guarantee>
</user-data-constraint>
</security-constraint>
Check all the 4 channels should have "https" set and make sure that all the changes are implemented correctly in /zephyr/tomcat/webapps/flex/WEB-INF/flex/services-config.xml
Add in the c:\windows\system32\drivers\etc\hosts the domain name of the ssl with the ip address. 192.168.100.130 <Your Zephyr Url>
Launch <Your Zephyr Url>/flex/html5 to access Zephyr Server.
Integrating Zephyr with JIRA over SSL
Please follow the below steps to add the SSL certificate to your Java Keystore.
Note that this step has to be performed in all the machines where Zephyr is installed.
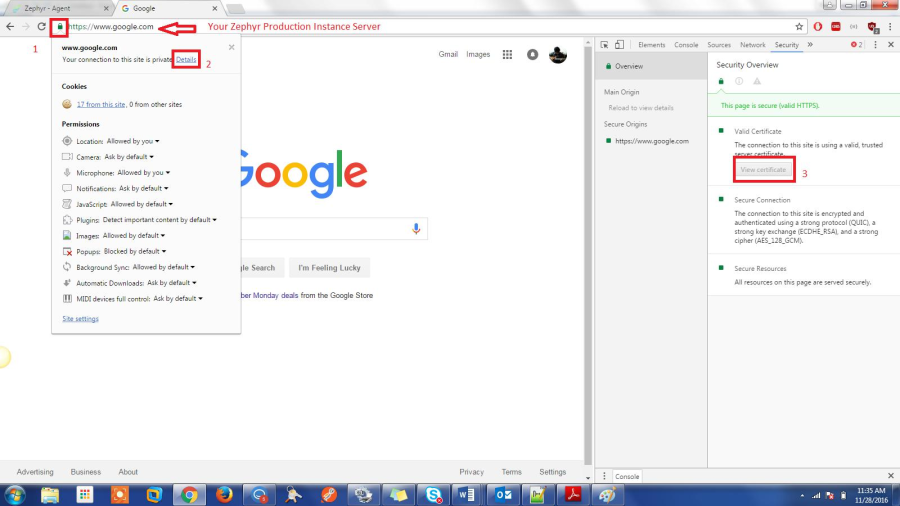
- First obtain the certificate from the browser. Open Chrome and access your JIRA instance.
- Now click on the lock icon near the address bar and click on 'More Information'.
- Select 'View Certificates', then select 'Details' tab and click on 'Export'.
- Save the certificate to the disk.
Please view the screenshots below. 'Google.com' is used as example but the steps for your JIRA instance is identical.
>>>>>Click on 'Details' tab -> 'Copy to File' -> 'Base 64 encoded X.509 -> Next 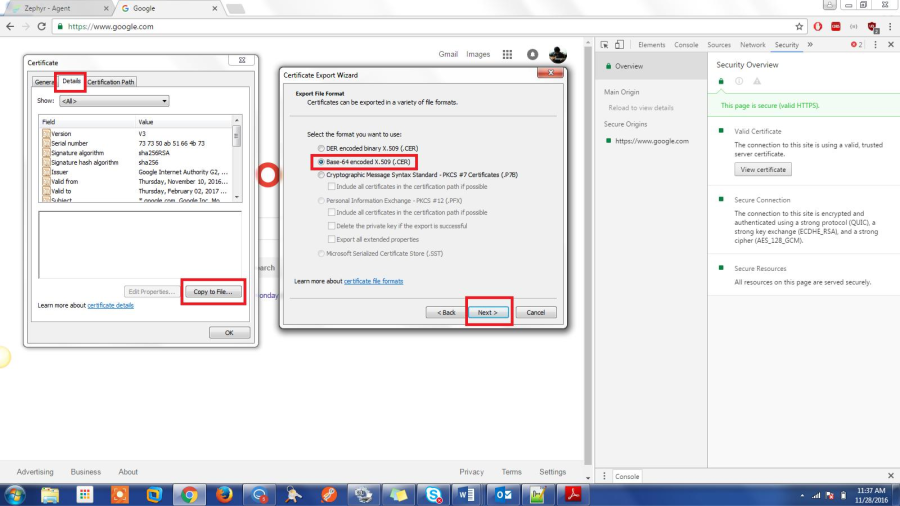
Give any file name and select Finish. This should export your certificate in a .cer file.
Adding the Certificate to the Java Keystore:
- Adding the certificate to the Java Cacert can be done either through Command Line or through UI.
- The steps included in this document will go over the UI part.
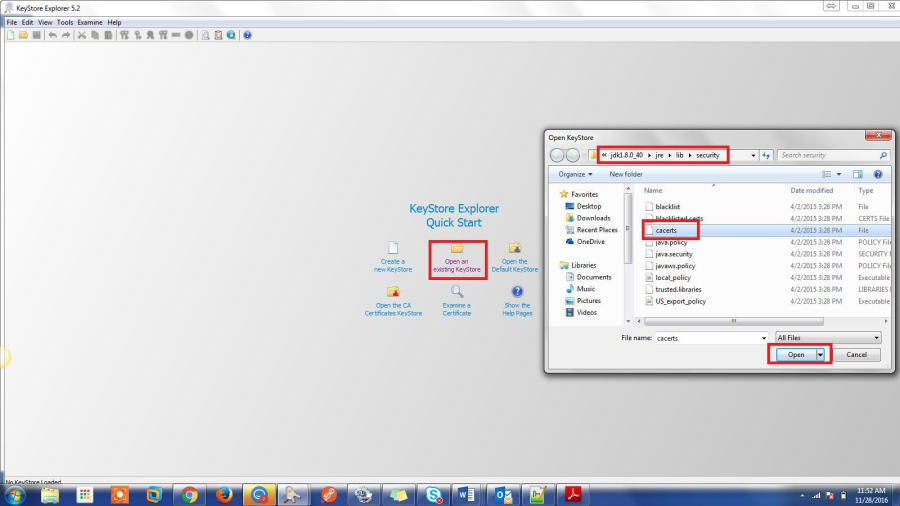
- Install a utility called 'Keystore Explorer', this is a free utility that can make this process very easy.
- After the utility is installed select 'Open an existing Keystore' and provide the path of the Java
Cacerts. For a default 32 bit JDK installation on Windows the location can be found in: C:\Program Files (x86)\Java\jdk1.8.0_40\jre\lib\security
- Open the 'Cacerts' found inside this folder. This should prompt for a password, if it was not manually changed the default password is 'changeit'.
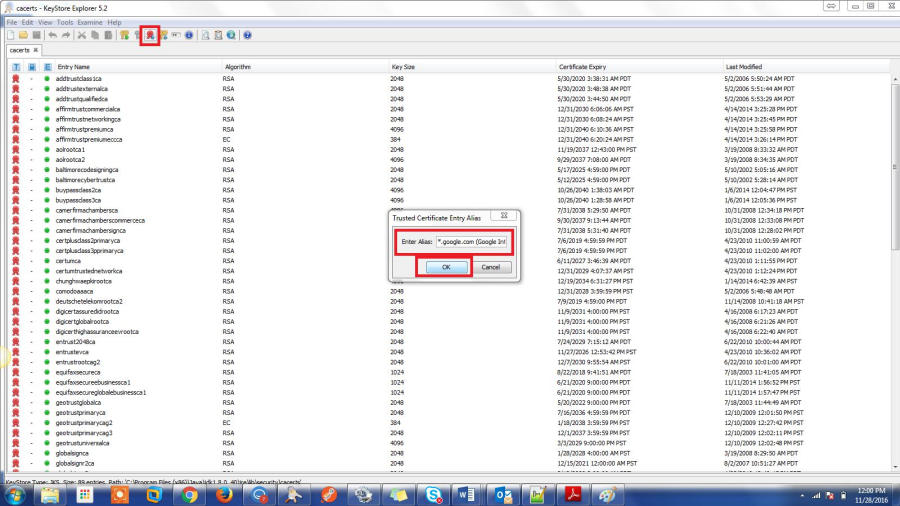
- If it is successful this should open the keystore with all the existing certificates in them. We'll be adding our certificate that we exported above in here.
- Select 'Import Trusted Certificate' and then provide the path of the exported certificate. Enter the alias of the certificate. Use the same alias that was configured with Zephyr and press OK.
- This should add the certificate to the Java Keystore.
Additional Questions
For any questions regarding this document, please contact Zephyr Support.
- Web: https://support.getzephyr.com
- Phone: +1-510-400-8656