Assigning Test Cases to Users
Steps to Assigning Test Cases to Users
The following sections will need to be followed to assign test cases to users in Zephyr:
Assigning in Test Phases
Prior to Assigning
Prior to adding a phase, there must be an existing project, release, and testing cycle that has been created in Zephyr. The project/release must be selected and the user must be under the Test Planning section within the release selected.
Scenario: You are a testing manager in Zephyr. As a testing manager, you want to assign test cases to users in the test planning section.
If this is your first time managing the assignment of test cases, you might want to work within a test project rather than an actual project in the system, and that way, you can work out any issues you might have with managing the assignment of test cases.
1. Click on the button on the test phase that you want to start managing the assignments for and then click on "Assign".
- The following page allows the user to add/delete test cases to the test phase
- The following page allows the user to assign existing test cases in the test phase to users of the project.
Assigning an Individual Test Case to Users
Scenario: You are a testing manager in Zephyr. As a testing manager, you want to assign individual test cases to users in the test planning section.
1. Click on the folder of the test phases to view the the test cases that are added in this test phase.
2. In the table of test cases, find the column called "Assigned To" and then click on the field and choose which user to assign the test case to.
- By default, if the test case was just added, the test case will be marked as "Unassigned".
- You can assign the test case to "Anyone" which allows anyone on the project to be able to execute the test case(s).
Bulk Assigning Test Cases to Users
Scenario: You are a testing manager in Zephyr. As a testing manager, you want to bulk assign multiple test cases to users in the test planning section.
1. Click on the folder of the test phases to view the the test cases that are added in this test phase.
2. Select the test cases you want to assign by using the checkboxes on the left side of the table.
- You also have the option to select all the test cases at the top left of the navigation
3. Click on the drop-down list with the label "Assign all selected to:" and select which user to assign all the selected test cases to.
- This will auto-assign all the selected test cases to the user selected.
1. The other way to bulk assign test cases is to click on the button at the top left of the interface.
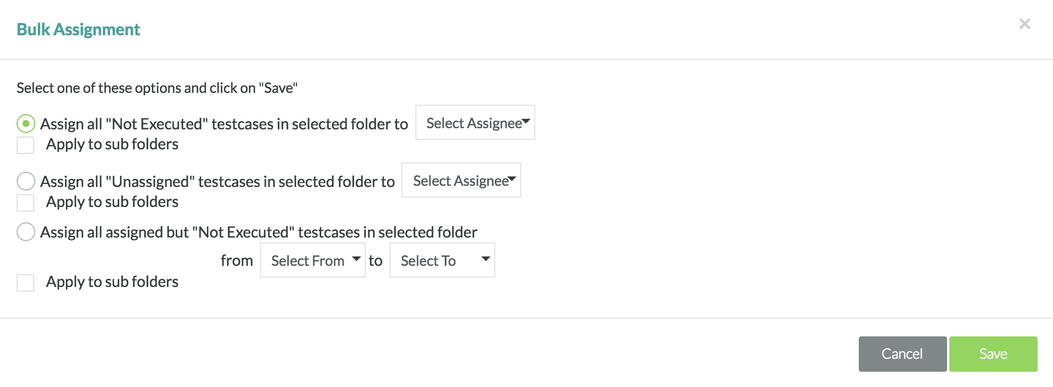
- A pop-up/modal will appear displaying a range of options to help bulk assign test cases.
The first option, "Assign all 'Not Executed" test cases in selected folder to" will take every test case that is not executed and assign them to the selected user, Anyone, or un-assign them entirely.
The second option, "Assign all 'Unassigned' test cases in selected folder to" will take every test case that is currently not assigned to a user and assign them all to the selected user or Anyone.
The final option, "Assign all assigned but 'Not Executed' test cases in selected folder" will take every test case that is assigned to a selected user and reassign them to another user, Anyone, or un-assign them entirely. Only unexecuted assignments will be included in this reassignment.
2. Simply click on "Save" after selecting your bulk assignment options.


Starting Release 8.2, Zephyr Enterprise documentation is moving from its current location on Atlassian to a dedicated, standalone Zephyr Enterprise Documentation page. https://support.smartbear.com/zephyr-enterprise/docs/en/welcome-to-zephyr-enterprise.html