Managing Phases
- Kevin Pham (Deactivated)
- Marc Ray (Deactivated)
Steps to Manage Test Phases
The following sections will need to be followed to manage testing phases in Zephyr:
Adding a Phase
Prior to Adding a Phase
Prior to adding a phase, there must be an existing project, release, and testing cycle that has been created in Zephyr. The project/release must be selected and the user must be under the Test Planning section within the release selected.
Scenario: You are a testing manager in Zephyr. As a testing manager, you want to add a new testing phase to a testing cycle in the test planning section.
If this is your first time managing test phases, you might want to work within a test project rather than an actual project in the system, and that way, you can work out any issues you might have with managing test phases before you work with live test phases.

1. Click on the ![]() button on the test cycle that you want to add a test phase to and then click on "Add Phase".
button on the test cycle that you want to add a test phase to and then click on "Add Phase".
- A pop-up/modal will appear with additional fields to fill out to add a testing phase..
2. Fill in the mandatory fields for adding a testing phase:
- Phase, Start Date, and End Date are mandatory fields.
- Phase - The name of the testing phase that is displayed in the schedule for test planning.
- Start Date - The start date for the test execution phase.
- End Date - The end date for the test execution phase.
Additional Notes
There are two types of test phases.
- Choose Existing Phase (Structured) - This option shows all the root-level folder nodes from the Test Repository which allows the user to create a test phase based on the folder structure from the Test Repository.
- Create New Phase (Free Form) - This option allows the user to create a more free-form testing phase where the user can give any naming convention to the test phase.
3. After filling in the fields, click on the "Save" Button to finalize any changes and create the phase.
Editing a Phase
Prior to Editing a Phase
Prior to editing a phase, there must be an existing project, release, and testing cycle that has been created in Zephyr. The project/release must be selected and the user must be under the Test Planning section within the release selected.
Scenario: You are a testing manager in Zephyr. As a testing manager, you want to edit a testing phase in the test planning section.
If this is your first time managing test phases, you might want to work within a test project rather than an actual project in the system, and that way, you can work out any issues you might have with managing test phases before you work with live test phases.

1. Click on the ![]() button on the test phase that you want to edit and click on "Edit".
button on the test phase that you want to edit and click on "Edit".
- A pop-up/modal will appear with ability to edit the fields for the testing phase.
2. Change/Edit any of the fields for the testing phase:
- Phase, Start Date, and End Date are mandatory fields.
- Phase - The name of the testing phase that is displayed in the schedule for test planning.
- Start Date - The start date for the test execution phase.
- End Date - The end date for the test execution phase.
Additional Notes
If you are editing a test phase that was created using an existing phase, the phase name cannot be changed/edited. You can change/edit the phase name if you created a new phase that wasn't built from an existing phase.
3. After filling in the fields, click on the "Save" Button to finalize any changes to the testing phase.
Deleting a Phase
Prior to Deleting a Phase
Prior to deleting a phase, there must be an existing project, release, cycle, and phase that has been created in Zephyr. The project/release must be selected and the user must be under the Test Planning section within the release selected.
Scenario: You are a testing manager in Zephyr. As a testing manager, you want to delete a testing phase in the test planning section.
If this is your first time managing test phases, you might want to work within a test project rather than an actual project in the system, and that way, you can work out any issues you might have with managing test phases.

1. Click on the ![]() button on the test phase that you want to delete and click on "Delete".
button on the test phase that you want to delete and click on "Delete".
- A pop-up/modal will appear asking "Are you sure you want to delete"?
2. Simply click on the "Delete" Button to remove the testing phase from the cycle.
Exporting a Phase
Prior to Exporting a Phase
Prior to exporting a phase , there must be an existing project, release, cycle, phase that has been created in Zephyr. The project/release must be selected and the user must be under the Test Planning section within the release selected.
Scenario: You are a testing manager in Zephyr. As a testing manager, you want to export a testing phase in the test planning section.
If this is your first time managing test phases, you might want to work within a test project rather than an actual project in the system, and that way, you can work out any issues you might have with managing test phases.
1. Click on the ![]() button on the test phase that you want export and click on "Export".
button on the test phase that you want export and click on "Export".
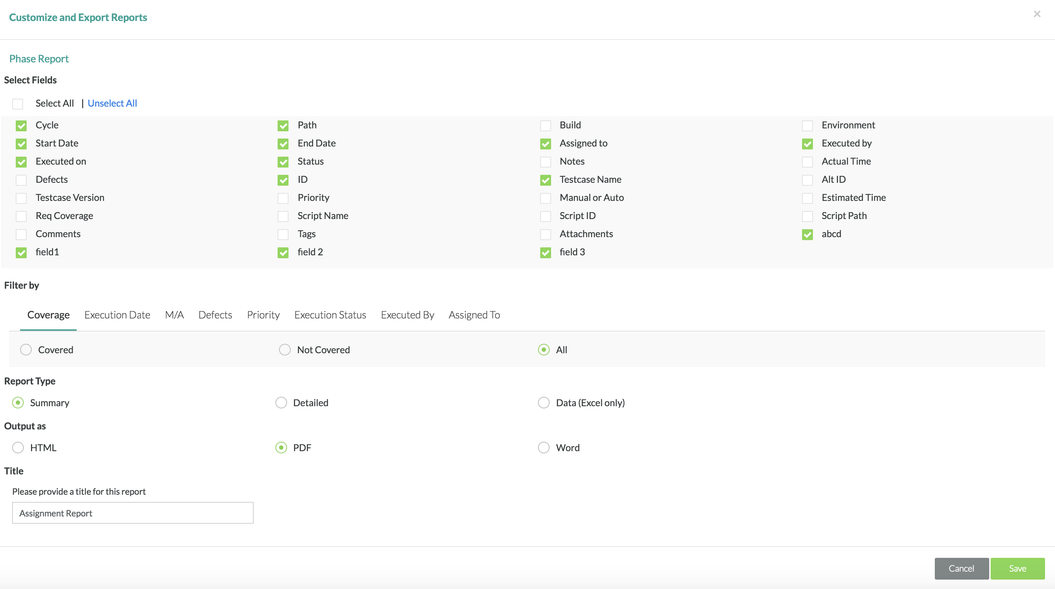
2. After clicking export, there will be a window that pops up where you can choose exactly which fields you want to export for the test phase, what kind of reporting type, what the output file the export should be, and naming the report.
- The default name for an exported report is labeled as "Assignment Report".
3. After selecting your options, simply click the "Save" button and the export will begin.
4. You can then click "OK" and you will get a prompt to download the file.

5. Click on "Download" and the export file of your test planning will be downloaded to your computer.