Test Repository Header
- Daniel (Deactivated)
The Test Repository tool can be found in the Lead's Desktop, Tester's Desktop and any other role's Desktop that has been given access. Selecting any folder in the Local Tree displays the following header on the right hand side.
This header displays the current node selected ("System Tests") on the top left. Directly to the right, you see a toggle for Search and Folder. The bell icon just to the right of those is the notifications area. Directly below those options, from left to right you will see the filter area of your current node selection in the local tree, testcase options, and a toggle to view the testcases in a Detail or List view.
Search and Folder View Toggle
By default, you will enter the Test Repository tool in the Folder view. This view includes the local tree and contents, filter, add and bulk options, and detail and list view toggle.
Switching to Search will change the view to the search window for the Test Repository tool. From this view you will be able to search all your testcases across the currently selected release or in the global tree.
Notifications
Changes made to your current local tree view will appear in the notification area. Clicking on this area will give you a list of changes, and the option to ignore or apply the pending changes immediately. Refreshing the page will also apply the changes.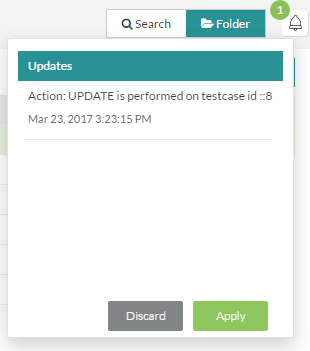
Filter
The filter option allows a user to enter any partial or complete string and filter their local tree for any folders that match the filter string.
Add and Bulk Options
Once a folder is selected in the local tree, if any testcases in that folder will appear on the right. A user then has a few options to them inside the folder:
- Add - Testcases can be added to a selected node or sub-node. On selecting a node or a sub-node, the "Add" button becomes active. Clicking on this button allows the creation of a new testcase. The lower panel opens and the cursor is ready on the subject line of a new testcase.
- Import - Shortcut to begin the testcase importing process
- Clone - Selecting a testcase and clicking on the "Clone" button creates a copy or a duplicate of that testcase with a new testcase ID. Multiple testcases can also be selected (hold down the "Shift" or "Control" keys) and copied in the same way.
- Delete - Selecting a testcase and clicking on the "Delete" button will delete the testcase after a confirmation. Multiple testcases can also be selected (hold down the "Shift" or "Control" keys) and deleted in the same way. This is an operation that cannot be undone so care must be taken before deleting testcase(s) as other users might be using it/working in them.
- Edit - Selecting multiple testcases (hold down the "Shift" or "Control" keys and select) and clicking on the "Change" button will display a window that allows the headers of those selected testcases to be changed in bulk. Available headers to change are Alt ID, Comments, Tags, Automation details, Priority and Custom Fields. The changes will be applied to the selected testcases overwriting whatever values they had before.
- Export - Selecting a testcase (or multiple testcases) and clicking on "Export" button will export those testcases via the Custom Export Report Wizard functionality.
Detail and List View Toggle
A user can freely toggle between the Detail and List view. The list view is default and contains the local tree, testcase list, and testcase details. Switching to the detail view will give a user more room to edit testcases while reduce the testcase list to the left and removing the local tree entirely from view.