On Linux

When installing Zephyr on your nodes, keep in mind the following:

  • Install Zephyr on any drive other than drive C: to avoid permission issues, as administrator permissions may be required to work with this drive.

  • Use the same Zephyr version and build on all the nodes.

  • Zephyr installed on all the nodes must have the same license.

Prerequisites (apply to each node)

  • Make sure the computer meets the system requirements.

  • Ensure you have the license file (license.lic) and any plugin license files that were provided. 

  • Download and install Oracle Java JDK.

  • Download the installation file of Zephyr Enterprise for Linux.

  • Download MySQL Connector.

  • Upload Zephyr License: The Zephyr installer requires access to the license file provided. It will need to be first uploaded to the file system of the server.

  • Upload the MySQL Connector: The Zephyr installer requires access to the MySQL connector jar file downloaded. It will need to be first uploaded to the file system of the server.

  • Set ulimit in Linux: increase ulimit on the server to 65535.

Base node creation

If you have a new node that is not yet configured, do the following:

1. Create a Linux EC2 instance, Name-BASE-01, and configure basic parameters:

  • Assign an elastic IP.

  • Login to the instance using your .pem key.

  • Create the user zephyr and the zephyr password:

sudo adduser zephyr
sudo passwd zephyr

  • Add the user to the root group and log in as the zephyr user:

sudo usermod -a -G wheel zephyr
su - zephyr

  • Add your ssh keys to user zephyr:

sudo yum install openssh-server
ssh-keygen
vi /.ssh/authorized_keys #add necessary public keys to the server

2. Install the following packages:

sudo yum install wget - WGET
sudo yum install -y perl-Digest-SHA - SHASUM
sudo yum -y install epel-release - EPEL repo install
sudo yum repolist - update the repo list
sudo yum install dpkg-devel dpkg-dev - DPKG

3. Create an Amazon Machine Image from this instance: Name-BaseCluster-AMI.

Zephyr installation steps:

1. Install Zephyr Enterprise on the first node (the installation steps on the first node differ from the steps you perform on the other nodes):

 Installation steps on the first node

When installing Zephyr on your nodes, keep in mind the following:

  • Use the same Zephyr version and build on all the nodes.

  • Zephyr installed on all the nodes must have the same license.

1. Ensure the installation file has proper permissions to be executed:

shell> chmod +x zephyr_(Build Number)_linux_setup.sh

2. Launch the installation file with the '-c' command line option as shown below, and ensure you launch it as sudo or root:

shell> sudo ./zephyr_(Build Number)_linux_setup.sh

3. You will be prompted to continue with the installation. Choose OK to continue:

Starting Installer...
This will install Zephyr X.X on your computer
OK [o, Enter], Cancel [c]

4. You may be prompted to choose between a new installation and upgrading. Choose Install.

Choose type:
Install [1, Enter], Upgrade [2]

5. You will be prompted to confirm your system meets the Zephyr Server requirements. Please make sure your system meets the requirements before proceeding:

Requirements
Server
OS:               RedHat Enterprise
                     CentOS
                     Ubuntu/Debian
                     SUSE/openSUSE
CPU:            Quad-core CPU Intel Pentium or AMD Opteron (2Ghz or higher)
RAM:            Minimum 16GB; Preferred 16GB
Disk Space:   At least 5GB Free
Networking:   Wired Ethernet
                     Static IP address
                     If Firewall exists, please allow ports
                     80, 443, 8005, 8009 , 3306
Account:       Superuser (root) access to the machine
                     Installer and services need to be installed as "root"

6. Agree to the Zephyr EULA:

License Agreement
Software End User License Agreement
IMPORTANT - PLEASE READ CAREFULLY:
This End User License Agreement ("Agreement") constitutes a valid and
binding agreement between D Software, INC. (”d software,” ”WE” or ”US”) and
you, as either an individual or a single business entity ("you," "your" or
"user") for the use of the Zephyr x.x software, ANY files that are delivered
to you by d software to modify the Zephyr x.x software product, any online
or enclosed documentation, and any updates, fixes and upgrades provided to
you (collectively, the ”Software”). You must FIRST READ AND ACCEPT THE TERMS
OF THIS LICENSE AGREEMENT by clicking on the ”i agree” checkbox below in
order to install and use the Software.

7. Press Enter key until you see the following, then press 1 to agree to the terms:

I accept the terms of this license agreement [1], I do not accept the terms of this  license agreement [2, Enter]

8. Specify the destination location to place the Zephyr home directory:

Select Destination Location
Setup will install Zephyr into the following folder.
To continue click Next. If you would like to select a different folder, click Browse
[/usr/local/zephyr]

9. Choose the installation type Data Center deployment:

Choose deployment type:
Server deployment [1, Enter], Data Center deployment [2]

10. Locate your license file:

License File
License Key File:
[/home/zephyr/license.lic]

11. Сhoose a port to run Zephyr on. By default, Zephyr runs on port 80:

Customization
Server Port :
[80]

12. Choose a Tomcat Server Shutdown Port.  We recommend that you leave the default port for it:

Tomcat Server Shutdown Port:
[8005]

13. You will be prompted to choose a database system. Choose MySQL:

Note: If you had just uninstalled. Please wait few miniutes for the port to get free and try again.
Configure Database
Database Type:       
MySQL [1, Enter]

14. Specify the username you use to connect to the database:

Database Character Set:  utf8
Username:
[]

15. Specify the password you use to connect to the database:

Password:                
[]

16. Specify the database connection string:

Database URL Configuration:
Sample URL:               jdbc:mysql://localhost:3306/
Database URL:
[]

17. Specify the connection string for Elasticsearch you configured earlier.  By default, Elasticsearch will bind to the IP configured in the elasticsearch.yml file edited earlier in the installation instructions. For example: "192.168.56.101:9300":

Configure Elasticsearch
Enter the hostname or IP address and port used by Elasticsearch. For example: localhost:9300.
Multiple Elasticsearch nodes should be separated by comma. For example: localhost:9300,localhost:9301
ES Host URL
[]

18. Zephyr will now install the required files:

Extracting files ..

# ************************************************************

  1. After the installation is complete, you will see the following:

    ZephyrService.sh may or may not start automatically. Please check and start manually if not started.

    Done! 

    Zephyr x.x has now been installed on your computer. 

    Zephyr Desktop will now be launched automatically.

    You can access additional help from the Zephyr installation.

    Click Finish to exit setup.

    Launch Zephyr Desktop?

    Yes [y, Enter], No [n]

Choose No for now.

2. After you install Zephyr, make sure it is up and running, and then stop the node.

3. Install Zephyr Enterprise on another node:

sh zephyr_6.6_xxx_setup_iRev_xxx.sh  -VzSkipStartupData=true

The command is case-sensitive.

4. Once the installation is complete, stop the node.

You can use any number of nodes. If you want to add more nodes, repeat steps 3-4, at that, keep in mind that:

  • The nodes can be in different regions, but all of them must be in the same time zone.

  • The node IPs must be on the same subnet.

Write down the IP address of each node – you will need them at step 7. 

After installing Zephyr on Java virtual machines, you need to allocate memory for the Tomcat server and set the amount of native memory that can be used for class metadata. To do that, open the file zephyr-directory/tomcat/bin/setenv.sh on each node and configure the line below in the following way:
export JAVA_OPTS="-server -Xms2048m -Xmx4096m -XX:MaxMetaspaceSize=512m
Note: The -Xms value must be 50% of RAM, the -Xmx value must be 75% of RAM. For example, if you have 16 GB of RAM on your machine, we recommend that you specify the following values:
export JAVA_OPTS="-server -Xms8192m -Xmx12288m -XX:MaxMetaspaceSize=512m
Important: Do not run any services or applications on the nodes where Zephyr is running, as they consume VM resources as well.

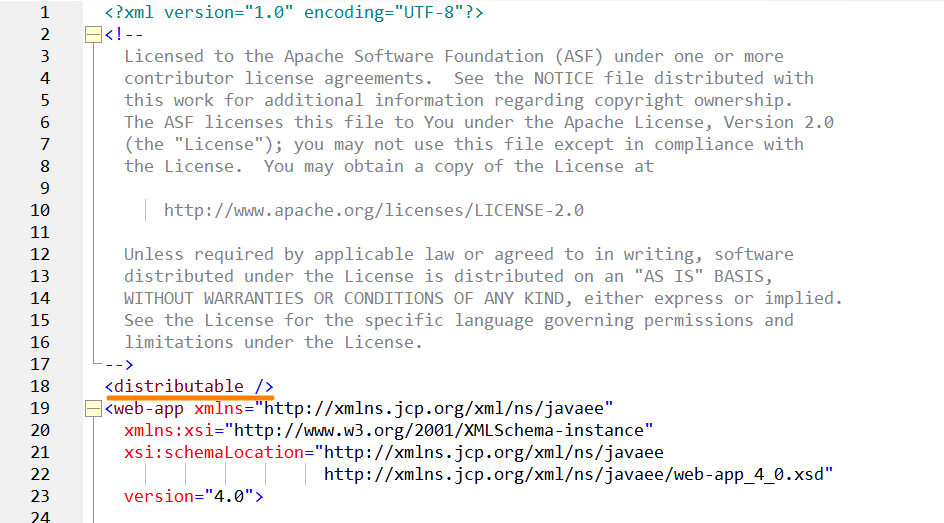
5. After you install Zephyr Enterprise on all the nodes, you need to modify the following files on each node:

 Zephyr\tomcat\conf\server.xml

In the file, find the following line:

<Cluster className="org.apache.catalina.ha.tcp.SimpleTcpCluster"/>

and replace it with the following:

<Cluster className="org.apache.catalina.ha.tcp.SimpleTcpCluster"channelSendOptions="8">
<Manager className="org.apache.catalina.ha.session.DeltaManager"
expireSessionsOnShutdown="false"
notifyListenersOnReplication="true"/>
<Channel className="org.apache.catalina.tribes.group.GroupChannel">
<Membership className="org.apache.catalina.tribes.membership.McastService"
address="228.0.0.22"
port="45564"
frequency="500"
dropTime="3000"/>
<Receiver className="org.apache.catalina.tribes.transport.nio.NioReceiver"
address="auto"
port="4000"
autoBind="100"
selectorTimeout="5000"
maxThreads="6"/>
<Sender className="org.apache.catalina.tribes.transport.ReplicationTransmitter">
<Transport className="org.apache.catalina.tribes.transport.nio.PooledParallelSender"/>
</Sender>
<Interceptor className="org.apache.catalina.tribes.group.interceptors.TcpFailureDetector"/>
<Interceptor className="org.apache.catalina.tribes.group.interceptors.MessageDispatch15Interceptor"/>
</Channel>
<Valve className="org.apache.catalina.ha.tcp.ReplicationValve"
filter=""/>
<Valve className="org.apache.catalina.ha.session.JvmRouteBinderValve"/>
<Deployer className="org.apache.catalina.ha.deploy.FarmWarDeployer"
tempDir="/tmp/war-temp/"
deployDir="/tmp/war-deploy/"
watchDir="/tmp/war-listen/"
watchEnabled="false"/>
<ClusterListener className="org.apache.catalina.ha.session.ClusterSessionListener"/>
</Cluster>
 zephyr/tomcat/webapps/flex/WEB-INF/template/hazelcast.xml.tmpl
  1. Find the line –

<member>127.0.0.1:5701</member>

– and add the IPs of all the nodes instead of 127.0.0.1. For example:

<member>172.17.18.141:5701</member>
<member>172.17.18.157:5701</member>
<member>172.17.18.223:5701</member>
<member>172.17.18.201:5701</member>

  1. Find the line –

interface>127.0.0.1</interface>

– and replace it with an IP address that has an asterisk instead of the last component. For example:

<interface>172.17.18.*</interface>

 zephyr/tomcat/webapps/flex/WEB-INF/classes/hazelcast-hibernate.xml
  1. In this file, find the line –

<member>127.0.0.1:5702</member>

– and add the IP addresses of all the nodes instead of 127.0.0.1. For example:

<member>172.17.18.141:5702</member>
<member>172.17.18.157:5702</member>
<member>172.17.18.223:5702</member>
<member>172.17.18.201:5702</member>

  1. Find the line –

<interface>127.0.0.1</interface>

– and replace it with an IP address that has an asterisk instead of the last component. For example:

<interface>172.17.18.*</interface>

 zephyr/tomcat/webapps/flex/html5/index.html

Find the line –

<input type="hidden" id="notificationConType" value="websocket" />

– and replace websocket with sse:

<input type="hidden" id="notificationConType" value="sse" />

 zephyr/tomcat/conf/web.xml

In the file, before the web-app tag, add the tag <distributable />:

6. On all the nodes, open the folder zephyr/tomcat/webapps/flex/WEB-INF/template, run the command

cp cluster.properties.tmpl ../classes/

to copy the file cluster.properties.tmpl to the folder zephyr/tomcat/webapps/flex/WEB-INF/classes, and change the file name to cluster.properties:

mv cluster.properties.tmpl cluster.properties

7. Make the following changes in the cluster.properties file on all the nodes:

  • Remove the following lines:

#unique identifier for the cluster node
cluster.aws.enable=false
HAZELCAST_PASSWORD=huser
HAZELCAST_USERNAME=hpass
  • Update the following information:

cluster.key=node1 (this should be a unique name of the node)
cluster.node.1.key=node1
cluster.node.1.url=172.17.18.141 (the IP address of node 1)
cluster.node.count=4
cluster.node.2.key=node2
cluster.node.2.url= 172.17.18.157(the IP address of node 2)
cluster.node.3.key=node3
cluster.node.3.url=172.17.18.223 (the IP address of node 3)
cluster.node.4.key=node4
cluster.node.4.url=172.17.18.201 (the IP address of node 4)

The cluster.key name must be unique in each file.

8. Start Zephyr on the first node by using the following commands:

cd /usr/local/zephyr/tomcat/bin
sudo ./startup.sh

To stop Zephyr, use the commands below:

cd /usr/local/zephyr/tomcat/bin
sudo ./shutdown.sh

When Zephyr starts, you will see the following line in the log file zephyrlocation/tomcat/logs/thedinc.log:

*****************
Zephyr Started
*****************

After Zephyr is launched, the HAZELCAST_USERNAME and HAZELCAST_PASSWORD values will be generated in the zephyr/tomcat/webapps/flex/WEB-INF/classes/cluster.properties file.

9. Copy the HAZELCAST_USERNAME and HAZELCAST_PASSWORD values and paste them to the zephyr/tomcat/webapps/flex/WEB-INF/classes/cluster.properties file on the other Zephyr nodes.

10. Stop the first node.

Now you can set up a shared folder. To learn how to do that, click Next Step below.

< Prev Step Next Step >

See Also

Set Up Zephyr Data Center
Support and Troubleshooting