Zephyr On-Premise Upgrade Instructions
- Kevin Pham (Deactivated)
Table of Contents
Download Zephyr
Please download Zephyr on the following page: Zephyr Download
Pre-Upgrade Process
Step 1: Delete the existing folder in elastic search (folder present in "\elasticsearch-5.5.0\data\nodes" or "/var/lib/elasticsearch/nodes" ) before starting the upgrade process. If ElasticSearch is not installed (not common), please refer to Steps to install Elasticsearch.
Step 2: Take a backup of the entire database: Steps to take database backup.
Step 3: Take a backup of the attachments, which are located in the file system (separate from the database).
- We suggest you take a backup of the entire folder which can be found in Windows under the Zephyr Directory (ZephyrDir) or in Linux within /zephyrdata.
- If you're using JIRA OAuth in a previous version of Zephyr, take a backup of 'applicationContext-resources.xml' file located within 'C:\Program Files\Zephyr\tomcat\webapps\flex\WEB-INF\classes'
Step 4: Check the Server.xml file for the AJP connector.
- Stop the Zephyr Server.
- Go the following location: zephyr/comcat/conf/server.xml
- Edit the server.xml file and comment the below line
- <!-- <Connector port=“8009” protocol=“AJP/1.3" redirectPort=“8443” /> -->
- Save the file, exit and then you can start the upgrade process.
If SSL is previously setup in Zephyr, please take a copy of your java keystore file which is present under the Zephyr/tomcat/conf path file. For special SSL consideration, we recommend viewing the following page: Special SSL Consideration.
Upgrade from Linux
Step 1: Stop the Zephyr Service.
sh /opt/zephyr/tomcat/bin/shutdown.sh
Step 2: Stop Elastic search.
service elasticsearch stop
Step 3: Delete the folder present in "/var/lib/elasticsearch/nodes"
rm -rf /var/lib/elasticsearch/nodes/
Step 4: Start Elastic search.
service elasticsearch start
Step 5: Run the 6.6 Zephyr installer.

Step 6: Select the upgrade option.
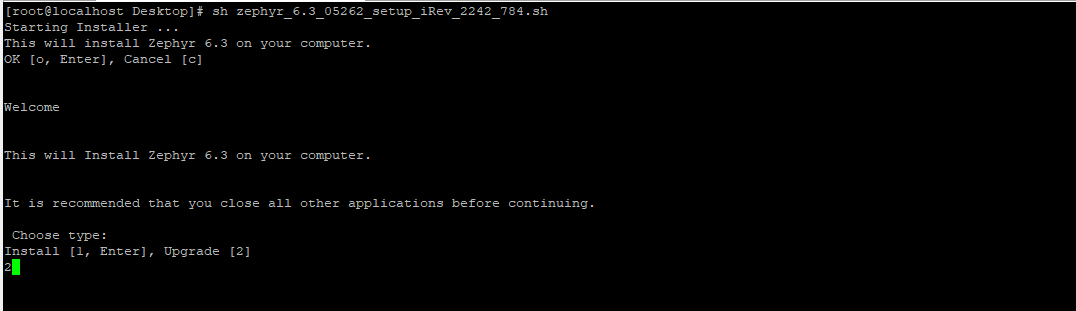
Step 7: Select the Zephyr installation folder where Zephyr was installed.
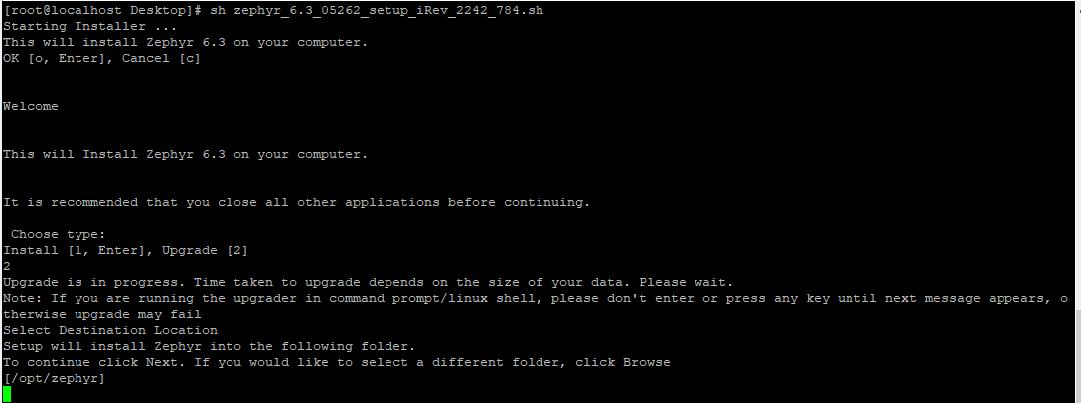
Step 8: Enter the elastic search ip with the transport port and then the upgrade should be completed successfully.

Step 9: Upgrade is completed successfully.
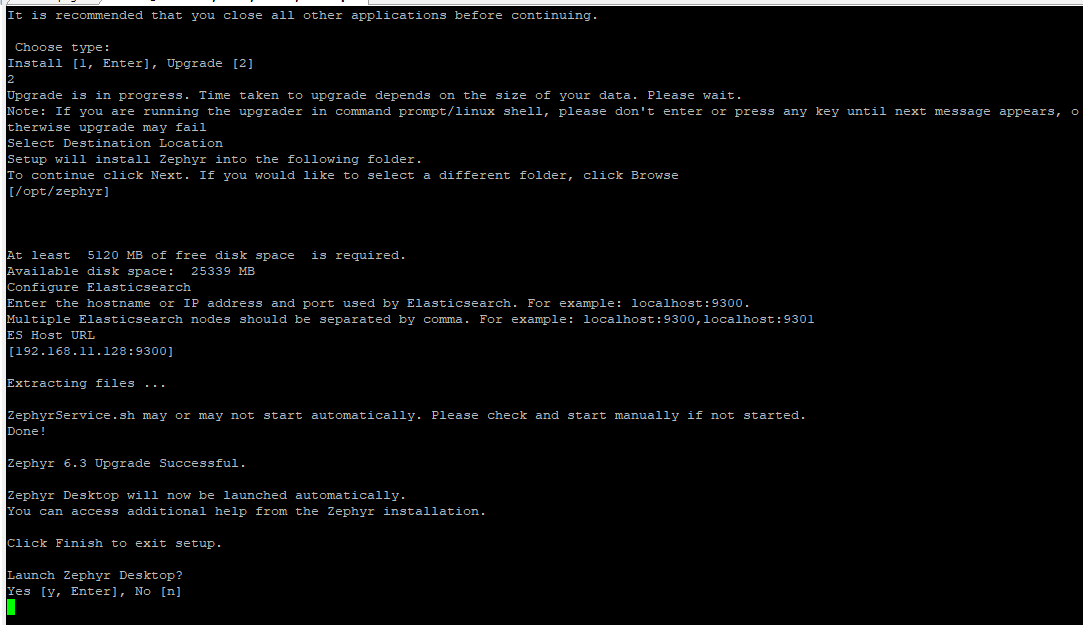
Please refer to the Post-Upgrade Process section below.
Upgrade from Windows
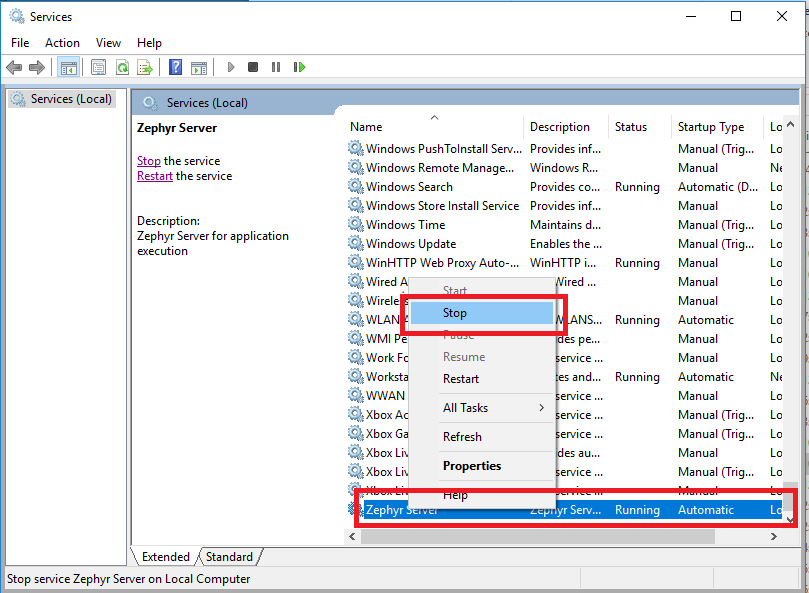
Step 1: Stop the Zephyr Server
Step 2: Stop the Elastic search
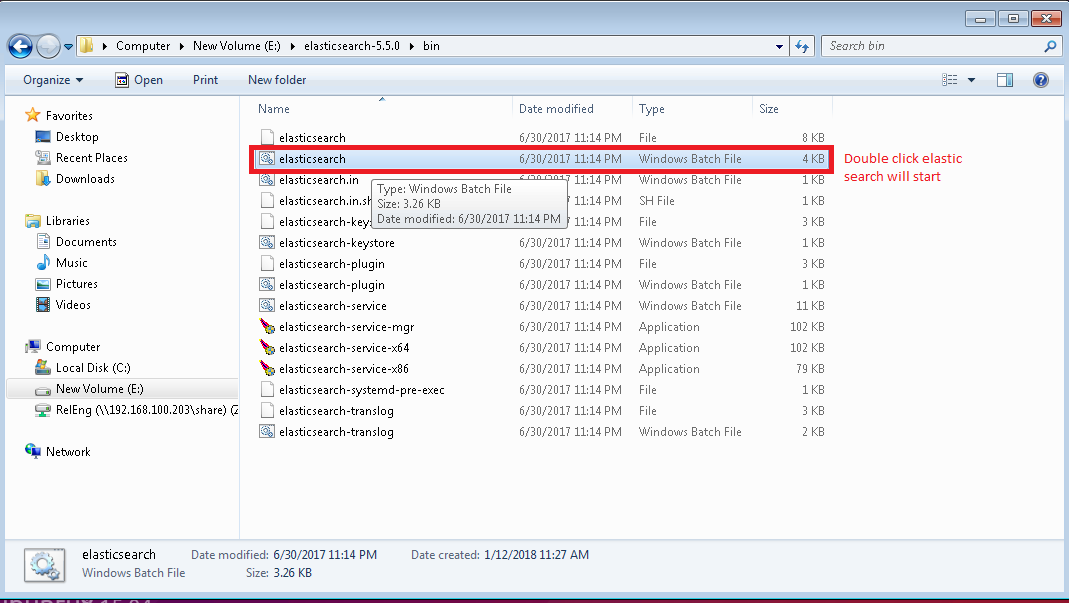
Step 3: Delete the folders present inside "\elasticsearch-5.5.0\data\nodes"

Step 4: Start the Elastic search
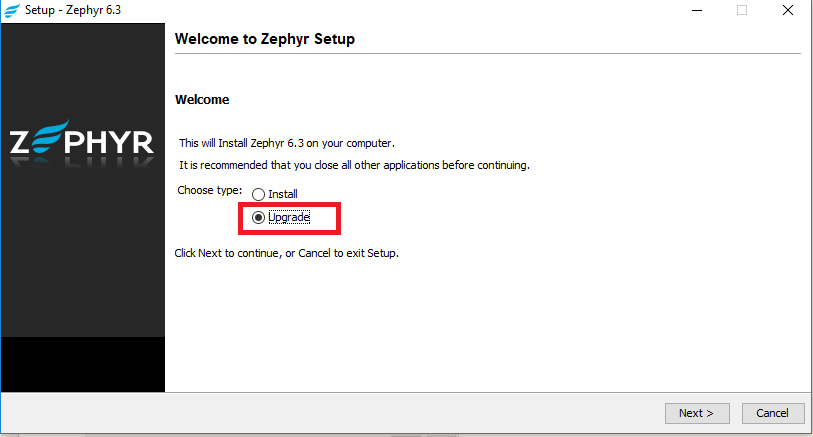
Step 5: Launch the Zephyr installer and select "Upgrade" → Then click "Next".
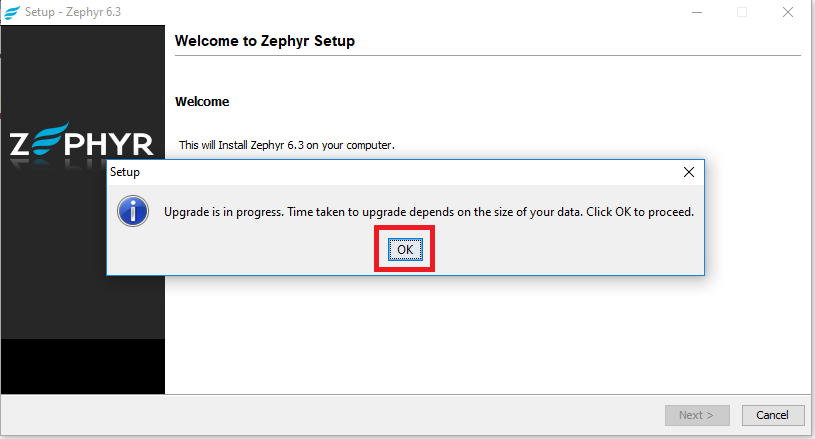
Step 6: Click on "OK".
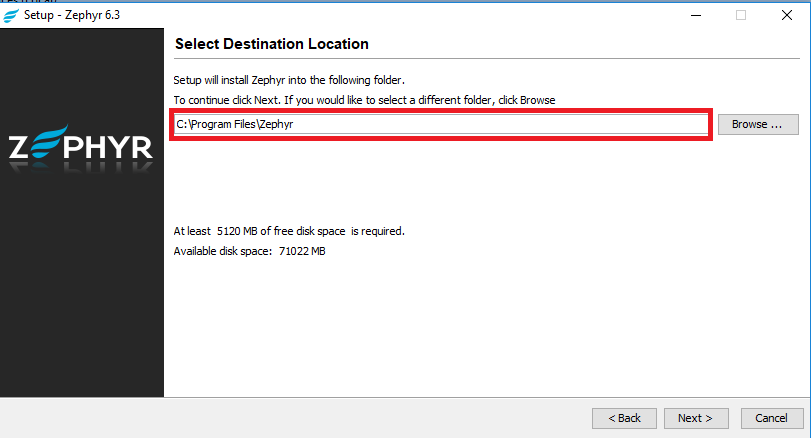
Step 7: Click on "Next" after selecting the destination folder.
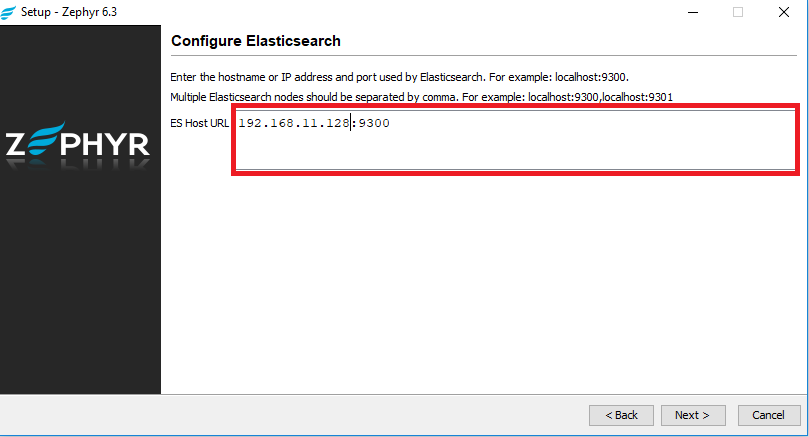
Step 8: Ensure the Elastic search IP with the transport port is correct before clicking "Next".
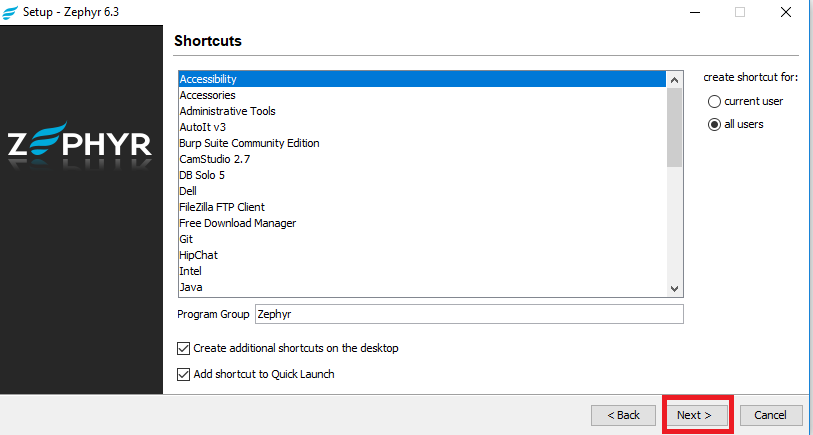
Step 9: After choosing if you want to create or add a shortcut, click on "Next".
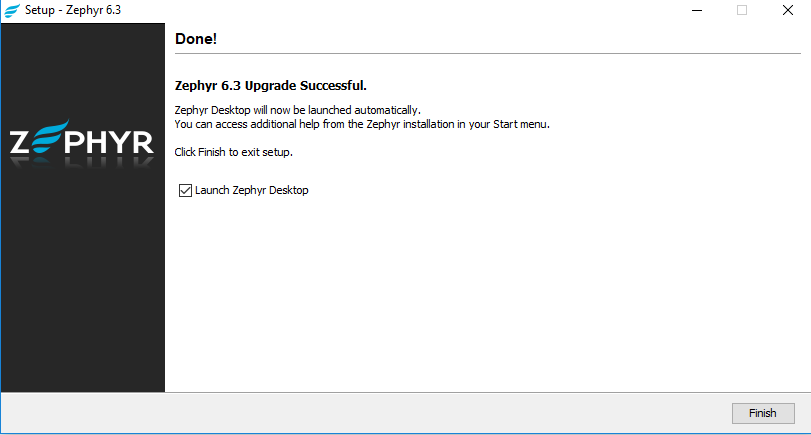
Step 10: Once the upgrade is complete, click on "Finish".
Post-Upgrade Process
Post Upgrade Recommendations
Step 1: After upgrading, we recommend users clear their browser cache when accessing their Zephyr application if you are experiencing issues regarding cached pages.
Step 2: After upgrading, we strongly recommend users to perform a re-index of your Zephyr instance to ensure the integrity of your data and information within the Zephyr instance.
Step 3: After upgrading, your users must update their OAuth keys from within Zephyr again on the Defect Tracking page in the administration section.
- With the updated authentication for JIRA, Zephyr saves the entries in the database and requires a manual update for the OAuth keys. The user needs to manually reset the consumer key name and the consumer private key.
Post Upgrade Recommendations for Special Considerations and Scenarios
These scenarios are based on whether or not users may have certain features enabled (SSO/etc.) These are not applicable to all customers.
Step 1: If SSL is setup in the previous version of Zephyr, then follow the instructions in Special SSL Consideration.
Step 2: Create and Validate Webhooks (May apply to users upgrading from either Zephyr Enterprise 6.2 or an earlier release)
Re-create the Webhook
1. The user must map a Zephyr project to their Jira instance/project. When users map a single project to their Jira, all other projects will be mapped creating the webhook. Users can choose to select any project to map as it does not matter which project is selected. Once the user finishes mapping the project to their Jira, the webhook will be created successfully in Zephyr.
Validate the Webhook
2. For users, you may want to double check that the webhook is created by navigating to the Jira webhook page and validating that all of the Jira projects are included in the webhook JQL.
SSO Consideration: If you have SSO set up, your users may run into the following scenario.
The Zephyr login page will now auto-redirect to the SSO page if zephyr is integrated with SSO.
For the Internal-login page, there will be no redirection. On that page, the login will contain the same behavior in the scenario that the admin wants to change the integration.
https://"Zephyr domain"/flex/html5/internal-login
When a user logs out of the system, they will be able to view the 2 following options:
A normal login (Internal login for users)
A Single Sign-On login (SSO)
The advantage of this is that if an SSO user is logged into their SSO already and that user hits the Zephyr URL, the user does not need to type their username and password. When navigating to the Zephyr URL, the SSO user will automatically be logged into Zephyr.
Linked test case statuses in Jira
In 6.3 and above, we've implemented a new behavior to show the latest Execution Status when a Zephyr test-case is mapped to a JIRA requirement in the JIRA. However, this information will not be automatically updated after upgrading. Any old or existing links in JIRA that have remote links pointing to test cases in Zephyr will not display the latest execution status and will not work for the latest update.
The reason for this is that Zephyr cannot update those existing remote links during the upgrade process.
However, as the system is used after the upgrade, any new test cases linked to Jira or existing test case links that are executed again will be updated with the latest status and with working links.
Rollback Process
Rollback may be required for specific situations:
- When the Zephyr server is not stopped prior to the user starting the upgrade process.
- When Zephyr is configured with Tomcat jvisual vm memory configuration and then the Zephyr server stopped and user performs an upgrade process.
If a rollback is required, please following the instructions in Zephyr On-Premise Rollback Process.