Recently, Zephyr for Jira's UI has undergone a new and improved makeover to coincide with the recent Jira UI changes. Check out the new look and feel to existing features detailed below.
| Note |
|---|
Zephyr for Jira does not support the restoring Test Cycle and Execution Details for tests issues moved between projects. This includes test issues that are moved from one project to another using the 'Move Issues' function in Jira. |
Main Navigation
On logging into Jira, you will see a navigation bar on the side with many items to choose from. A Tests button is present and will navigate you to the side-bar below:

You can access Zephyr for Jira in two ways:
- Open a Jira project and select Zephyr in the project sidebar.
- From Jira main menu, select Apps > Zephyr.
When the Zephyr application is open, you will see the following sidebar:

- What's New - Learn about new features and improvements made in recent releases of Zephyr for Jira.
- Design
- Create a Test - Create a brand new test under the current project. The issue type is "Test" and is indicated by this icon:

- Plan Test Cycle - This takes you to the Cycle Summary page, to let you create Create a BDD Feature - Create a BDD feature with accompanying steps.
- Search Tests -This opens the Issue Navigator to allow searching for tests.
- Import Tests - Import your existing tests from Excel or XML files.
Note: This item appears only when Zephyr is accessed within a project.
- Create a Test - Create a brand new test under the current project. The issue type is "Test" and is indicated by this icon:
- Planning and Execution
- Cycle Summary - Create and view various test cycles based on version.
- Search Test Executions - Search for executions in a project using ZQL.
- Manage Execution Filters - Manage filters saved using the test execution search functionality
- Execute Tests - Allows the tester to access any test cycle for that project and start executing tests. Note: a test can also be executed directly while viewing it
- Test Summary:Reporting
- Test Metrics - Opens the Test Dashboard with testing metrics gadgets displayed
- Test Summary - Summary of all testing activity in a project
- Traceability Matrix - A report that can generate a trace of testing from a story through tests, cycles, executions, and defects
- ImporterIntegrations
- API Keys - Information needed if using the Zephyr for Jira Importer Utility
- Get API keys required to call Zephyr for Jira REST API.
- Test Automation - Imports test results from test automation frameworks directly into Zephyr test execution cycles.
- BDD/Cucumber - Learn how to create and use behavior-driven development (BDD) testing with Zephyr for Jira.
- REST API - Learn more about Zephyr for Jira REST API.
- Continuous Integration - Learn how to integrate your CI/CD workflows with Zephyr for Jira.
- Settings
- Zephyr Custom Fields - Select the custom fields to add to test steps and test executions.
- About (this menu appears only when Zephyr is opened from global context)
- Welcome - This page educates and provides access to a variety of resources such as Support, Buying/Upgrading etc.
- ADG UI Documentation - Option Link to enable or disable the new Zephyr for Jira UI. This option is not available if you are not using the new Jira UI.the online documentation.
- Zephyr Status - Opens the status page where you can see the current status of Zephyr for Jira Cloud and subscribe to updates on planned maintenance.Documentation - Online documentation.
- Zephyr Support - Link to Zephyr's support page.
- Feedback - Give feedback directly to the plugin developers regarding your Zephyr for Jira experience.
- About Zephyr - Version and license information.
Create and View a Test
A test can be created in any one of the ways that any issue type can be created in JIRAJira. For example, clicking on the "Create Issue" link or "Create Test" link will bring up the following screen:
A test can be viewed in its entirety in the following "View Issue" page (click to enlarge):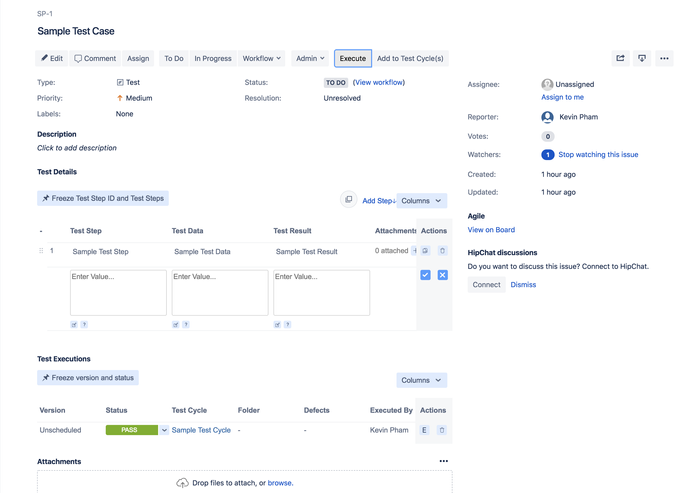
On this screen, you'll find a toolbar that will allow you to access various features associated with editing and executing a test:
- Comment: This allows users to add comments to the test
- Add to Test Cycle(s): Allows this test to be added to a specific test cycle of a version for test execution
- Attach Files: Allows files to be attached to this test
- More Actions:
- Link: This brings up the "Link Issue" dialog that allows this test to be linked to any other issue (Task, Improvement, Story, Epic etc.)
- Clone: A test can be very easily and quickly cloned
- Attach Screenshot: Allows screenshots to be attached to this test
- Execute: This allows for this test to be executed - either in an ad hoc manner (i.e. not associated with any particular test cycle and/or version) or as part of a test cycle
| Info |
|---|
If you use the new Jira issue view, you must have the Edit Issues permission in the project in order to see Zephyr test information in the issue detail view. See User Permissions for more information. |
| Anchor | ||||
|---|---|---|---|---|
|
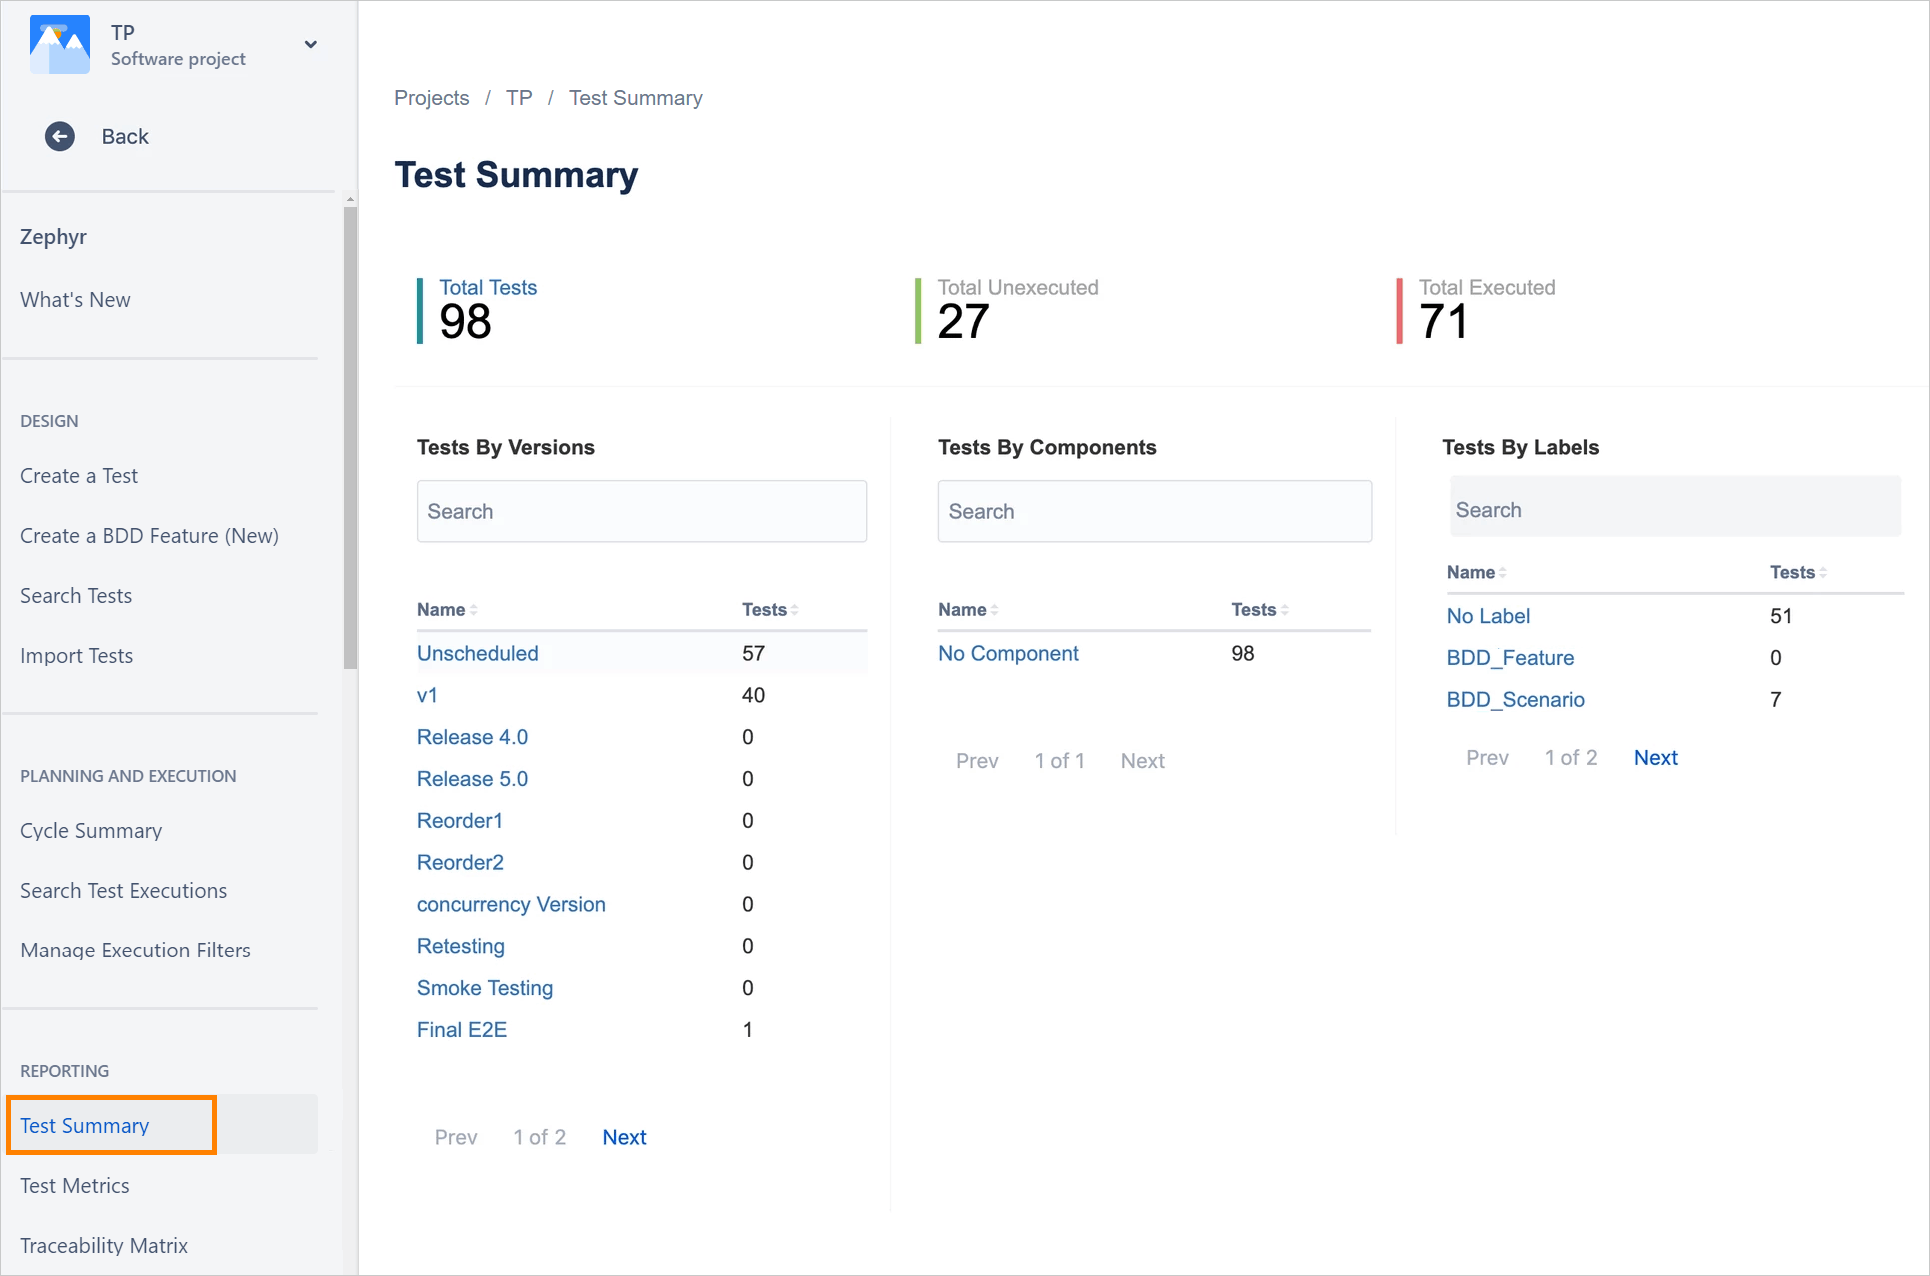
The Test Summary page is accessed either via clicking on the top-level "Tests" in the navigation bar or by selecting the "Test Summary" tab on the left side.

This page provides page provides a comprehensive view of all the tests that belong to a particular project, summarized based on overall totals, Versions, Components and Labels. Clicking on any of these links will take you to the Issue Navigator and display a list of those tests.
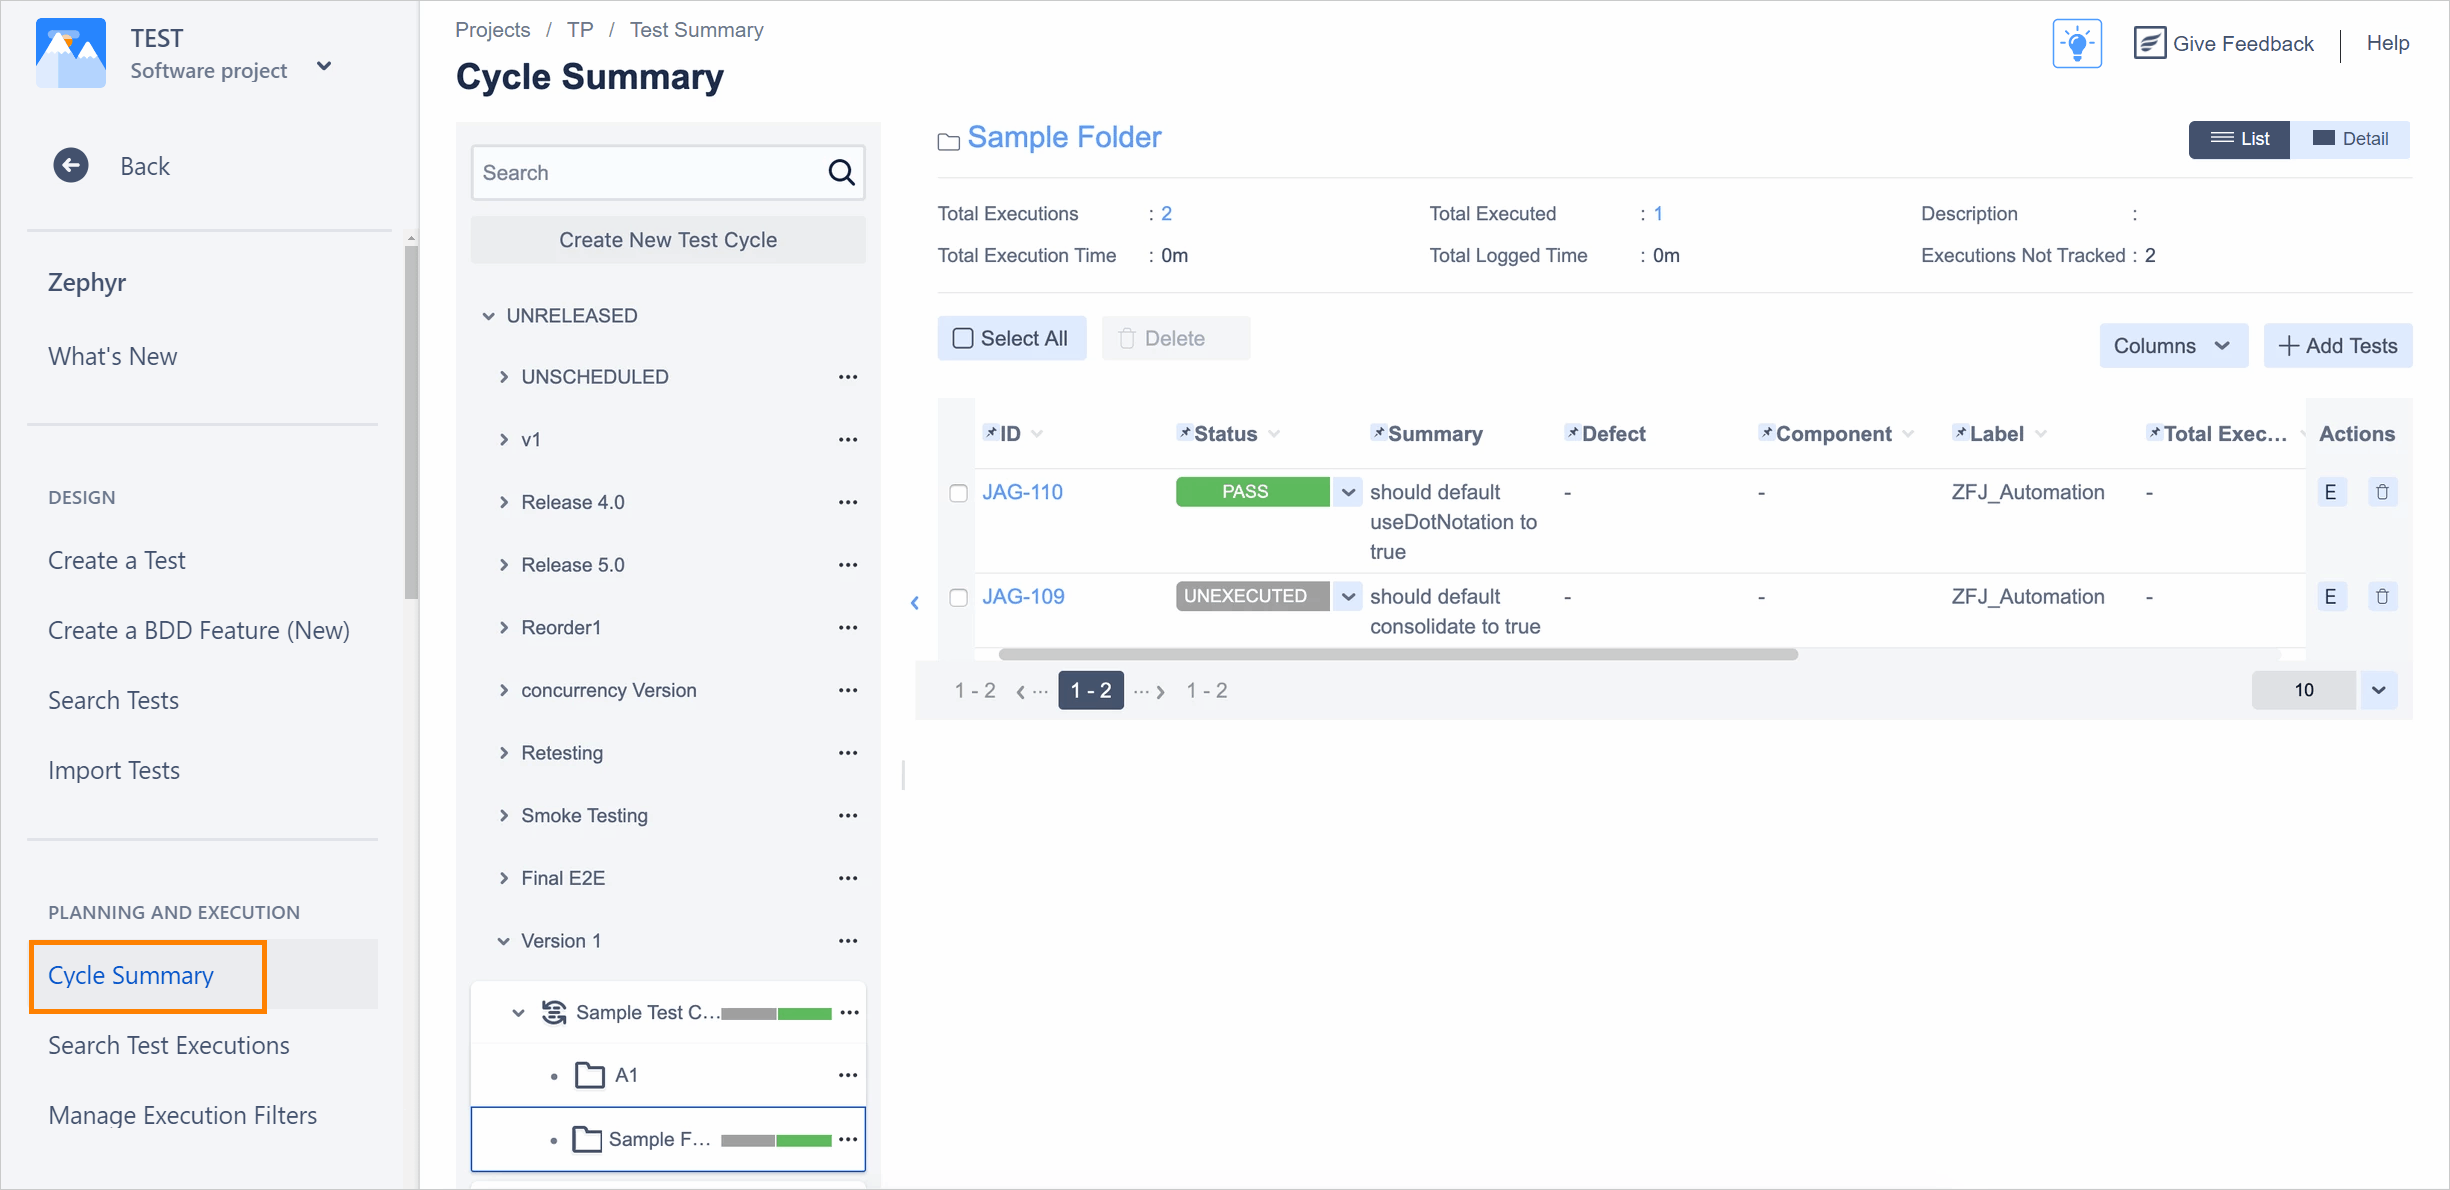
Cycle Summary
The Cycle Summary page is accessed either via clicking on "Plan Test Cycle" or "Execute Tests" in the top-level "Tests". This can also be selected by clicking on the "Plan Test Cycle" button on the left side.

This page The Cycle Summary page allows you to view test cycles that have been created for a particular version of a project, create new ones, and drill-down into the list of tests for execution. Selecting a different version will change the view and display the test cycles for that selected version. A summary of the execution status is also displayed on the right and hovering over it provides additional stats.
Execute Test
This screen allows you to execute a test by changing its status, filing a new bug or associating an existing one, adding attachments and comments. You can then save and return to the test or the test cycle from where you had come.
