Zephyr Vortex
- Kevin Pham (Deactivated)
- Edward Stolyar (Deactivated)
Overview
What is Vortex?
- The value of Vortex is to Organize the Automated Test cases in Zephyr platform and see results
- When the Vortex job is run, it posts the test cases into Zephyr, schedules and executes the test cases according to the automation report
Benefits to user
- Integration with test automation tools/frameworks- Selenium, UFT and Tricentis
- Users can get the complete picture of automated and non-automated test cases in Zephyr application
- Increase ROI by reducing time to setup and maintain integration
- Provides easy to use workflow and intuitive UI to setup integration with Automation Frameworks
Vortex Configuration
- Install Zephyr
- Go to the zephyr Installation Directory eg: C:\Program Files\Zephyr\license
- Copy the zautomation.lic license file in license folder
- Restart the Zephyr service
How to Validate Vortex is Installed Properly
- Launch Zephyr.
- Login as Manager → Select any project
- Click on Vortex → It should be visible and should show in Green color
- Add Job and Execute Job
In Vortex we have Automation and Folder watcher. In both the widgets, Zephyr supports the following frameworks (JUnit xml format).
- SoapUI PRO
- TestComplete
- Cucumber
- JUnit
- Selenium
- TestNG
- Tricentis Tosca
- UFT
- eggPlant
Automation:
Automation is mainly to post a bunch of automation report into ZE UI. When Automation job is executed it posts the test cases into ZE, schedules and executes the test cases according to automation report. If there are any failed test cases, in the Test execution section, it will add logs and attachment.
Folder Watcher:
Folder Watcher also does the same job as Automation does, but the difference is that an Automation user has to execute the job, whereas in Folder watcher, user will configure the job's result folder with a sleep over time (eg: 2 minutes). So for every 2 minutes, this Folder watcher will watch the result folder and if any report file will generate, it will take that generated automated file and post the results to Zephyr.
How to Add and Execute Automation Job
Prior to using Vortex
General Vortex perquisites
- Install Zephyr.
- Install Zbot and configure with any user having all the permission of Test Repository, Test Planning and Test execution (manager, lead, or any custom user).
- Login as (manager, lead, or a custom user that has access to Vortex).
- Click on Vortex.
- Select Automation.
- Click on '+' button to add job.
- Fill in the mandatory fields that are highlighted red and then save the job.
- Click on the 'E' button to execution the automation job.
- Once the job is scheduled, it will give 3 notifications on the status of the job (New, In-progress, Complete).
- Once the job is completed based on the Automation report file, it will create test cases in Test Repository, create the cycle with the given name in Test Planning with the given start and end dates, and finally in Test execution it will post the results, and for failed test cases it will add any attachments and logs.
1. Click on Vortex.
2. Select Automation.
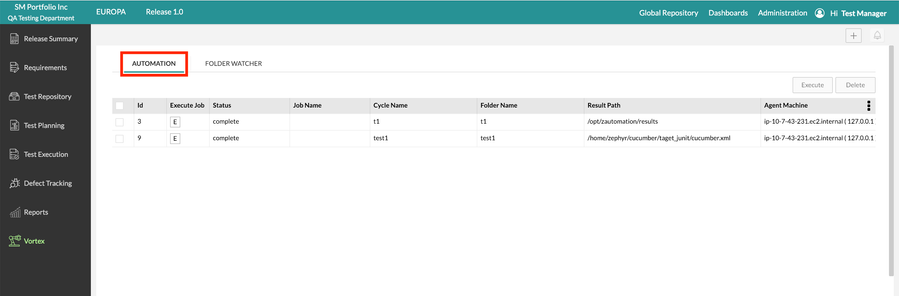
3. Click on the '+' button in the top right to add a job.
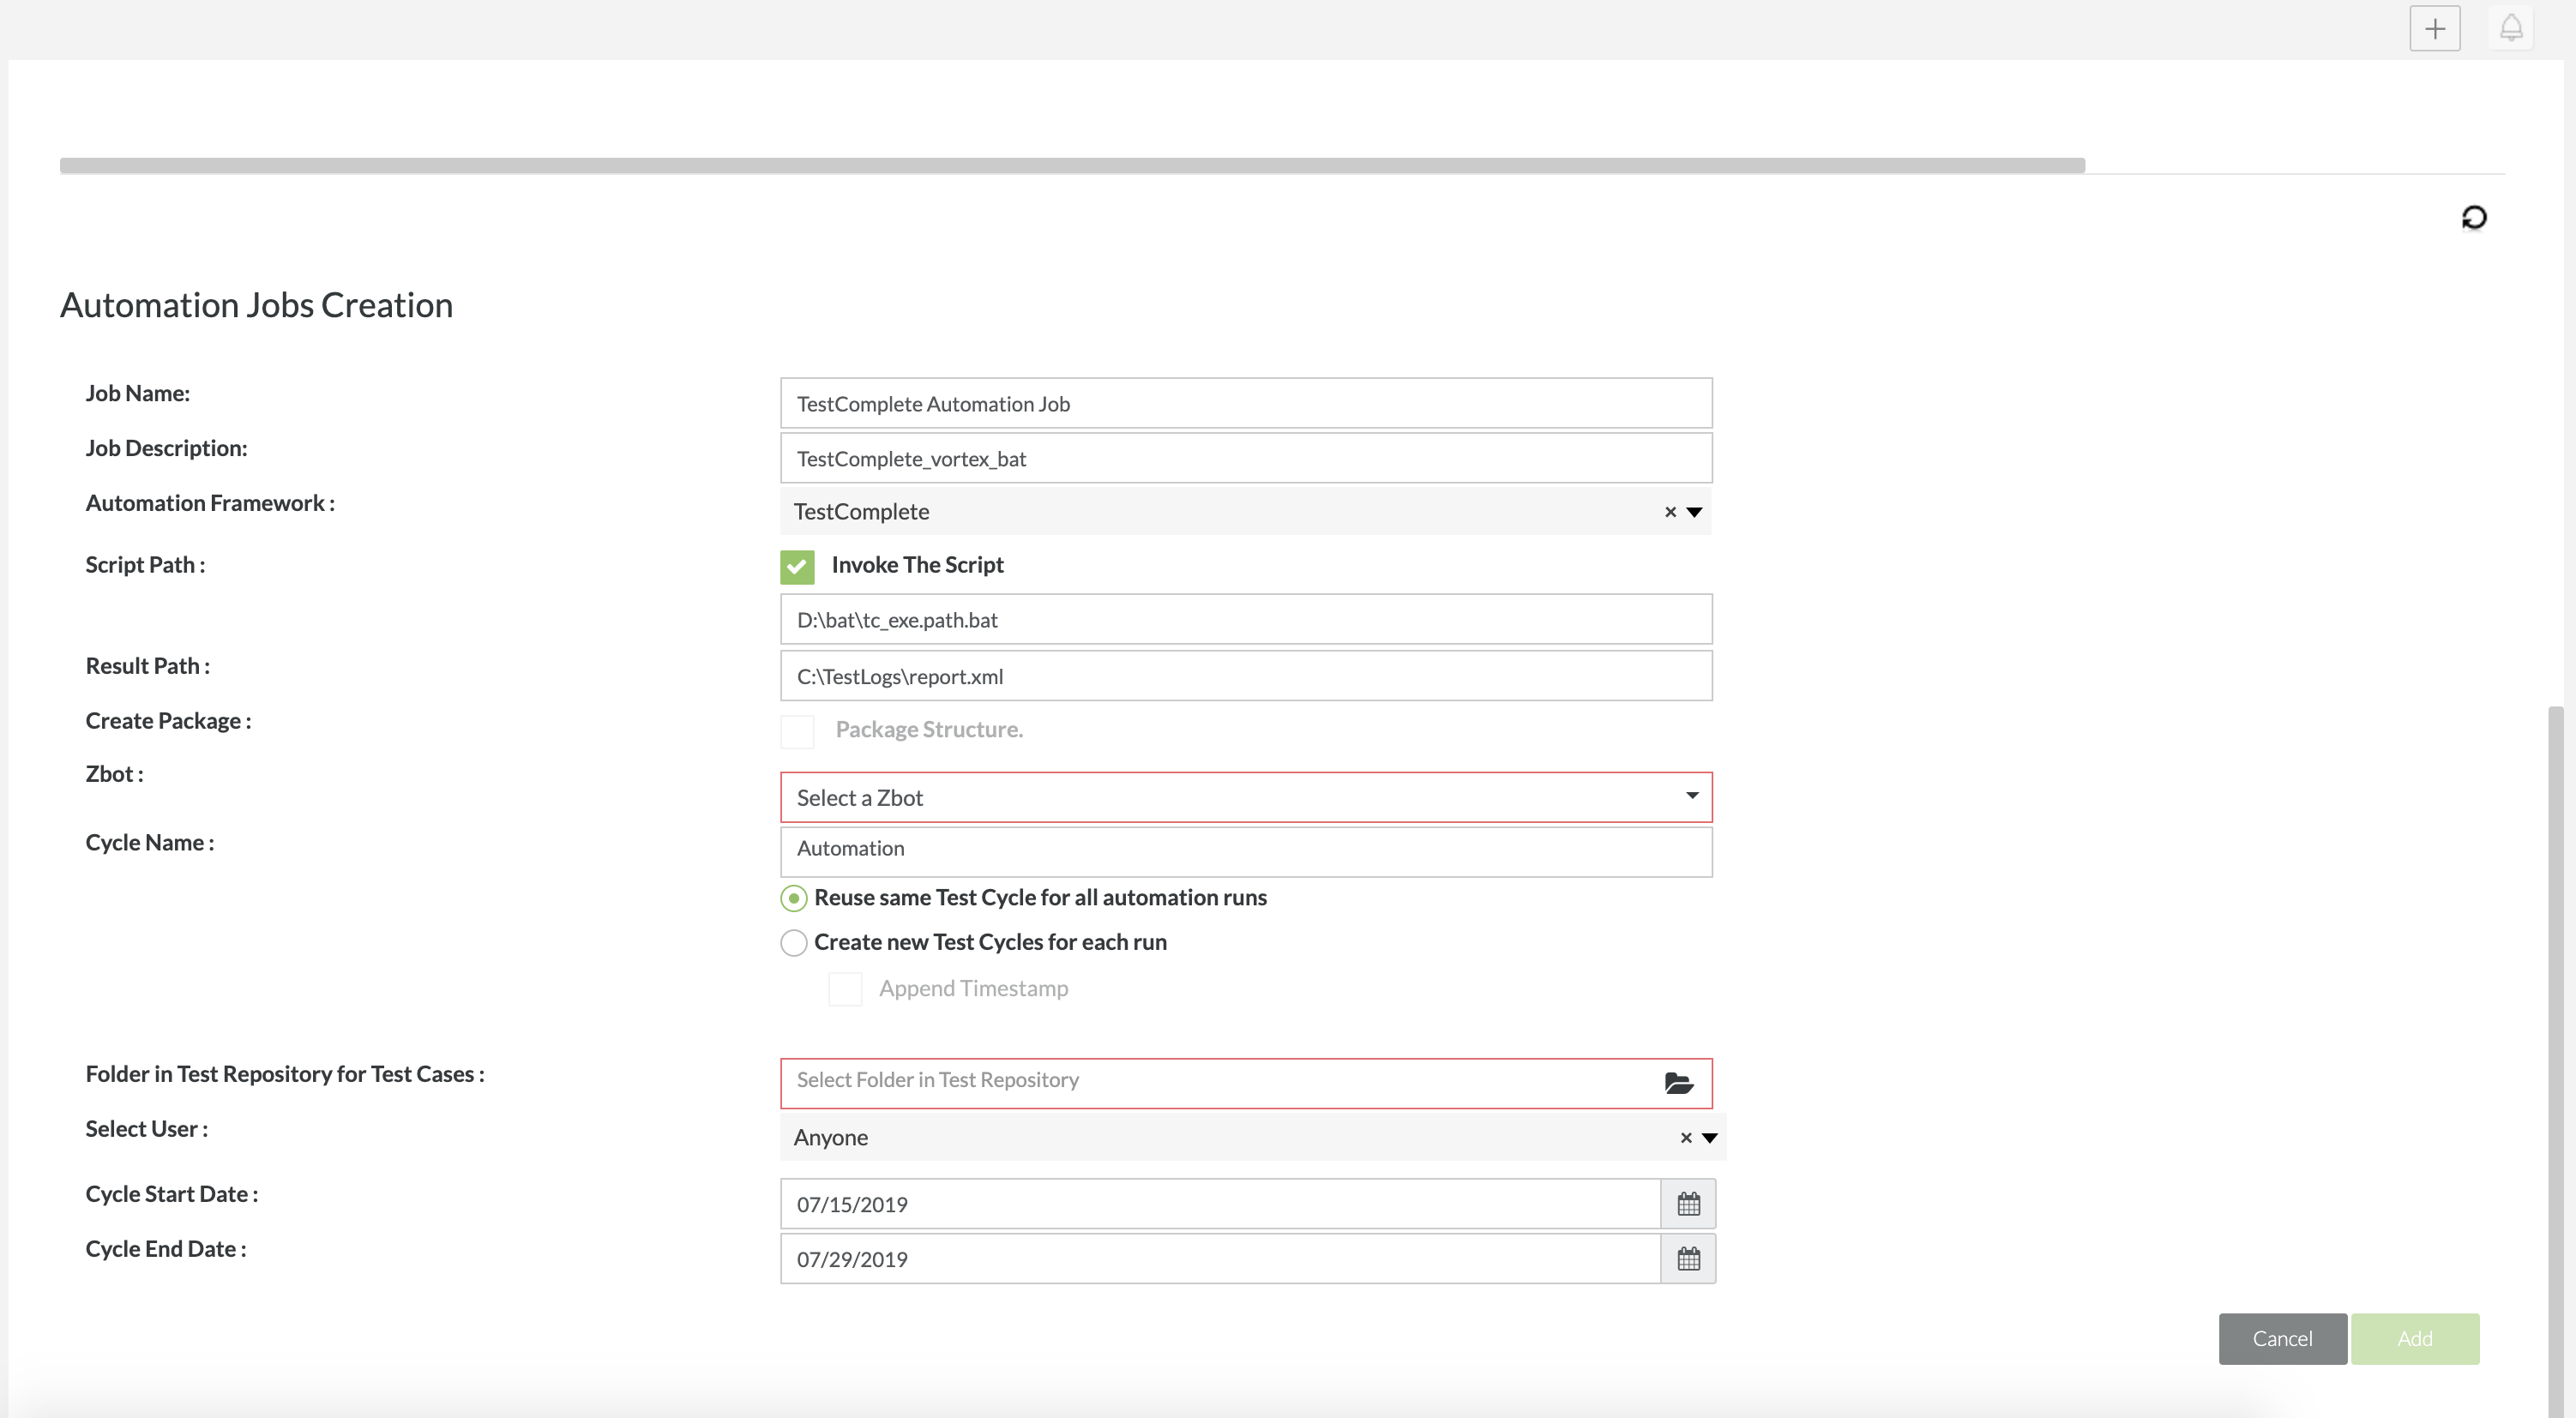
4. Fill in the mandatory fields that are highlighted red and then save the job.
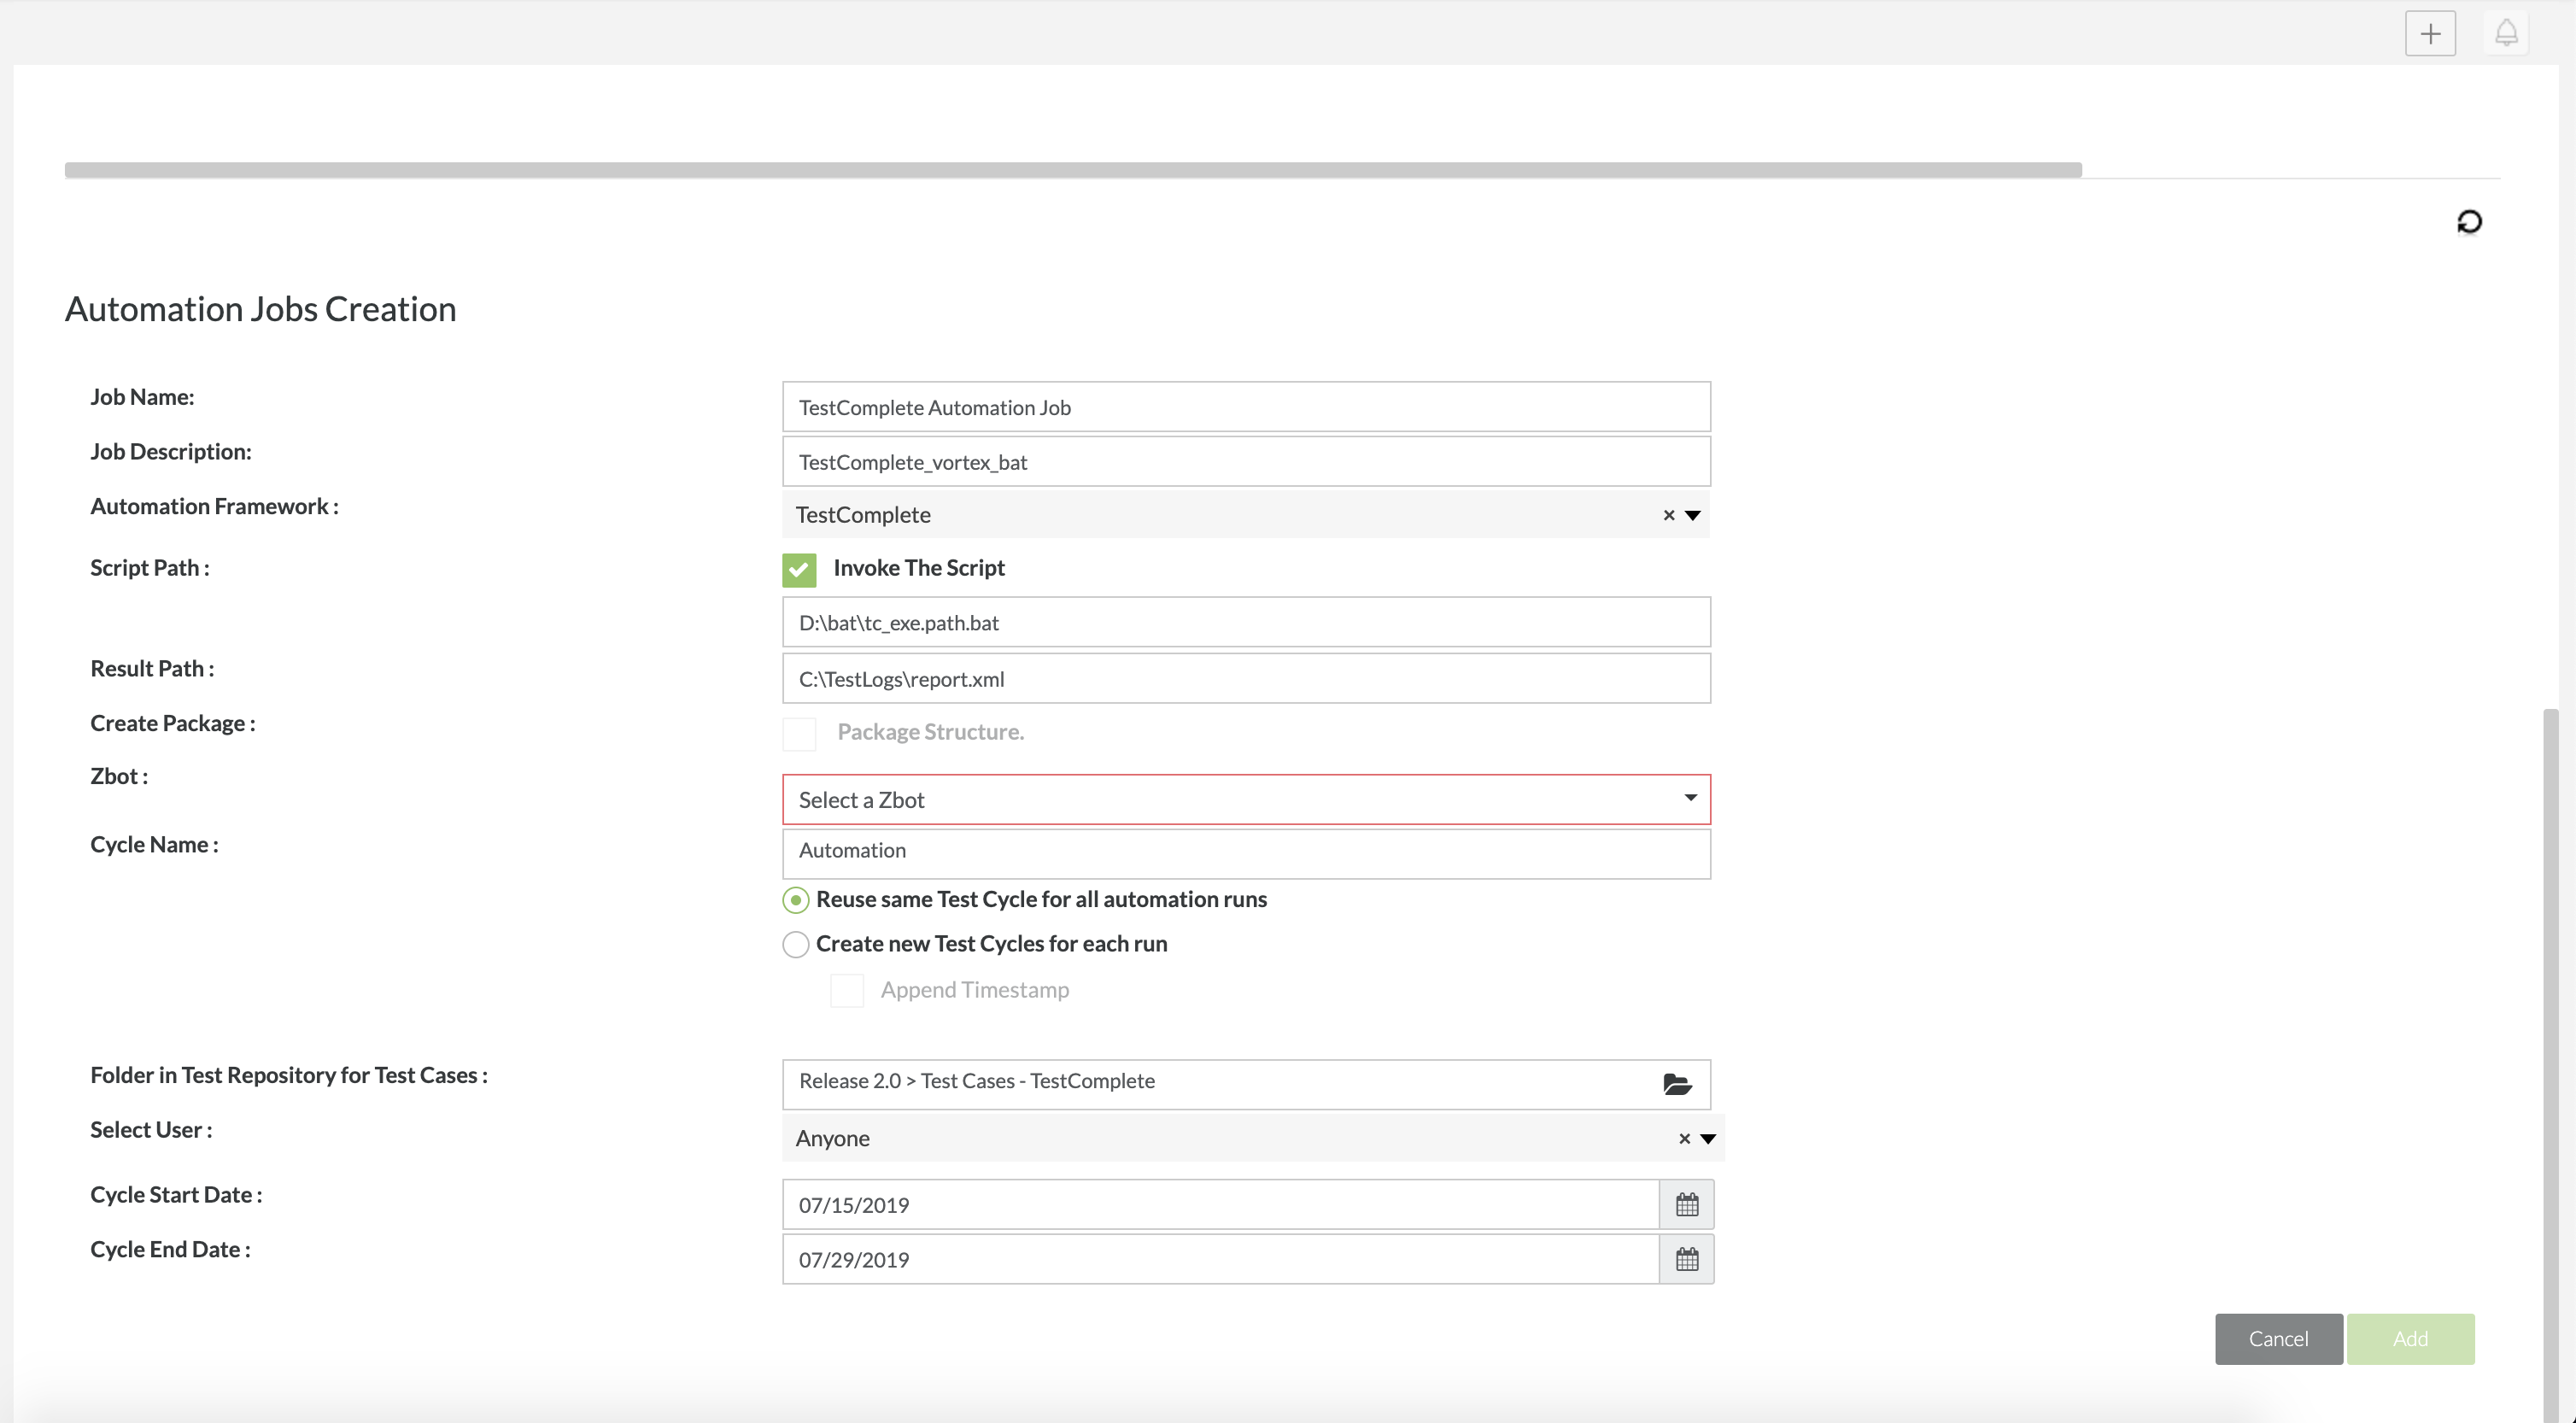
- Enter in a name for the automation job.
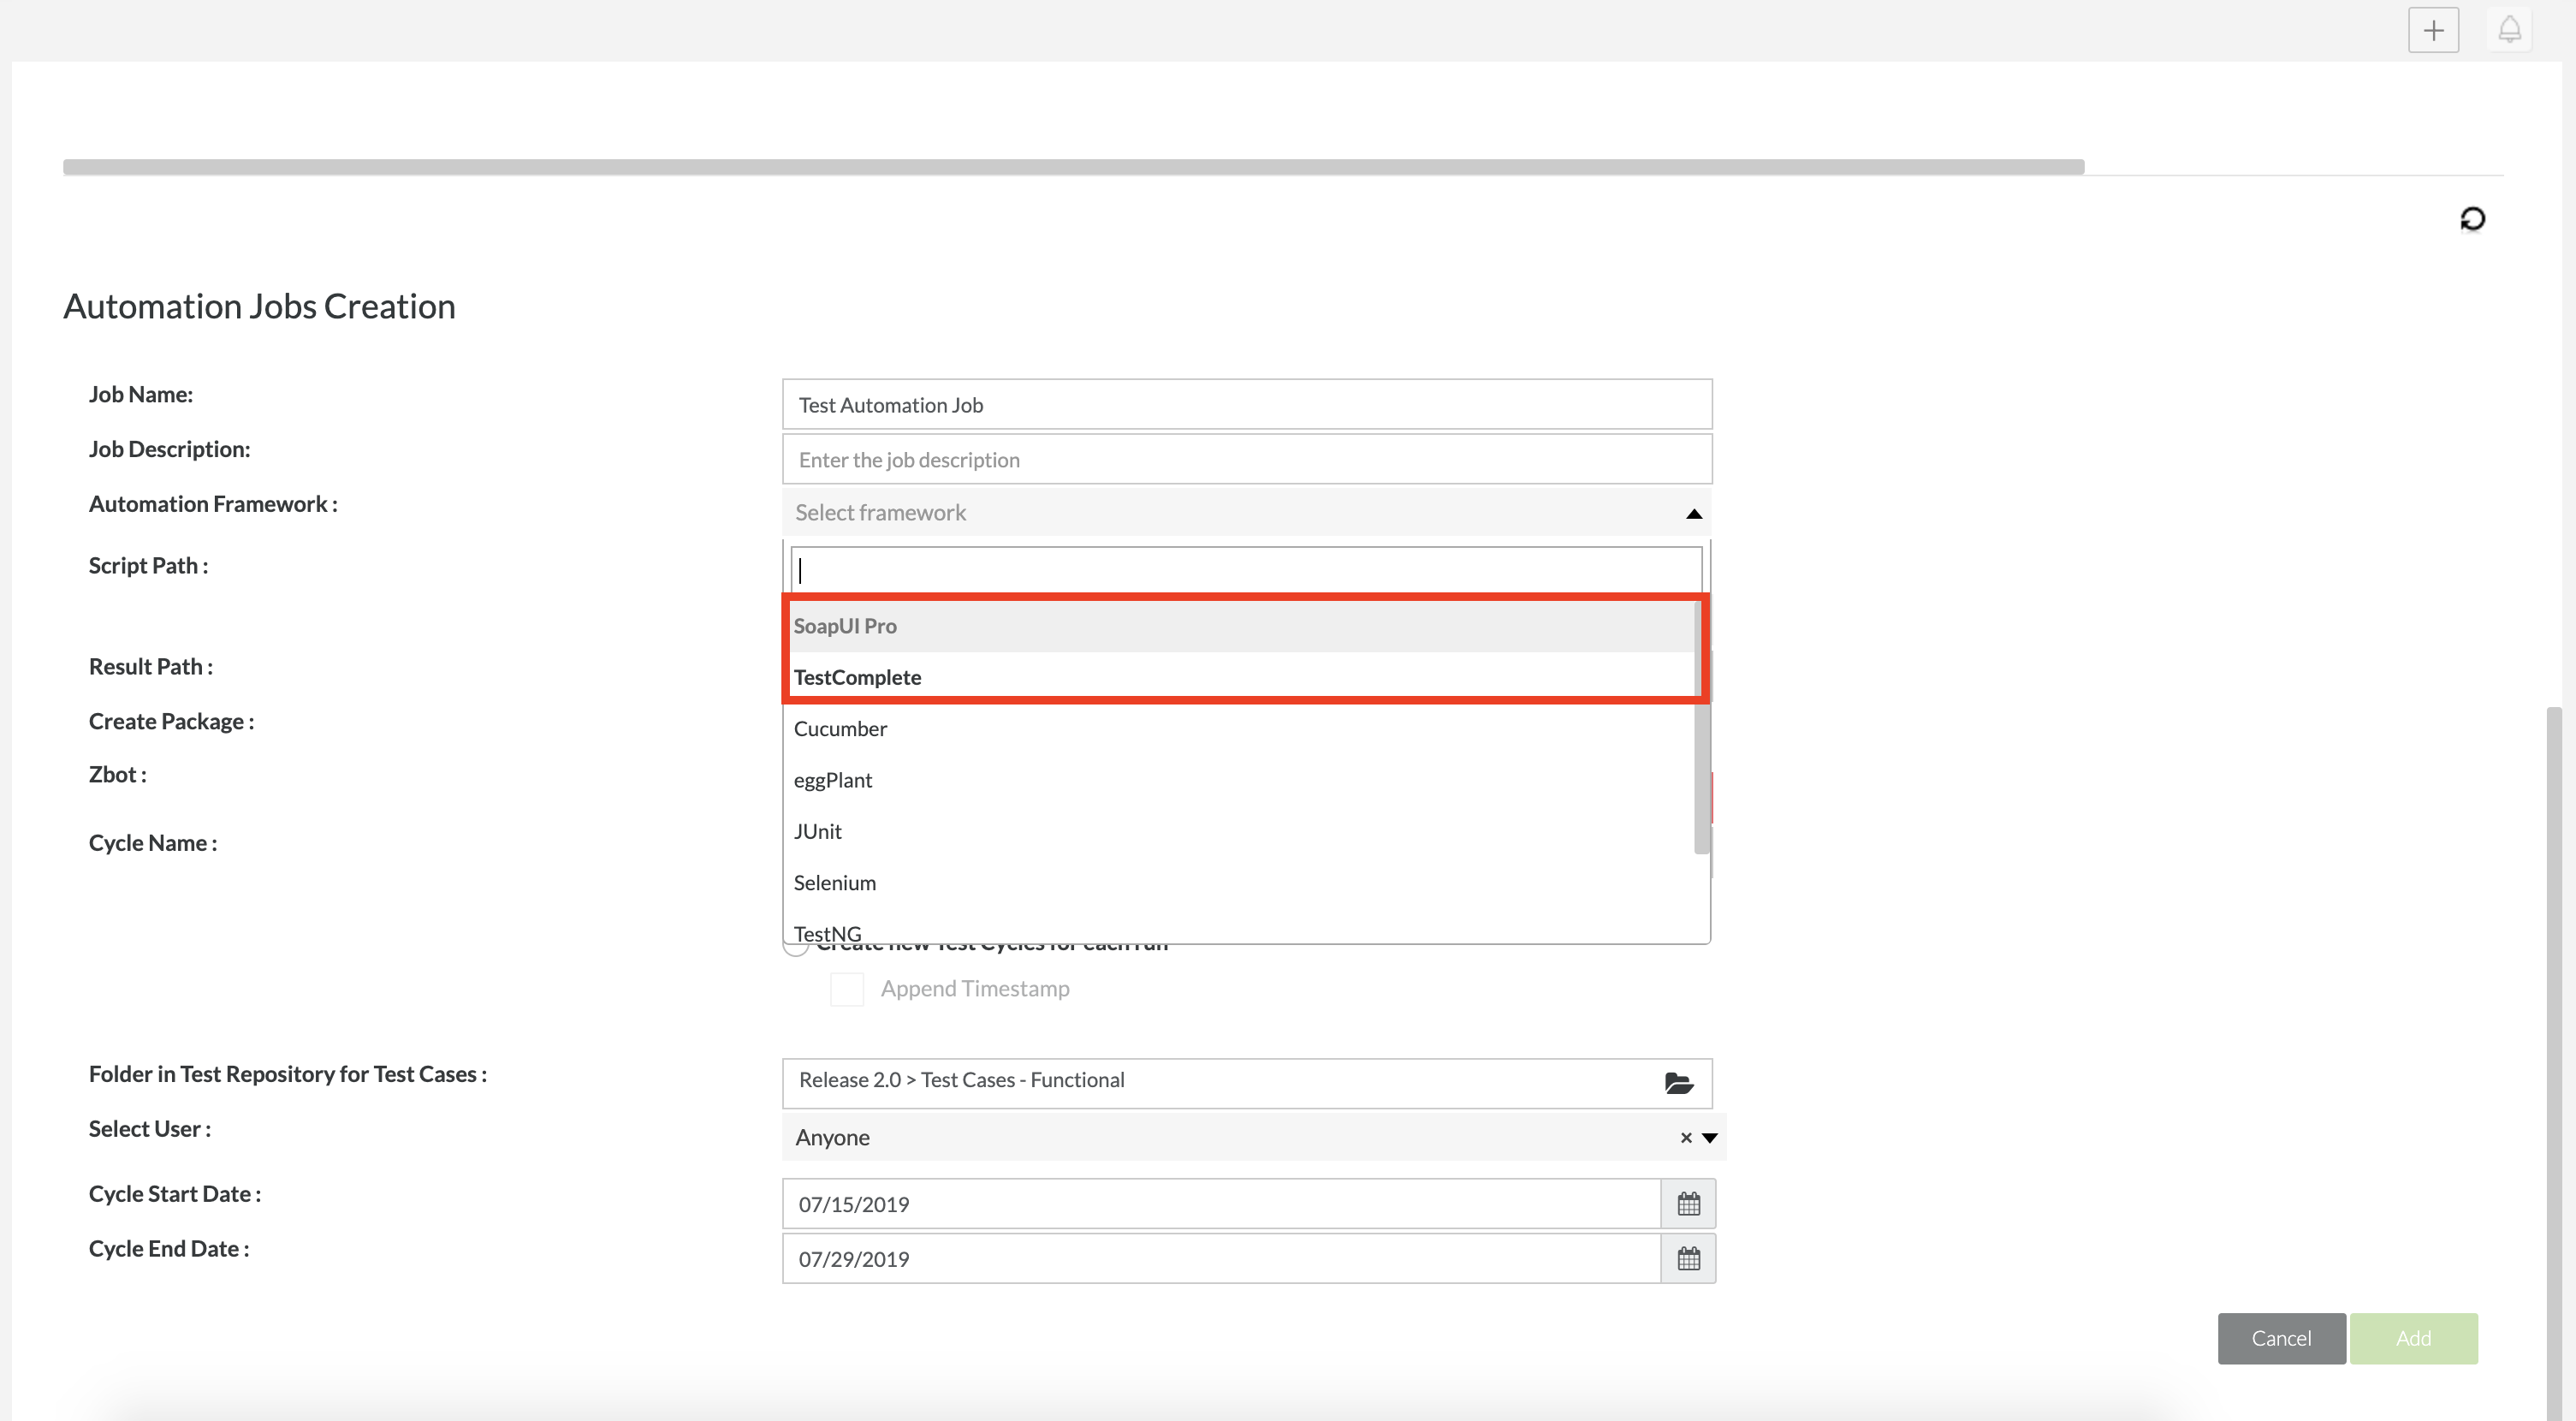
- Select the framework that you are using for the automation job. Zephyr has multiple frameworks that can be used with Vortex along with the introduction to using Soap UI Pro and TestComplete.
- Enter in the results path for the automation job.
- Select the Zbot being used for the automation job.
- Enter in a cycle name for to perform the automation job's executions.
- Here you can decide whether you want to reuse the same test cycle for all the automation runs or create a new test cycle every time the automation job is run (you can include the timestamp to the test cycle as well).
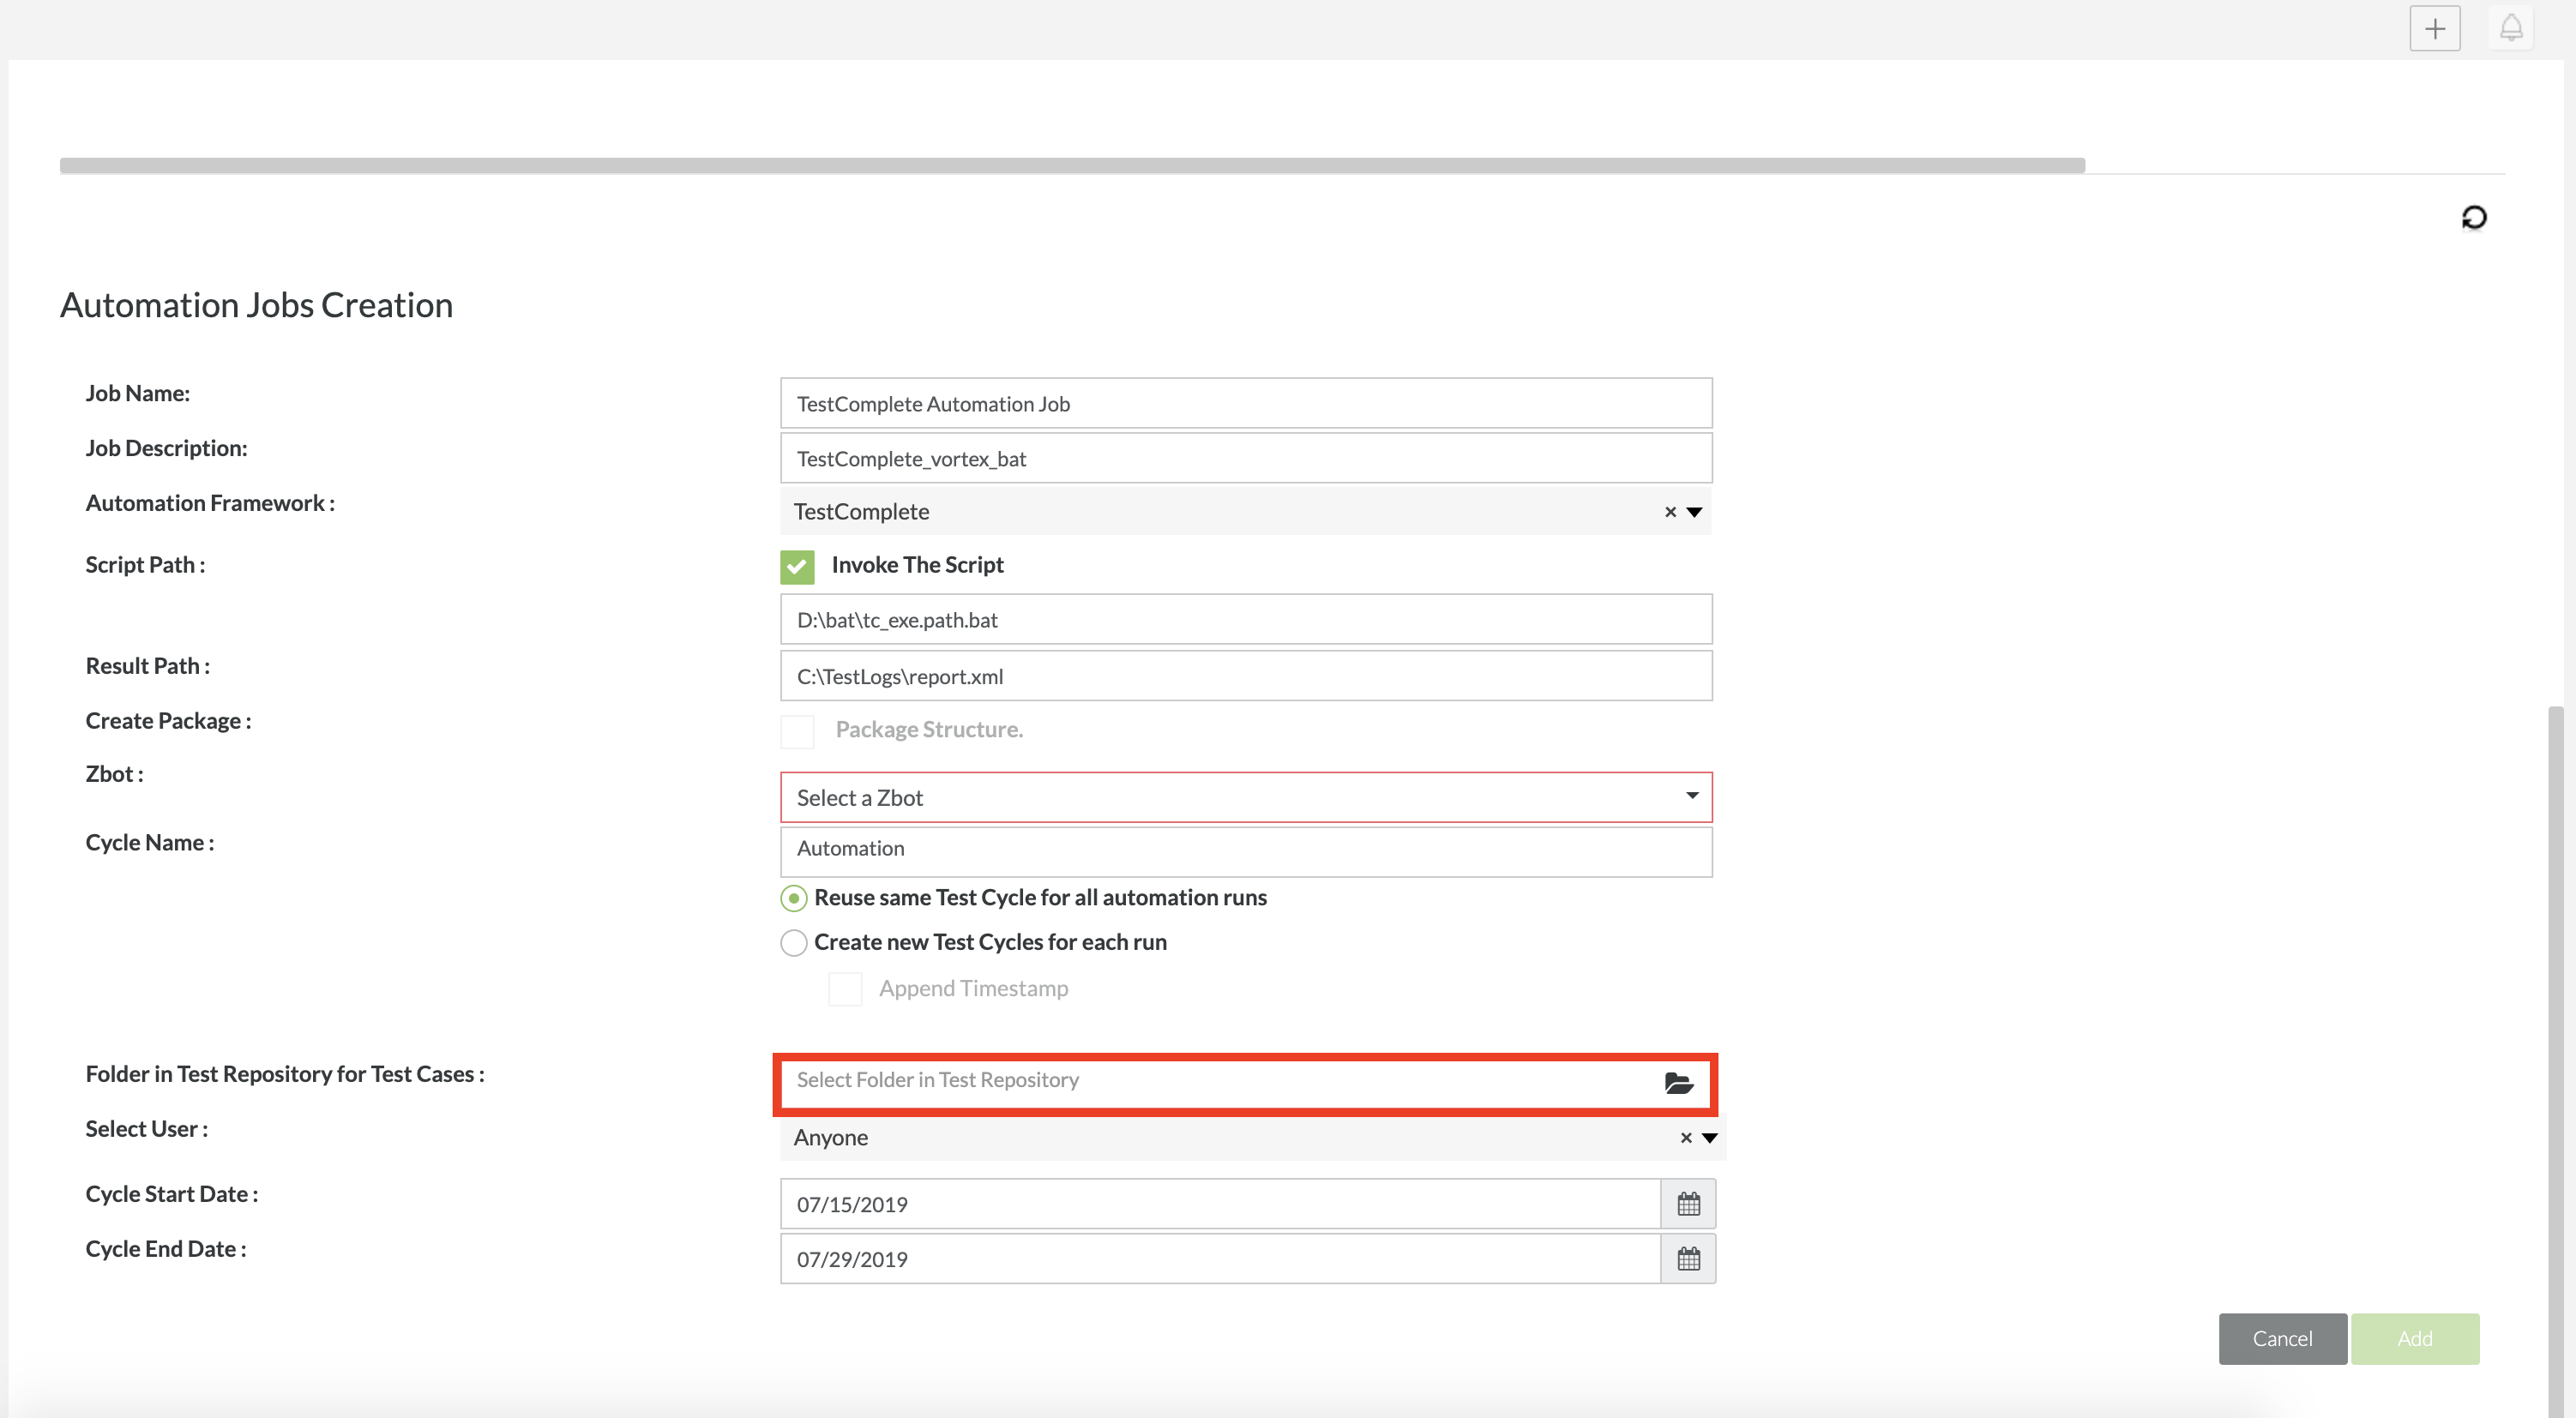
- Use the folder selector to select where to house the test cases for the automation job.
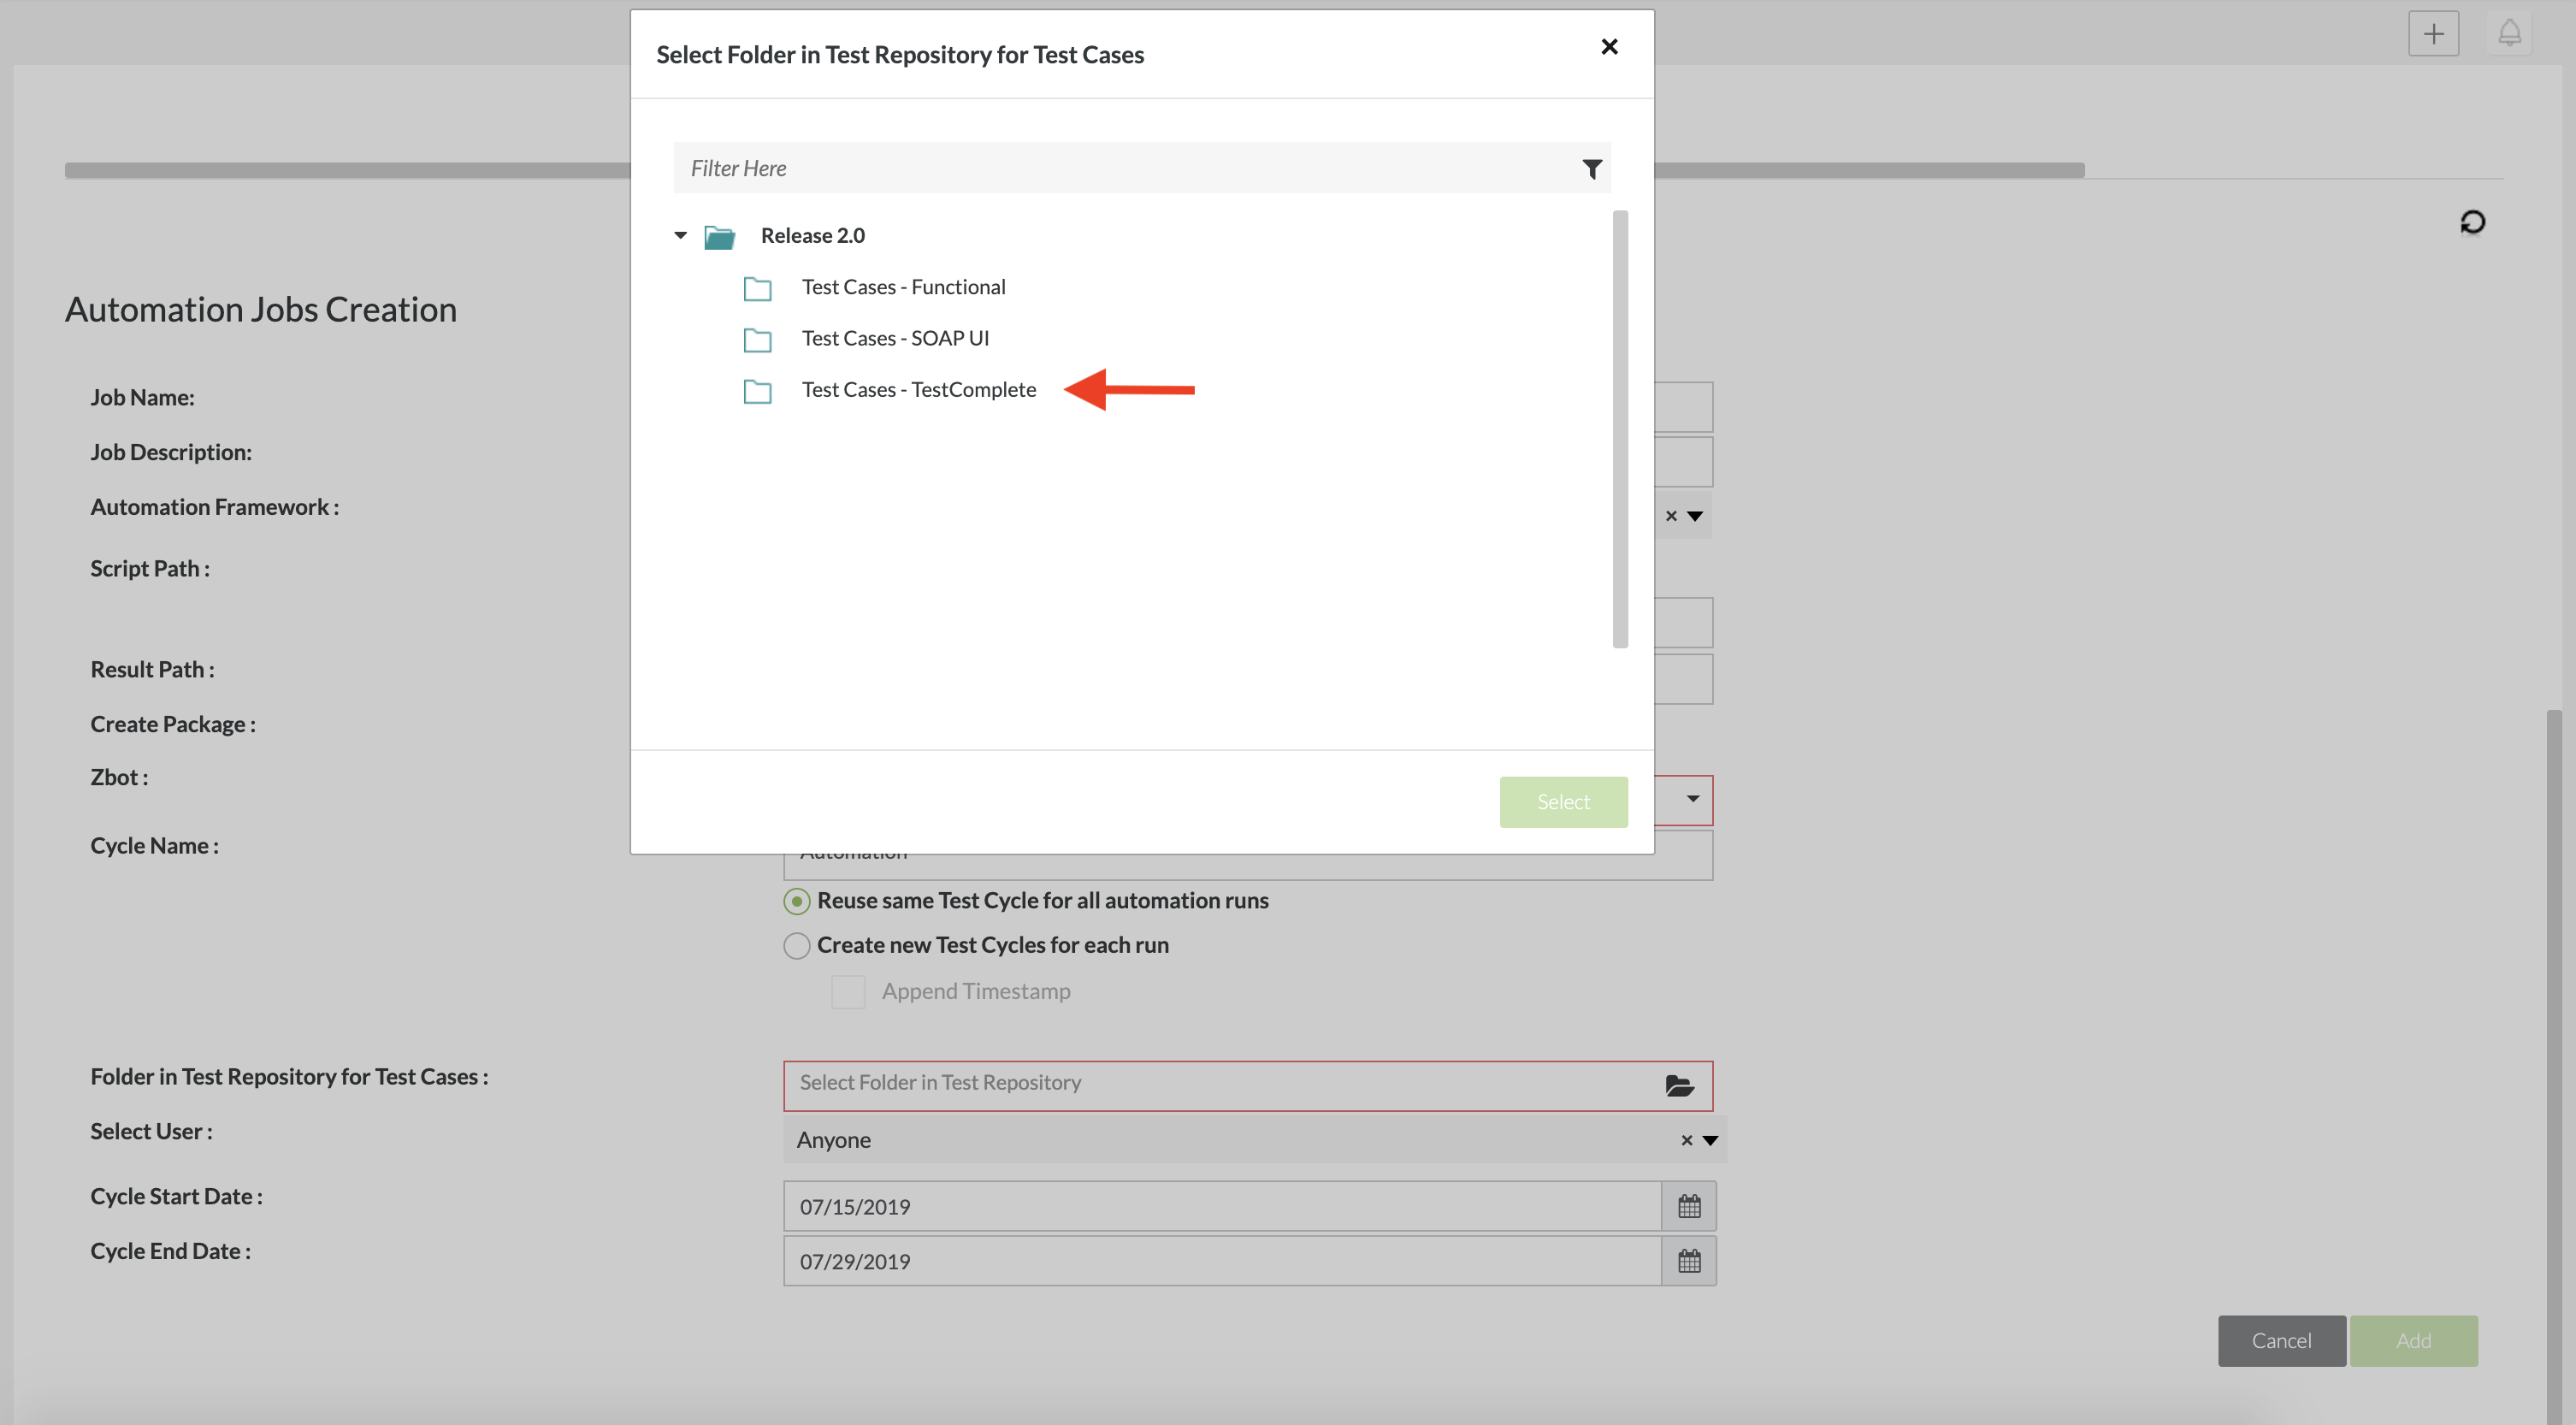

- Select the user in Zephyr that you would like to assign the job to.
- Select the test cycle start and end dates.
Cycle Start and End Date Selection Limitations
How vortex works with the project and vortex job start and end dates
- Users are able to select the cycle start and end dates as per release start and end date.
- If the project has a start date, no end date, and no release end date, then the user will be able to select the cycle start date using the release start date and the end date will be any date from the release start date.
- The release end date will be considered while selecting the cycle end date if the project has no end date.
Identifying when Vortex is not working due to the cycle start and end dates being out of range
- If the project end date is beyond the current date (Ex: the current date 08/23/2019 and the project start date is 08/01/2019, the end date is 08/20/2019) while configuring a job, the user will receive an error in the UI when trying to click on the save button stating 'Project has completed'.
.png?version=1&modificationDate=1567005082552&cacheVersion=1&api=v2&width=800&height=449)
- If the user selects a future date as the project start date (Ex: the current date 08/23/2019 and the project start date is 08/20/2019, the end date is 08/30/2019) while configuring a job, the user will receive an error in the UI when trying to click on the save button stating 'Project has completed'.
.png?version=1&modificationDate=1567005590788&cacheVersion=1&api=v2&width=800&height=449)
- When executing a vortex job with the above errors, the user will get the project is completed error and in the zephyr logs, the logs will contain information regarding the cycle creation failure and the update cycle method will also be logged as failed within the zbot logs.
5. Click on the 'E' button to execute the automation job.
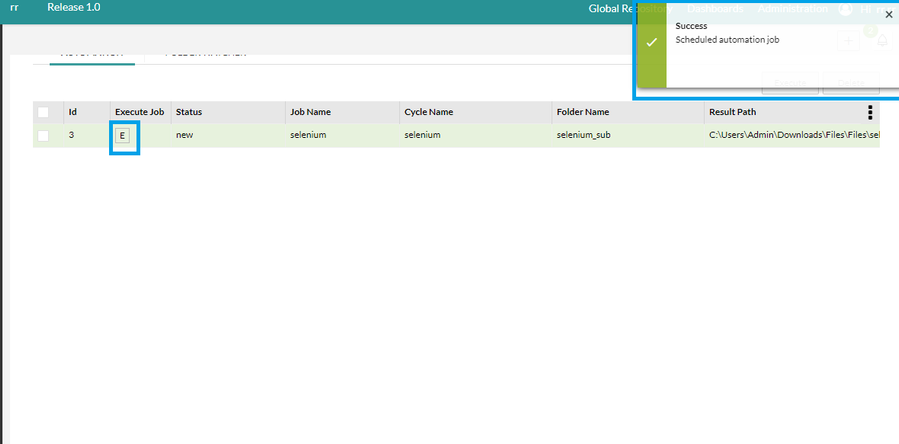
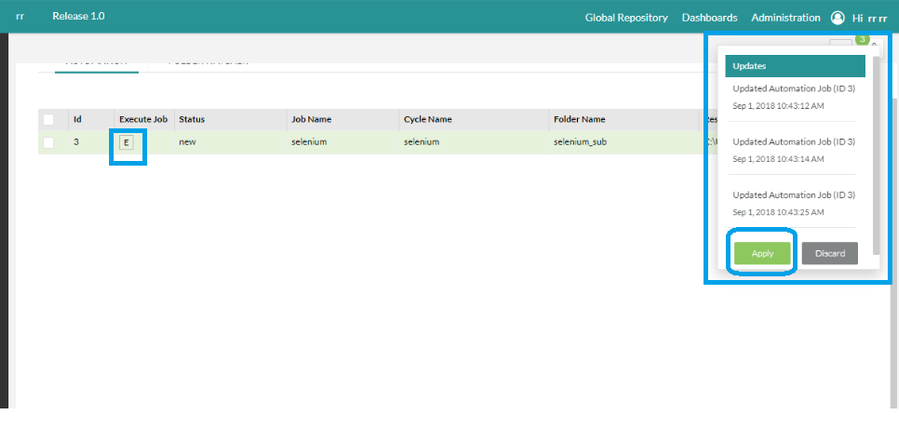
6. Once the job is scheduled, it will give 3 notifications on the status of the job (New, In-progress, Complete).
- Click on the 'Apply' button to apply the notifications.
- The status of the job should now be set to 'Complete'.
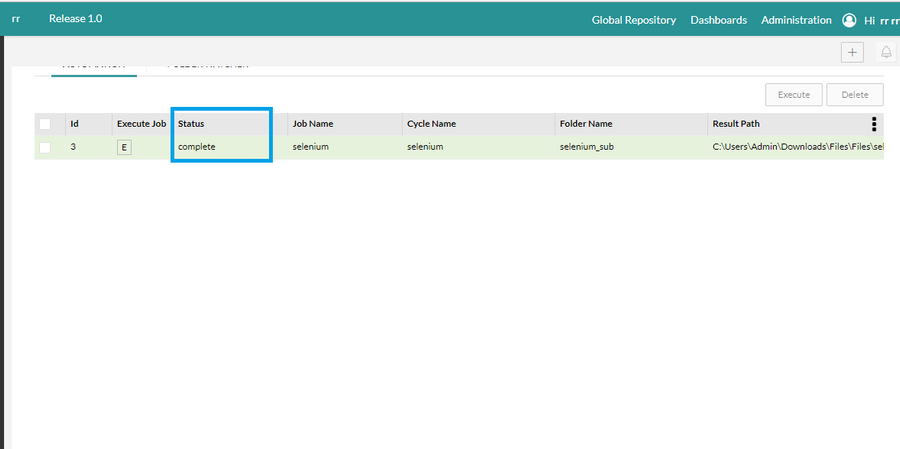
7. Once the job is completed based on the Automation report file:
- It will create test cases in Test Repository
- It will create the cycle with the given name in Test Planning with the given start and end dates
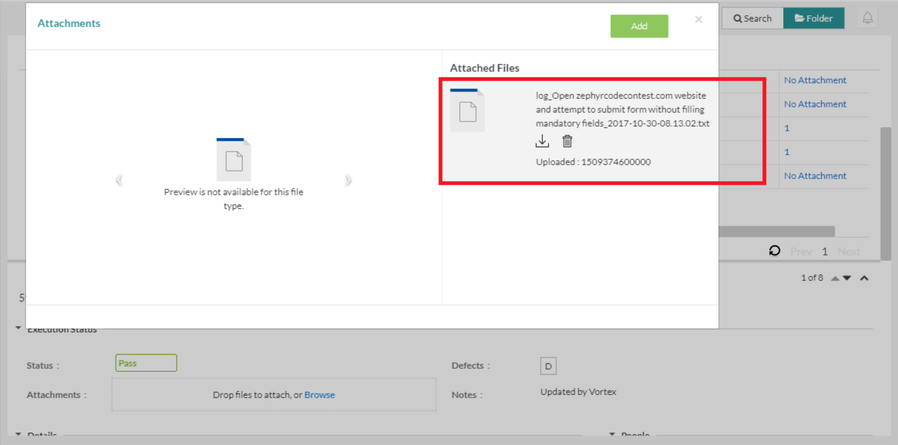
- In Test execution, it will post the results and for failed test cases it will add any attachments and logs.
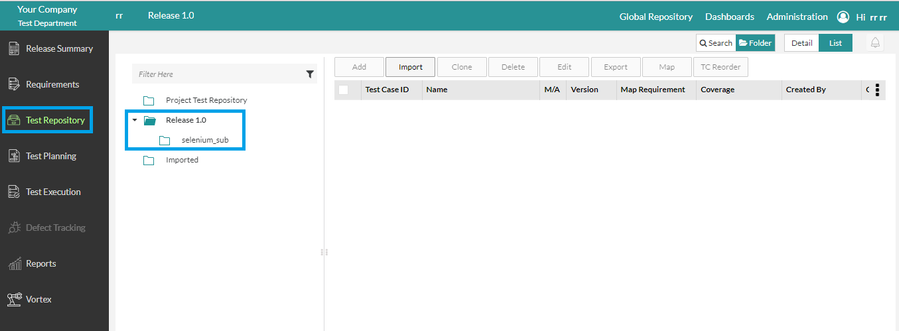
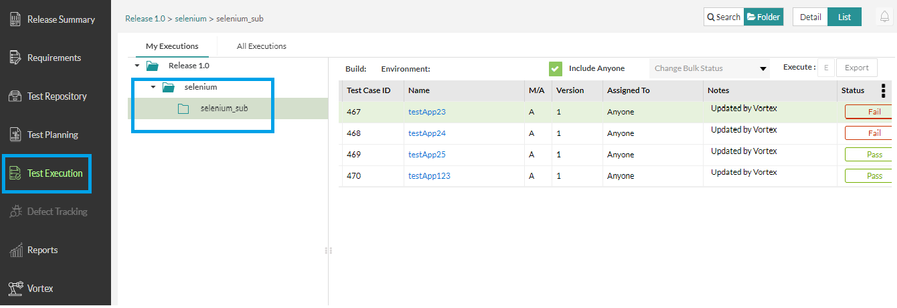
Vortex Automation Job Notes
- Since cucumber supports BDD framework, in ZE, it will create test cases with test steps. For the remaining frameworks, only test cases will be present and not the test cases with test steps.
- In eggPlant, Zephyr will give the result path as a csv file instead of xml file. (eg : D:\egg plant\Files\EggPlant\test.suite\Results\SuiteStatistics.csv )
- For every failed test case, it will attach screenshots or logs in the Test Execution.
- For cucumber, if any of the steps fail, the next steps will not be executed and the test case status will be set as fail.
- To run the Automation and Folder Watch, users should install Zbot and follow the instructions mentioned in page:
- User can create their automated scripts through any framework, and they can execute their scripts by eclipse, bat file, sh file, Jenkins, Maven, etc.
- This depends from one user to another in user configuration.
- After executing their script, they must have generated reports in any format like JSON, XML, PDF, etc.
- Zephyr is only supporting JUnit XML now, and Zephyr are supporting only the above mentioned frameworks. The output report xml file consists of how many test cases are present, and how many passes and how many fail, and if it failed, it consists of the error.
- Result path should as given:
- 'C:\Users\jagadeesh\Desktop\cucumber1.xml'
Sample automated xml report files for all the frameworks is available at : \\192.168.100.203\SHARE\QA\Vortex\Files
Reuse Existing Cycles and Phases
| Reuse Scenarios | Reuse Actions and Impact |
|---|---|
| Currently using an existing test cycle and phase | A new test cycle and phase aren't created and instead reuse the same testing cycle and phase that was already created from the previous job in the Test Planning and Test Execution pages. |
| Currently using an existing test cycle and phase but you need to update the cycle start and end dates | A new test cycle and phase aren't created and instead will update/append the changes to the cycle's start and end dates for the test cycle and phase that already exists in the Test Planning and Test Execution pages. |
| Currently using an existing test cycle and phase but you need to update the person that they are assigned to | A new test cycle and phase aren't created and instead will update/append the changes to the assignee for the specific testing cycle and phase that already exists in the Test Planning and Test Execution pages. |
| Creating a new test phase but using an existing test cycle | When editing the phase name, the new test phase name will be created under the existing test cycle in the Test Planning, and Test Execution pages. |
| Using an existing test phase but creating a new test cycle | When editing the cycle name, a new test cycle name will be created under the Test Planning and Test Execution pages but there won't be a new phase created in the Test Repository. |
| Creating a new test phase and new test cycle | When editing both the cycle and phase name, a new test cycle name will be created in the Test Planning and Test Execution but there will not be a new test phase created in the Test Repository. |
Using the previous example, we can reuse the existing cycle and phase that we created above.
1. Edit the existing job by selecting the job from the automation table in vortex.
2. Ensure that the 'Reuse same Test Cycle for all automation runs" is selected and then click on 'Add'.
- Vortex jobs support multiple automation engineers running the same automation jobs in different machines and publishing results to the same Test Cycle/Phase in Zephyr.
3. Click on the 'E' to execute the automation job again.
4. Click on the 'Apply' button to apply the notifications.
5. The status should be set to complete after applying the notifications.
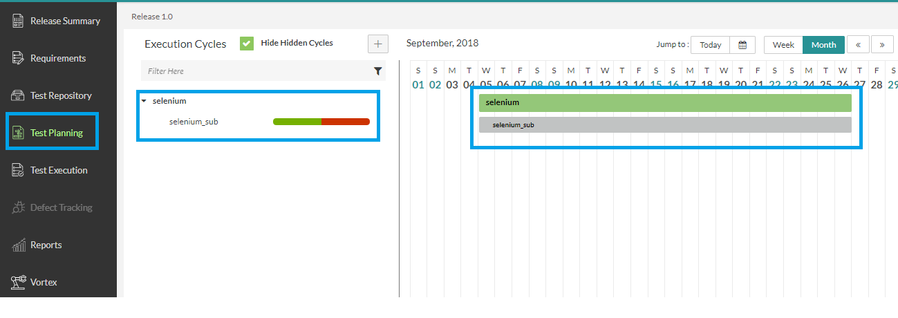
The new test folder will not be created in the test repository, it will remain the same as the previous job.
The new test cycle/phase will not be created in the Test Planning and Test Execution page, both will remain the same.
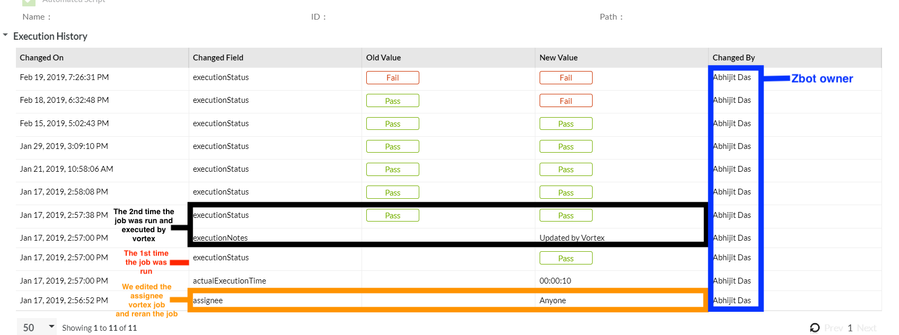
The execution history when reusing the same vortex job may display execution changes made by vortex.
How to Add and Execute Folder Watcher Job
Prior to using Vortex
General Vortex perquisites
- Install Zephyr.
- Install Zbot and configure with any user having all the permission of Test Repository, Test Planning and Test execution (manager, lead, or any custom user).
- Login as (manager, lead, or a custom user that has access to Vortex).
- Click on Vortex.
- Select Folder Watcher.
- Click on the '+' button to add a job.
- Fill in the mandatory fields that are highlighted red and then save the job.
- Trigger the script through Jenkins, Maven, sh file, bat file, eclipse, etc. Once the execution of script is completed, it will create the report file in the folder path and it will give notifications in folder watcher.
- After applying notifications, the job will be completed. Based on the Automation report file, it will create test cases in the Test Repository, create the cycle with the given name in Test Planning with the given start and end dates. In Test execution, it will post the results, and for failed test cases it will add any attachments and logs.
1. Click on Vortex
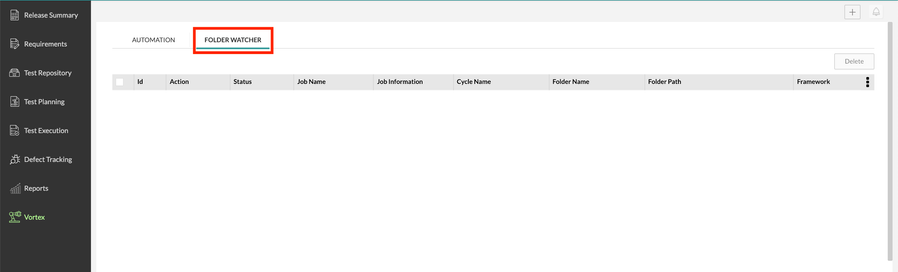
2. Select Folder Watcher.
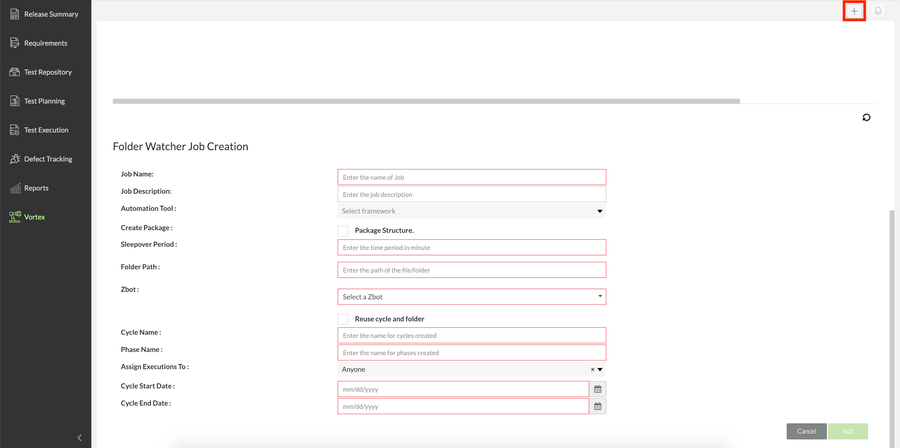
3. Click on the '+' button to add a job.
4. Fill in the mandatory fields that are highlighted red and then save the job.
Cycle Start and End Date Selection Limitations
How vortex works with the project and folder watcher job start and end dates
- Users are able to select the cycle start and end dates as per release start and end date.
- If the project has a start date, no end date, and no release end date, then the user will be able to select the cycle start date using the release start date and the end date will be any date from the release start date.
- The release end date will be considered while selecting the cycle end date if the project has no end date.
Identifying when Vortex is not working due to the cycle start and end dates being out of range
- If the project end date is beyond the current date (Ex: the current date 08/23/2019 and the project start date is 08/01/2019, the end date is 08/20/2019) while configuring a job, the user will receive an error in the UI when trying to click on the save button stating 'Project has completed'.
- If the user selects a future date as the project start date (Ex: the current date 08/23/2019 and the project start date is 08/20/2019, the end date is 08/30/2019) while configuring a job, the user will receive an error in the UI when trying to click on the save button stating 'Project has completed'.
- When executing a folder watcher job with the above errors, the user will get the project is completed error and in the zephyr logs, the logs will contain information regarding the cycle creation failure and the update cycle method will also be logged as failed within the zbot logs.
When using folder watcher, users will still be able to execute a job irrespective of selecting a project start and end date. The Execution of the folder watcher job will not fail. This is not intended and we advise that you do not attempt to execute a folder watcher job without a start and end date.
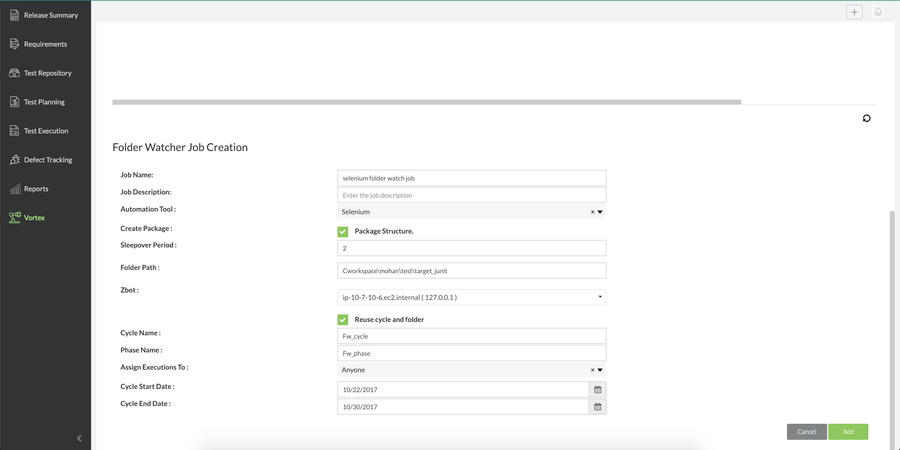
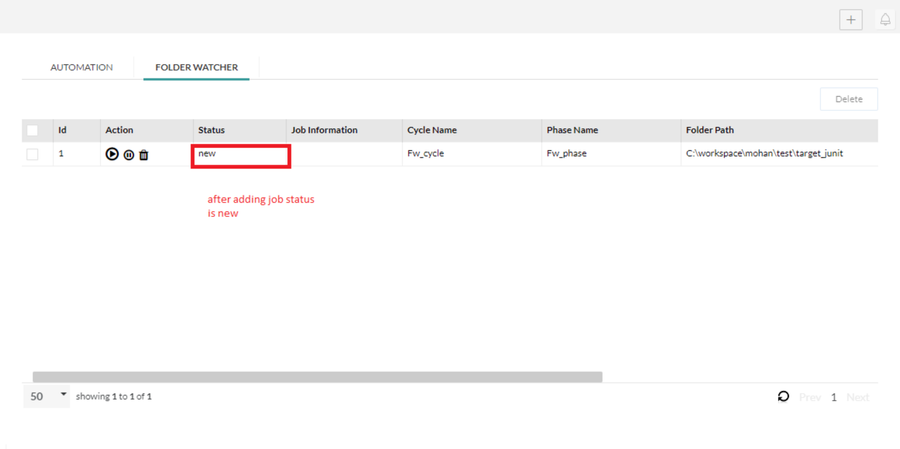
After saving and adding the job, the job will be created with the status set as 'new'.
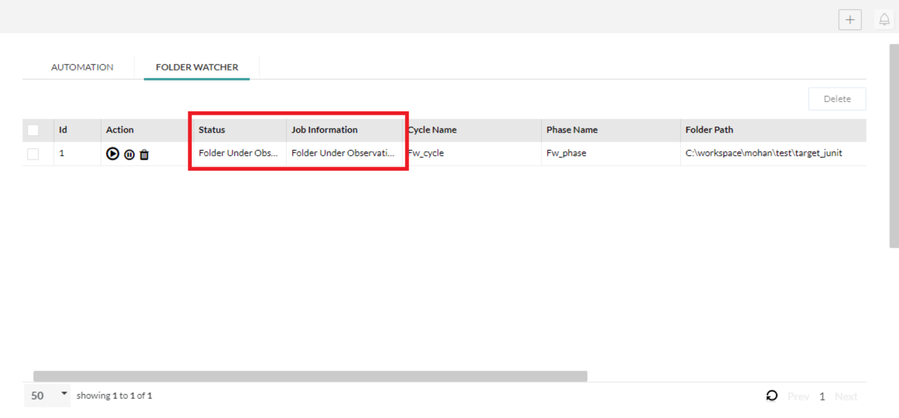
After adding a job, it will keep on watching the folder path every 2 minutes.
- It is based on sleep over time, since we have given 2 minutes, it will keep on watching the folder for every 2 mins.
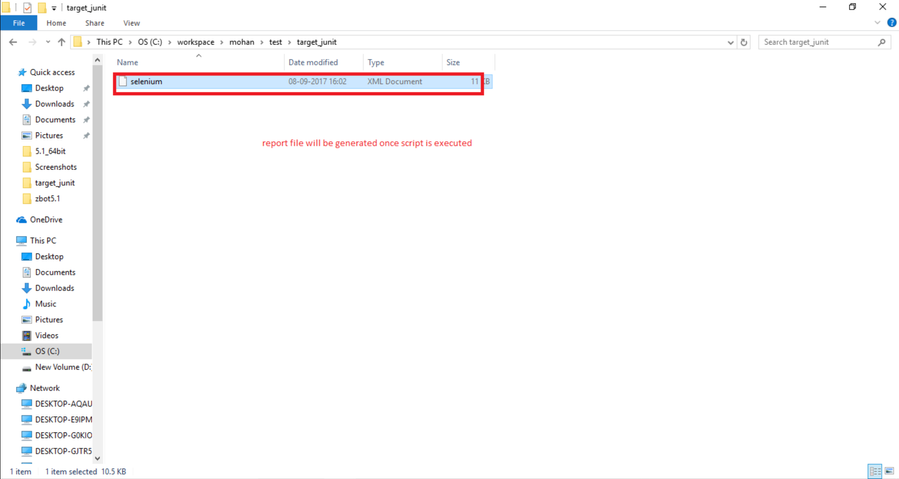
5. Trigger the script through Jenkins, Maven, sh file, bat file, eclipse, etc. Once the execution of script is completed, it will create the report file in the folder path and it will give notifications in folder watcher.
So now, the user will go and trigger this script through Jenkins or through the bat file, sh file, maven file, etc.
- This will create the output file in the folder path. So this folder watcher will take that file and post the results to Zephyr and the UI will remain the same as the Automation.
The status will be completed when Job Information changes to 'complete'.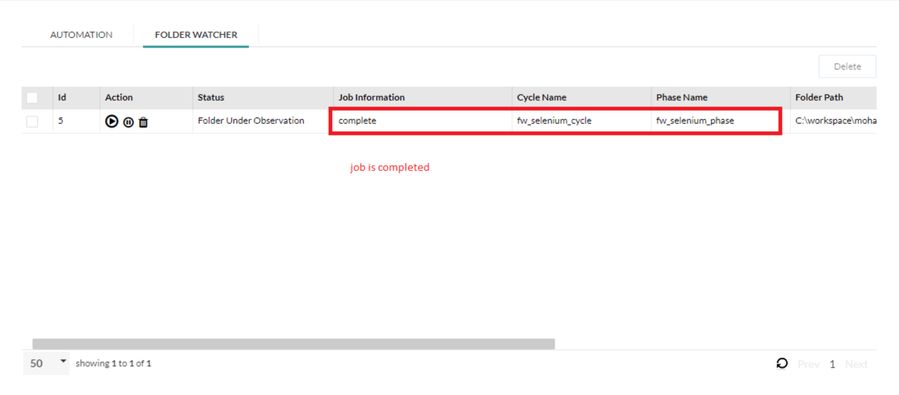
7. After applying notifications, the job will be completed. Based on the Automation report file, it will create the following:
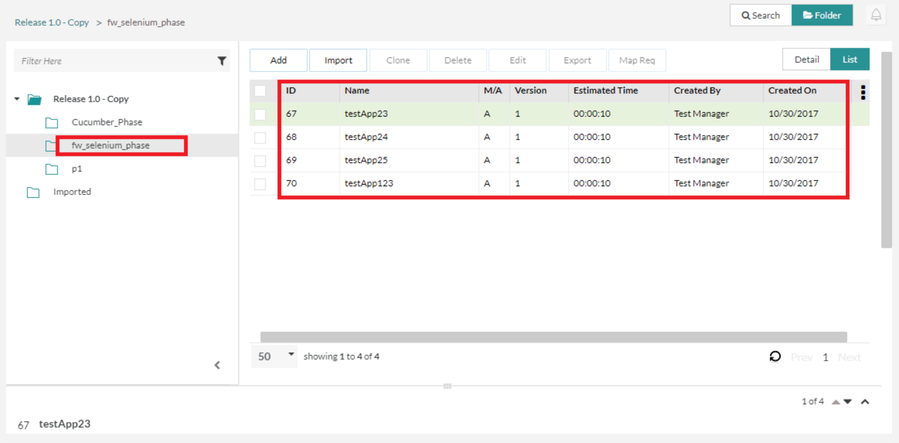
- Test cases in the Test Repository
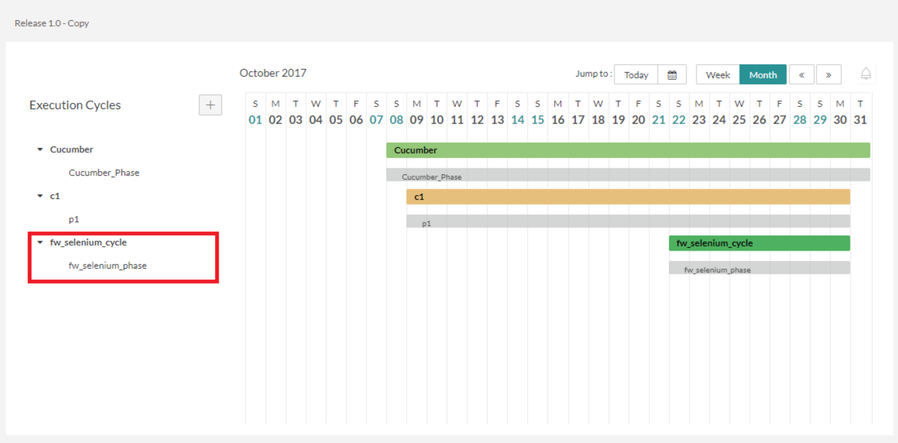
- The cycle with the given name in Test Planning with the given start and end dates.
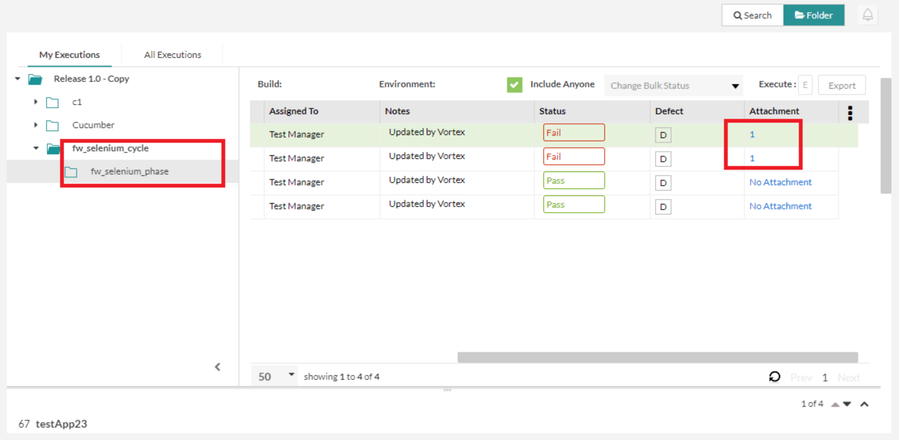
- In Test execution, it will post the results, and for any failed test cases, it will add any attachments and logs.
We can then view them in the respective locations and pages.
Starting Release 8.2, Zephyr Enterprise documentation is moving from its current location on Atlassian to a dedicated, standalone Zephyr Enterprise Documentation page. https://support.smartbear.com/zephyr-enterprise/docs/en/welcome-to-zephyr-enterprise.html