About the script file
You can create Zephyr automation tasks, run them and push test results to Zephyr for Jira directly from your CI/CD workflow. To do this, you can create a special script file that works with Zephyr through API.
You can create this script based on the following sample files:
Windows (.bat)
Linux and MacOS (.sh)
Before using these files, you need to replace values in them – access key, user ids, project key, result file name, and others – with values relevant to your project and tests. Below is a detailed explanation of what you need to change. For quick reference, search for the ![]() icon – it indicates the code parts that need to be updated.
icon – it indicates the code parts that need to be updated.
You can modify these files in any text editor.
File contents
Description | .bat file | .sh file |
|---|---|---|
The script starts with a comment describing the script file. | :: ========================================= :: This .bat file demonstrates how to create or update an automation task in Zephyr for Jira Cloud, run this task, and publish test results to Zephyr. :: Author: SmartBear Software :: ========================================= | ###################################################################### # This .sh file demonstrates how to create or update an automation task in Zephyr for Jira Cloud, run this task, and publish test results to Zephyr. # Author: SmartBear Software ###################################################################### |
This constant specifies the Zephyr base URL. | set "$zephyrBaseUrl=https://prod-api.zephyr4jiracloud.com/connect" | zephyrBaseUrl="https://prod-api.zephyr4jiracloud.com/connect" |
The access and secret keys to connect to Zephyr for Jira, and id of the user account who will “create” or “update” automation tasks.
1. Log in to Jira and go to your Jira project. 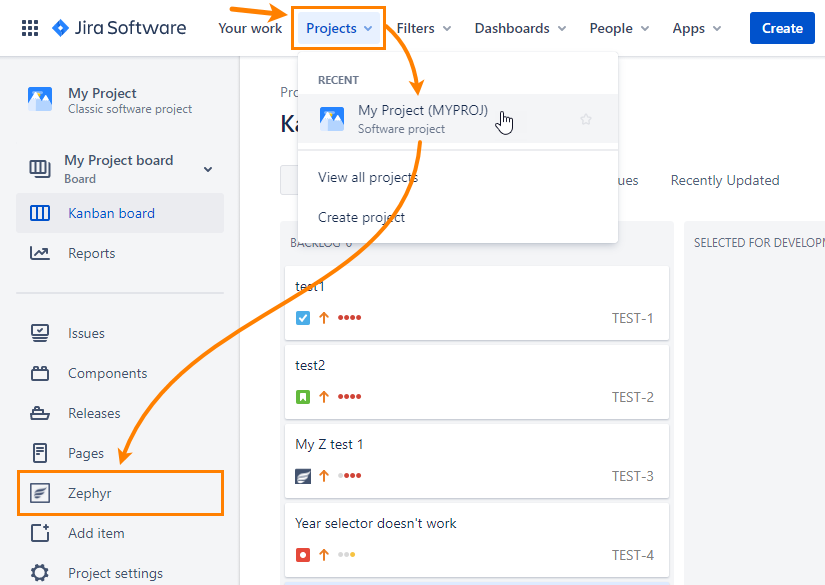 3. Click API Keys in the menu on the left.  1. Log in to your Jira project. 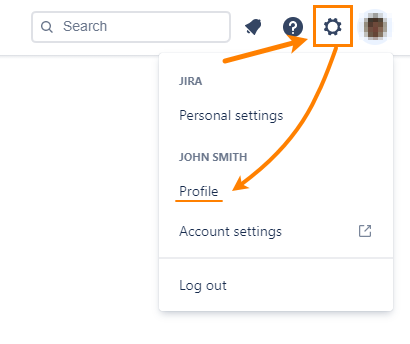 3. You will see the account id in the browser’s Address bar. Copy this value and paste it to your script.  | set "$accessKey=XXXXXXXXXXXXXXXXXXXXYzdkLTliNzEtZjllMTZmZTZlNWQxIDU1NzA1OCUzQTg0NzBkN2EzLWY3NTgtNDBkYS04ZDc4LWRhNjBlZjEyNTM3MSBVU0VSX0RFRkFVTFRfTkFNRQ" set "$secretKey=XXXXXXXXXXXXXXXXXXXXrj1usQ3mhvJslXkmTSjrOFY" set "$accountId=557058:XXXXXXXX-XXXX-XXXX-XXXX-da60ef125371" | accessKey="XXXXXXXXXXXXXXXXXXXXYzdkLTliNzEtZjllMTZmZTZlNWQxIDU1NzA1OCUzQTg0NzBkN2EzLWY3NTgtNDBkYS04ZDc4LWRhNjBlZjEyNTM3MSBVU0VSX0RFRkFVTFRfTkFNRQ" secretKey="XXXXXXXXXXXXXXXXXXXXrj1usQ3mhvJslXkmTSjrOFY" accountId="557058:XXXXXXXX-XXXX-XXXX-XXXX-da60ef125371" |
This block generates a JSON Web Token (JWT) that is needed to access Zephyr for Jira through API. To create this token, the script sends an API request to Zephyr for Jira. This block doesn’t require changes, you can use it as it is. The created JWT token is time-limited. The expirationTime parameter in the curl line specifies the expiration period in milliseconds: | echo "Generating a JSON Web Token ..."
for /F "tokens=*" %%i in (' curl -s -X POST -H "Content-Type: application/json" --data "{ \"accessKey\":\"%$accessKey%\", \"secretKey\":\"%$secretKey%\",\"accountId\":\"%$accountId%\",\"zephyrBaseUrl\": \"%$zephyrBaseUrl%\",\"expirationTime\":360000}" "https://prod-vortexapi.zephyr4jiracloud.com/api/v1/jwt/generate" ') do set jwtgenerated=%%i
set "$finaljwt=%jwtgenerated%"
echo %$finaljwt%
| echo "Generating a JSOM Web Token ... \n"
curl -o headers -s -d '{ "accessKey": "'"$accessKey"'" , "secretKey": "'"$secretKey"'" ,"accountId": "'"$accountId"'","zephyrBaseUrl": "'"$zephyrBaseUrl"'","expirationTime":360000}' -H "Content-Type: application/json" -XPOST https://prod-vortexapi.zephyr4jiracloud.com/api/v1/jwt/generate
jwt="$(cat headers | head -n 1)"
echo "The generated token: \n"
echo $jwt
|
This block specifies properties of the automation task to be created or edited. These properties are scripting analogues to task properties you see in the Create Automation Task dialog box.
Task info Id of your Jira project: 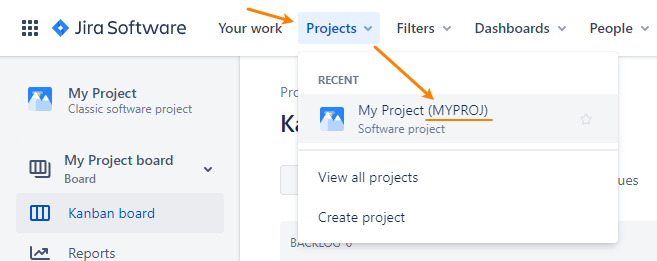 Cycle info Folder info Other values | :: Task info set "$taskName=My task" set "$taskDescription=Task description" set "$automationFramework=junit" set "$projectKey=PROJ" set "$versionName=Unscheduled" :: Cycle info set "$cycleName=CICD Automation" set "$createNewCycle=true" set "$appendDateTimeInCycleName=false" :: Folder info set "$folderName=Windows" set "$createNewFolder=true" set "$appendDateTimeInFolderName=true" set "$assigneeUser=557058:XXXXXXXX-XXXX-XXXX-XXXX-da60ef125371" :: Fully-qualitified name of the test result file set "$resultPath=@\"C:/Test results/junit.xml\" | # Task info taskName="My task" taskDescription="Task description" automationFramework="junit" projectKey="PROJ" versionName="Unscheduled" # Cycle info cycleName="cycle1" createNewCycle="true" appendDateTimeInCycleName="false" # Folder info folderName="RegressionTests" createNewFolder="true" appendDateTimeInFolderName="true" assigneeUser="557058:XXXXXXXX-XXXX-XXXX-XXXX-da60ef125371" # Name of the test result file resultPath="@//Applications/<user-name>/target/junit.xml" |
This code sends a request to Zephyr for Jira to create an automation task with the specified properties. Zephyr will run this task and import the testing results from the specified file. | echo "Creating and running an automation task ..." curl -v -X POST https://prod-vortexapi.zephyr4jiracloud.com/api/v1/automation/job/saveAndExecute -H "Content-Type: multipart/form-data" -H "Content-Type: application/json" -H "accessKey: %$accessKey%" -H "jwt: %$finaljwt%" -F "jobName=%$taskName%" -F "jobDescription=%$taskDescription%" -F "automationFramework=%$automationFramework%" -F "projectKey=%$projectKey%" -F "versionName=%$versionName%" -F "cycleName=%$cycleName%" -F "createNewCycle=%$createNewCycle%" -F "appendDateTimeInCycleName=%$appendDateTimeInCycleName%" -F "folderName=%$folderName%" -F "createNewFolder=%$createNewFolder%" -F "appendDateTimeInFolderName=%$appendDateTimeInFolderName%" -F "assigneeUser=%$assigneeUser%" -F "file=%$resultPath%" | echo "Creating and running an automation task ..." curl -o headers -s -v -H "accessKey: $accessKey" -H "jwt: $jwt" -H "Content-Type: multipart/form-data" -H "Content-Type: application/json" -F "jobName=$taskName" -F "jobDescription=$taskDescription" -F "automationFramework=$automationFramework" -F "projectKey=$projectKey" -F "versionName=$versionName" -F "cycleName=$cycleName" -F "createNewCycle=$createNewCycle" -F "appendDateTimeInCycleName=$appendDateTimeInCycleName" -F "folderName=$folderName" -F "createNewFolder=$createNewFolder" -F "appendDateTimeInFolderName=$appendDateTimeInFolderName" -F "assigneeUser=$assigneeUser" -F "file=$resultPath" -XPOST https://prod-vortexapi.zephyr4jiracloud.com/api/v1/automation/job/saveAndExecute result="$(cat headers | head -n 1)" echo "Test results: \n" echo $result |
The script file ends with the code that demonstrates how to update an existing automation task. The code uses constants for the task info, cycle, folder and results file defined above. The “new” constant here is taskId. It specifies the id of the automation task to be updated. You get this id in the response to the request that created the task.
The rest of the code doesn’t require changes. You can use it as it is. | :: Id of your automation task. You get it after the task is created. :: set "$taskId=XXXXXXXXXXXXXXXXXXXX42E96E8863BF7EEE44BDB95FF763DA3E9C3BC4776886" :: echo "Updating and running the automation task" :: curl -v -X PUT https://prod-vortexapi.zephyr4jiracloud.com/api/v1/automation/job/updateAndExecute -H "Content-Type: multipart/form-data" -H "Content-Type: application/json" -H "accessKey: %$accessKey%" -H "jwt: %$finaljwt%" -F "jobId=%$taskId%" -F "jobName=%$taskName%" -F "jobDescription=%$taskDescription%" -F "automationFramework=%$automationFramework%" -F "versionName=%$versionName%" -F "cycleName=%$cycleName%" -F "createNewCycle=%$createNewCycle%" -F "appendDateTimeInCycleName=%$appendDateTimeInCycleName%" -F "folderName=%$folderName%" -F "createNewFolder=%$createNewFolder%" -F "appendDateTimeInFolderName=%$appendDateTimeInFolderName%" -F "assigneeUser=%$assigneeUser%" -F "file=%$resultPath%" | # Id of your automation task. You get it after the task is created. # taskId="XXXXXXXXXXXXXXXXXXXX42E96E8863BF7EEE44BDB95FF763DA3E9C3BC4776886" #echo "Update and run the automation task... " #curl -o headers -s -v -H "accessKey: $accessKey" -H "jwt: $jwt" -H "Content-Type: multipart/form-data" -H "Content-Type: application/json" -F "jobId=$taskId" -F "jobName=$taskName" -F "jobDescription=$taskDescription" -F "automationFramework=$automationFramework" -F "versionName=$versionName" -F "cycleName=$cycleName" -F "createNewCycle=$createNewCycle" -F "appendDateTimeInCycleName=$appendDateTimeInCycleName" -F "folderName=$folderName" -F "createNewFolder=$createNewFolder" -F "appendDateTimeInFolderName=$appendDateTimeInFolderName" -F "assigneeUser=$assigneeUser" -F "file=$resultPath" -XPUT https://prod-vortexapi.zephyr4jiracloud.com/api/v1/automation/job/updateAndExecute #result="$(cat headers | head -n 1)" #echo $result |