...
Supporting your journey to Cloud
Since Atlassian is accelerating Atlassian’s shift in strategy to become a cloud-first company has accelerated the journey to cloud with wordnext-class cloud experience and next level offerings, we at SmartBear level offerings. On this journey, customers will start migrating their Jira instances and Apps from Server to Cloud (or Data Center) later in 2021 when Atlassian updates the Jira Cloud Migration Assistant (JCMA) with support for Jira apps.
At SmartBear, we are committed to facilitate a smooth transition to all our customers . This page is intended to communicate our plans and provide additional information regarding the migration path to cloud.
We’ll be providing regular updates on our Cloud migration plans here, so please keep this page bookmarked.
Jira Cloud Migration Assistant
Jira Cloud Migration Assistant is an app that helps you move projects, users, and groups from Jira Core or Jira Software on server to the cloud. We are currently working with Atlassian on a solution to integrate with this app, and we will share more information on this soon.
Below is the high level timeframe.
...
When
...
Status
...
What
...
Q4-2020
...
| Status | ||||
|---|---|---|---|---|
|
...
Migration of test cases and steps
...
Q1-2021
...
| Status | ||||
|---|---|---|---|---|
|
...
Migration of the remaining entities (cycles, executions, etc)
...
Q2-2021
...
| Status | ||
|---|---|---|
|
...
Official release of the Cloud migration assistant (April/2021)
*The dates above are subject to change
Migration via Open Source APIs
Information on this will be provided later.
Existing Support
There isn't support for the Jira Cloud Migration Assistant yet.
Any questions?
For more information, please raise a ticket with our awesome support team here.as the Server end-of-life date approaches on February 2nd, 2024. We have created a guide that will help you plan your migration. You will be able to migrate your instance and your Zephyr app data once Atlassian makes JCMA generally available later in 2021.Important notice:
![]() Important notice:
Important notice:
We strongly urge our customers to NOT migrate using the Jira Cloud Migration Assistant (JCMA) until Atlassian enables it for app migrations later in 2021. The JCMA does not enable app migrations at this time.
We are currently working with Atlassian to release beta support for this tool for Zephyr Squad, and you can follow along the progress and sign up for the Early Access Program via Atlassian’s migration platform ticket.
The JCMA steps outlined below are for EAP members only.
For more information about Atlassian’s app migration timelines, visit their blog and Cloud Roadmap.
Supported versions
JCMA support is available only for Zephyr Squad Server 6.x used in Jira Server 8.x.
Zephyr Squad Server 4.x (used in Jira Server 7.x) does not support JCMA.
Pre-migration steps
In Jira Server
Back up the data of your Zephyr Squad Server.
Install the Jira Cloud Migration Assistant plugin in your Jira Server instance.
Note: In Jira Server 8.14, the migration assistant is installed by default.
To install the plugin manually:
In Jira Server, go to Settings > Manage apps.
Choose Find new apps in the sidebar.
Enter Jira Cloud Migration Assistant in the search bar.
Once the plugin is found, click Install:

Alternatively, you can install it from the Atlassian Marketplace.
Upgrade Zephyr Squad Server to at least version 6.1.0 (this version is the first to support the Jira Cloud Migration Assistant plugin).
In Jira Cloud
Install Zephyr Squad Cloud in your Jira Cloud instance.
If you are already using Zephyr Squad Cloud and it has projects with the same name or project key as Zephyr Squad Server projects, delete those projects from Zephyr Squad Cloud.
Navigate to Apps > Manage apps > JCMA Migration and click Register listener to register your Jira Cloud instance for migration:

Migration steps
To start migrating your projects, users, and groups, navigate to Settings > System > Migrate to cloud in your Jira Server instance and follow the steps described in the Atlassian Jira documentation:
Use the Jira Cloud Migration Assistant to migrate
...
Make sure to wait until the migration completes (the status must be Complete):
...
To review the migration status:
Go to your Jira Cloud instance and navigate to Apps > Manage apps > JCMA Migration.
Click the refresh button to view the current migration (the migration will appear in the list). Wait for the status to become Success:

Note: Each migration in the list has the Action button. Clicking the button opens a dropdown that you can use to view the migration details and download the migration report and logs:

Post-migration steps
Clear cache and reindex data
Once the migration status is Success, do the following:
Select General Configuration in the Jira sidebar to open the Zephyr Squad Cloud settings.
Scroll down the page and click Clear Cache and Clear Permission Cache:

While staying on the General Configuration page, scroll up to the Re-Index section and re-index all your projects:
Select Project Metadata and click Re-Index.
Select Executions and click Re-Index.
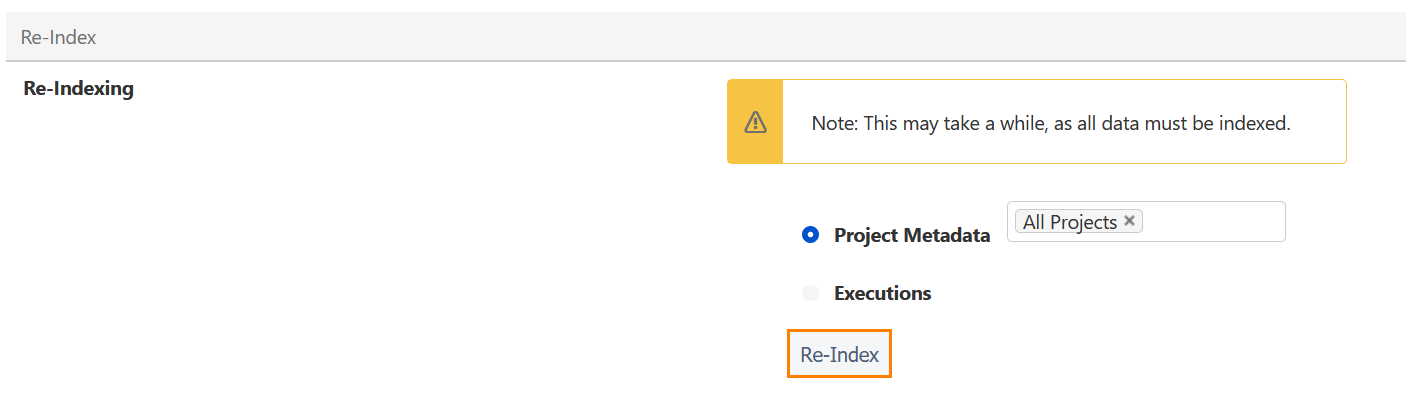
On the same page, check the value of the Sort Cycles Order option. If it is Custom order, you also need to reset the sorting for the migrated projects:
Add the migrated projects to the Reset Custom Order list.
Click reset.

Now you can open your project in Zephyr Squad Cloud and validate the migrated data. If no issues are found, you can start working with your project.
Update Test Automation jobs
If you have Test Automation jobs that use ZBot, you need to configure a new ZBot agent for Zephyr Squad Cloud and modify the migrated jobs to use the new ZBot agent.
Download and install ZBot for Zephyr Squad Cloud:
https://atombuild.zephyr4jiracloud.com/atom.zip
The installation instructions are in the README file inside the archive.
In Jira Cloud, navigate to the Zephyr Squad > Test Automation page.
Find jobs with Automation Type = ZBot. Edit each of these jobs and select the new ZBot agent.


Now you can execute and schedule these automation jobs again.
Known issues and limitations
For the common JCMA issues and limitations, see the Atlassian documentation:
➡ JCMA known issues and troubleshooting
➡ What gets migrated with the Jira Cloud Migration Assistant
The following limitations are specific to the Zephyr Squad app data migration.
Data that is not migrated:
Tests with issue-level security and their details (steps, executions, and so on).
Archived tests and their details (steps, executions, and so on).
Miscellaneous:
Timestamps in issues might be different in Jira Server and in Jira Cloud. Since Jira Cloud uses UTC, there might be a shift in time zones if the Jira Server instance uses another time zone.
Sorting tests in the Cycle Summary by ID may produce incorrect sorting order.
Support and troubleshooting
Should you have any questions, please visit our Support Portal where you can search for an answer in Zephyr Squad Community or contact our Customer Care team.