...
These system usage requirements for Zephyr Enterprise Server and Data Center
...
(both Linux- and Windows-based) are based on various statistics regarding a
...
single Zephyr Enterprise instance. You can find the usage requirements below as well as the steps to change the JVM allocation.
JVM
...
allocation
Allocate the amount of JVM specified under the "Final JVM Allocation" column column based on where your Zephyr instance falls in the usage chart below. Your allocation should be based on whichever column your instance hits the highest of and not the average.
- For exampleExample: You have 2 projects which has a 4GB allocation, 150 users which has a 8GB allocation, and 2,000,000 test cases and executions which has a 16GB allocation. Your allocation for Zephyr should be 16GB since the because 2,000,000 test cases/executions hits the highest.
| Active Projects | Concurrent Users | Testcase Test Case and Execution Combination | Final JVM Allocation |
|---|---|---|---|
| 1-2 | <25 | <100,000 | 4GB4 GB |
| <5 | <50 | <500,000 | 4-8GB8 GB |
| <5 | <100 | <1,000,000 | 8GB8 GB |
| <10 | <250 | <1,000,000 | 8GB8 GB |
| 10-20 | 250-500 | >1,000,000 | 16GB16 GB |
| 10-20 | 500-1,000 | >5,000,000 | 16GB 16 GB [per 2 clusters] |
Steps for Changing the JVM Allocation
Change JVM allocation
On Windows
1. Open a CMD command prompt window and navigate to:
| Code Block | ||
|---|---|---|
| ||
cd %Zephyr_Root%\tomcat\bin |
2. Run the this command:
| Code Block | ||
|---|---|---|
| ||
tomcat7w.exe //ES/ZephyrServer |
3. The Zephyr Server Properties window will pop up. Simply select the 'Java' tab. dialog will appear.
3. Switch to the Java tab. This tab provides details on the interactions between Java and the Zephyr
...
Tomcat server.

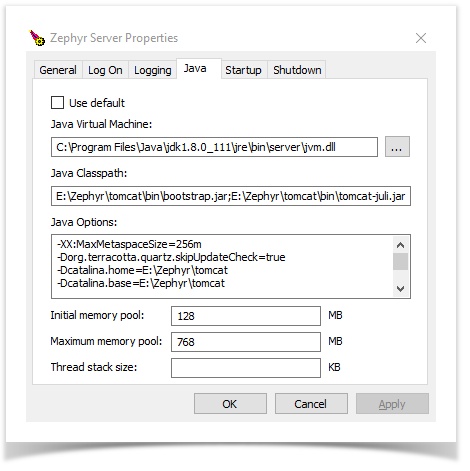
4. Find the field 'Maximum memory pool'. Increase this number Change the Maximum memory pool value based on the chart table above.
- This field value controls the JVM allocation for the Zephyr server server.
- The unit value is always in MB (Megabytes).
5. Select 'Click Apply' . to save the change and then click the 'OK' button when you are finished changes.
6. Click OK to close the windowdialog.